Headings
Headings help you structure content on a page, making the page easier to read for your users. Headings are usually presented using different sized text, maybe bold text, and possibly different colored text. This makes it easy to pick out the sections visually and to distinguish main section headings from subsection headings.
The following image shows an example page of how heading levels are used to create a structured view of your content. Notice the main heading or title is Learning Academy: Gateway to Success. The page has two sections and these have the headings Essential Learning and Top Courses by Business Unit. The second of these sections has two subsections with the headings Sales and Marketing. Under the sections and subsections are cards, each of which has its own heading.

Users who use screen readers make use of these headings, not only to understand the structure of the information on the page, but also to enable them to quickly scan the section and subsection titles to get straight to the information they want without having to read all the text.
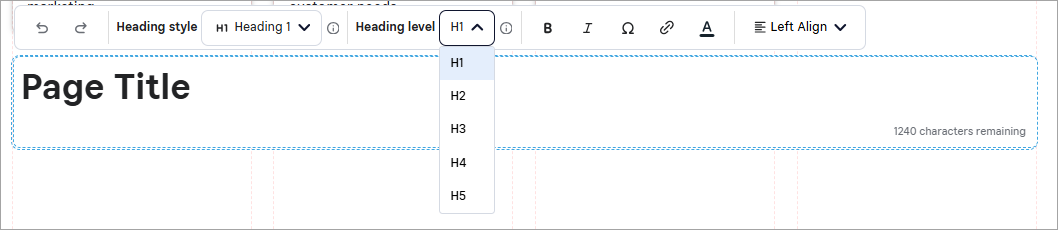
Page Builder allows you to specify whether a piece of text is a heading. When you format your text as a heading style using the Page Builder editor, you also select the heading level, and it automatically inserts the appropriate HTML code, which is what the web browsers and assistive technologies use.
What makes text a heading
A heading must use the appropriate heading style and heading level from the Page Builder editor's drop-down lists. Simply changing the font color, weight, or size does not make text a heading to a screen reader, although it might mimic a heading's formatting. Each heading style by default maps to a corresponding heading level which becomes the HTML code: Heading 1 is H1, Heading 2 is H2, Heading 3 is H3, and so on.
With Page Builder, you can have up to five levels of headings on a page. The title of the page typically uses the Heading 1 style and associated Heading level H1. Sections of the page use Heading 2 style and associated Heading level H2. Subsections under Heading 2 use the Heading 3 style and associated Heading level H3, and so on. It is the HTML code associated with the Heading level that is used by web browsers and assistive technology. When you format text using a heading level, the HTML code is added automatically for you.
Best Practices
When working with headings in Page Builder, you should:
- Aim to have a single Heading 1 style with the heading level of H1 on the page. This should be the page title.
- Have all section headings should be Heading 2 style with the heading level of H2. The subsection headings under Heading 2 should be the Heading 3 style with a heading level of H3.
- Ensure each heading level has its own style to make the content visually connected. In some cases you may want to use the same heading style at different heading levels.
- Always use the heading styles and heading levels when formatting text that should be a heading. That is the most important requirement for making content easy to find and understand by screen reader users.
- Not format paragraph text to mimic a heading style.
Example
The following image shows an example page where the main heading, Learning Academy: Gateway to Success has a heading style of Heading 1 and a heading level of H1. The page has two sections, Essential Learning and Top Courses by Business Unit which have a heading style of Heading 2 and heading level of H2. The second of these sections has two subsections with the headings Sales and Marketing. These subsections have a heading style of Heading 3 and heading level of H3. Under the sections and subsections are cards, each of which has its own heading. All heading levels, H1, H2, and H3 are used in the HTML code to indicate heading levels for web browsers and screen readers.
The heading levels reflect the nesting of the content so card heading levels can vary on the same page, as shown here, or on different pages.
Notice that the headings of the cards under the Sales and Marketing headings are levels H4, even though they have the same font, size, and color (style) as the card headings in the previous section which are levels H3. The font, size, and color of headings, the heading style, is chosen for visual appeal and consistency. But the heading level, H1, H2, H3, etc. always indicates only the hierarchical structure in the HTML code.

WCAG requirements for headings
WCAG requires all page or section titles that are acting as headings to be marked up as heading levels. Also, the appropriate heading levels should be specified, H1, H2, H3, etc., according to the hierarchical structure of the information. A page should have a single H1 heading level, the title. Each section title should be an H2 heading level. Subsection titles should be H3. It is possible to go even further, using H4 or H5, depending on the nesting of the information. In practice, learning content rarely has more than four levels of nesting.
How to make text a heading in Page Builder
Text boxes, cards, strips, and banners of all types, such as Image & Text cards, Profile cards, Dynamic cards, and Promoted Content Strips, all have headings. By default, cards use a heading style of Heading 3 and a heading level of H3. You may need to change the heading level in a card to match your page structure. For example, if a card is within a section with a H2 heading level, then H3 will be correct and you don’t need to do anything. However, if you created a subsection with H3, and put the card in that, then the card heading level will need to be changed to H4.
To make text from a text box or content card the appropriate heading level:
- After you add the text or content card to your page, select it.
- Select the Edit button. The edit toolbar displays.
- From the Heading style menu drop-down or Heading section, select the appropriate heading style. The style affects how the heading is displayed, font, size, color, etc.
- After you choose a heading style, from the Heading level drop down, select the appropriate level. The heading level, H#, is inserted in the HTML code.