Setup the Skillsoft CAISY™ for Salesforce Package
This page guides Salesforce administrators in setting up the Skillsoft CAISY™ for Salesforce package in Salesforce for a production environment. This package is also referred to as the Skillsoft base package.
This package is used to keep common components, such as, custom objects, custom metadata, client applications, and configurations, that are used by other Skillsoft package(s) such as the Skillsoft CAISY for Agentforce package.
It also includes the CAISY components for launching and practicing CAISY.
Prerequisites
Before installing and setting up the CAISY base package in Salesforce, you must:
- Have Salesforce administrative access as package installation and configuration require admin-level permissions.
- Be familiar and have knowledge of your Salesforce governance policies and procedures.
- Have access to the AppExchange marketplace.
- Identify a dedicated Integration User for API or system integrations, if applicable.
- Identify a name and contact information of a person at your company who can sign a license agreement with Skillsoft.
Install the CAISY for Salesforce package
From the Salesforce AppExchange marketplace locate the Skillsoft CAISY for Salesforce package and follow these steps to install it:
- Open the package. The Install page displays.
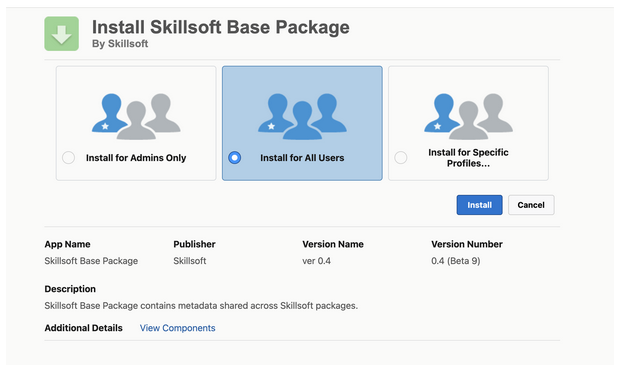
- Select the package to install. Your options are:
- Install for All Users*: This is the recommended option because it allows all your team members in Salesforce to access CAISY.
- Install for Admins Only: Select this option if you only want to install CAISY for the Salesforce administrators on your site. You might select this option if you are evaluating the product.
- Install for Specific Profiles: Select this option if you only want specific team members to access CAISY. You might select this option if you are running a pilot program or only want a select group of users to access CAISY.
- Select Install. A third party dialog box displays.
- In order to run CAISY for Salesforce, you must allow this package to send and receive data from the CSP trusted site: https://*.percipio.com. Check the box: Yes, grant access to these third party web sites.
- Select Continue. The installation proceeds granting access to designated users.
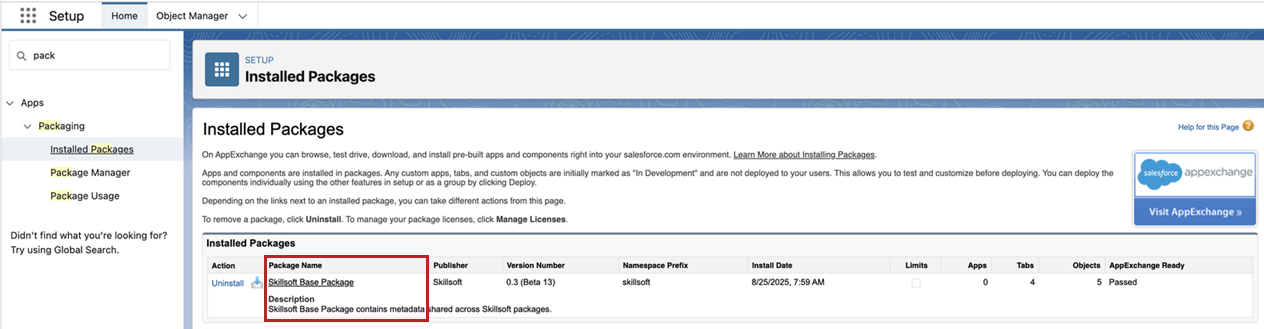
- After the installation completes, in Salesforce, navigate to the list of Installed Packages, then locate the Skillsoft Base Packagein the list and select it.
Setup the Base package
After you install the Base package in Salesforce, you must set it up so it works as expected. There are multiple components that you need to set up.
- Configure permission sets
- Configure the Skillsoft to Salesforce integration
- Configure the Salesforce to Skillsoft integration
- Register Salesforce with Skillsoft
- Configure organizational context
- Configure the CAISY launch experience
After you setup the base package, learners can run CAISY for Salesforce and admins can see reports.
Configure permission sets
The Skillsoft Base package comes with two default permission sets. You see these in the list of Permission Sets from the Setup area of Salesforce.
- Skillsoft Agent Admin: Use this permission set for users who will act as administrators for Salesforce CAISY. The user with this permission set must be an Salesforce System Administrator. These users will be able to configure CAISY and run reports on usage.
- Skillsoft Agent User: Use this permission set for users who will be interacting with CAISY as a learner.
We recommend that you provide one additional permission set and set up permission groups to easily assign users. The information provided is recommended only. Please adapt based on your on Salesforce policies and procedures.
Additional permission set
You must provide one additional permission set that applies to both administrators and users of CAISY. This additional permission set is for connected app access. If you already have that permission set defined, you can use it instead of creating one. If you have an existing permission set you can use that, otherwise, create a new permission set.
Within Salesforce, locate permission sets under: Setup > Users > Permission sets.
We recommend the following data for the new permission set:
- Label: Skillsoft External Client App Access V1
- API Name: Skillsoft External Client App Access V1
- Description: Needed to connect Skillsoft to Salesforce
After you create the new permission set, we recommend that you configure the User External Credentials for read access.
- Open the Skillsoft External Client App Access V1 permission set.
- Select the Object Settings from the center.
- From the Object Settings page, locate User External Credentials.
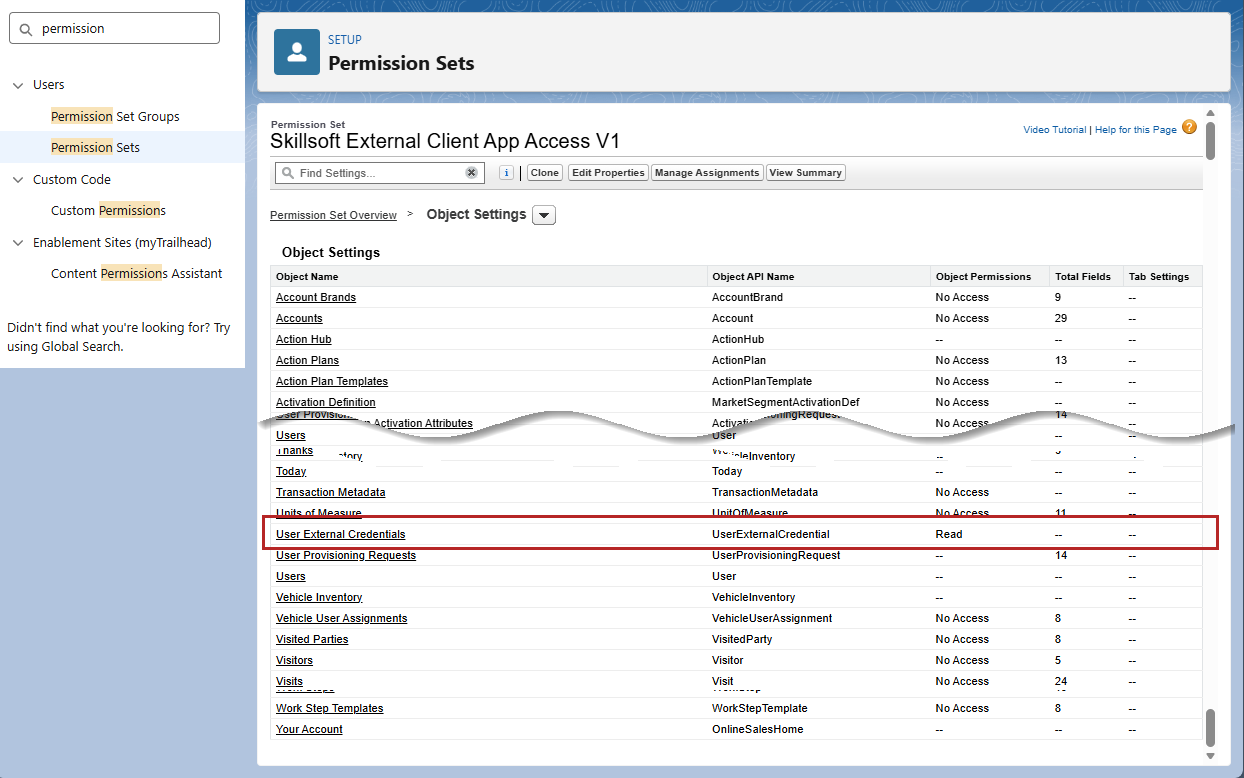
- Edit the object to grant Read access if it lacks it.
- Save your changes.
Permission groups
After you have your permission sets defined, we recommend that you create three permission groups.
Within Salesforce, locate permission groups under: Setup > Users > Permission groups.
If your company does not use permission groups, you can use permission sets to assign users. We recommend that you create the following three groups:
- Group 1: Use for all people using CAISY.
- Label: Skillsoft CAISY Permissions
- Permission sets to include: Skillsoft Agent Admin, Skillsoft Agent User, Skillsoft External Client App Access V1 (or similar)
- Group 2: Use for only administrators of CAISY:
- Label: Skillsoft CAISY Admin Permissions
- Permission sets to include: Skillsoft Agent Admin, Skillsoft External Client App Access V1 (or similar)
- Group 3: Use for only people using CAISY.
- Label: Skillsoft CAISY Learner Permissions
- Permission sets to include: Skillsoft Agent User, Skillsoft External Client App Access V1 (or similar)
Assign users to permission sets or groups
After you have defined your permission sets and groups, assign users accordingly based on what they will access. Use the Salesforce instructions for assigning users to permission sets or permission groups.
For users to access CAISY, you must assign them to a permission set or group within Salesforce.
Configure the Skillsoft to Salesforce integration
To ensure Salesforce can send data to CAISY, you must configure the Skillsoft to Salesforce integration. The following fields are the only ones required to support the integration.
To configure this integration:
-
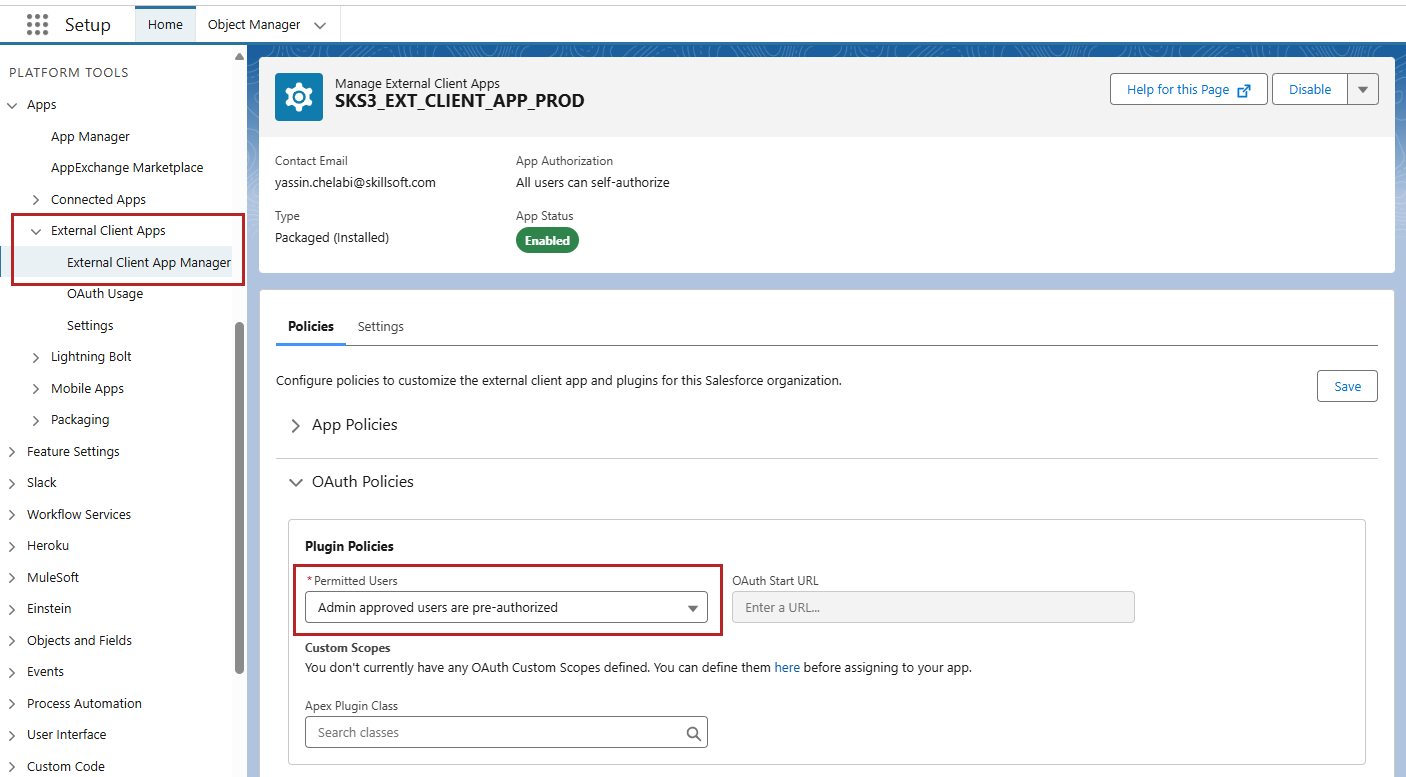
From Salesforce, select Setup > External Client App Manager.
-
Locate SKS3_EXT_CLIENT_APP_PROD and select to open its details.
-
Select Edit.
-
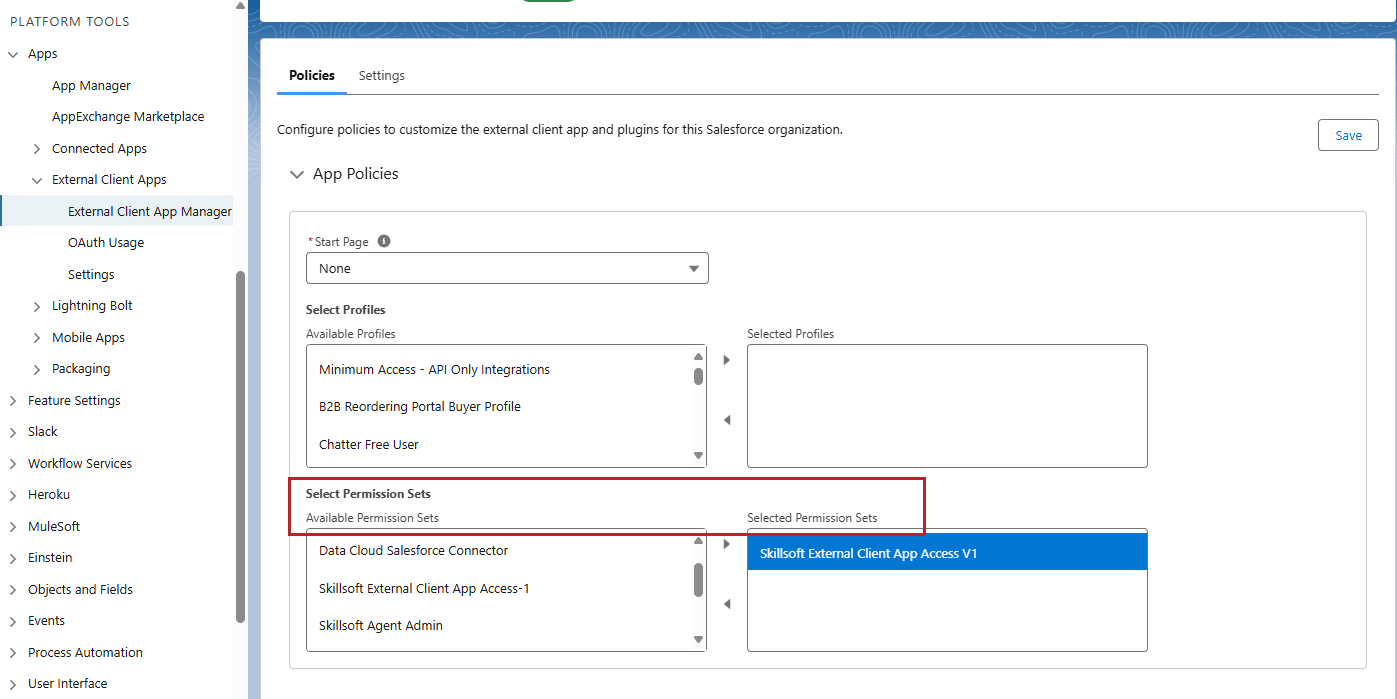
From the OAuth Policies section, locate the Plugin Policy section.
-
Under Permitted Users, select Admin approved users are pre-authorized. The App Policies section updates with the ability to select Permission sets.
-
From the Available permission sets, select the Skillsoft External Client App Access V1 permission set, and move it to the Selected permission sets side.
-
Update the Named User JWT-Based Access Token Settings to the desired time out period. Select from the list the value that best meets your corporate policies. You can select any value. The setting controls how long the access token remains valid before the user must re-authenticate.
-
Save your changes.
Configure the Salesforce to Skillsoft integration
To ensure Skillsoft can send data to Salesforce for scoring and reporting, you must configure the Salesforce to Skillsoft integration. The following fields are the only ones required to support the integration.
To configure this integration:
-
From Salesforce, select Setup > Named credentials.
-
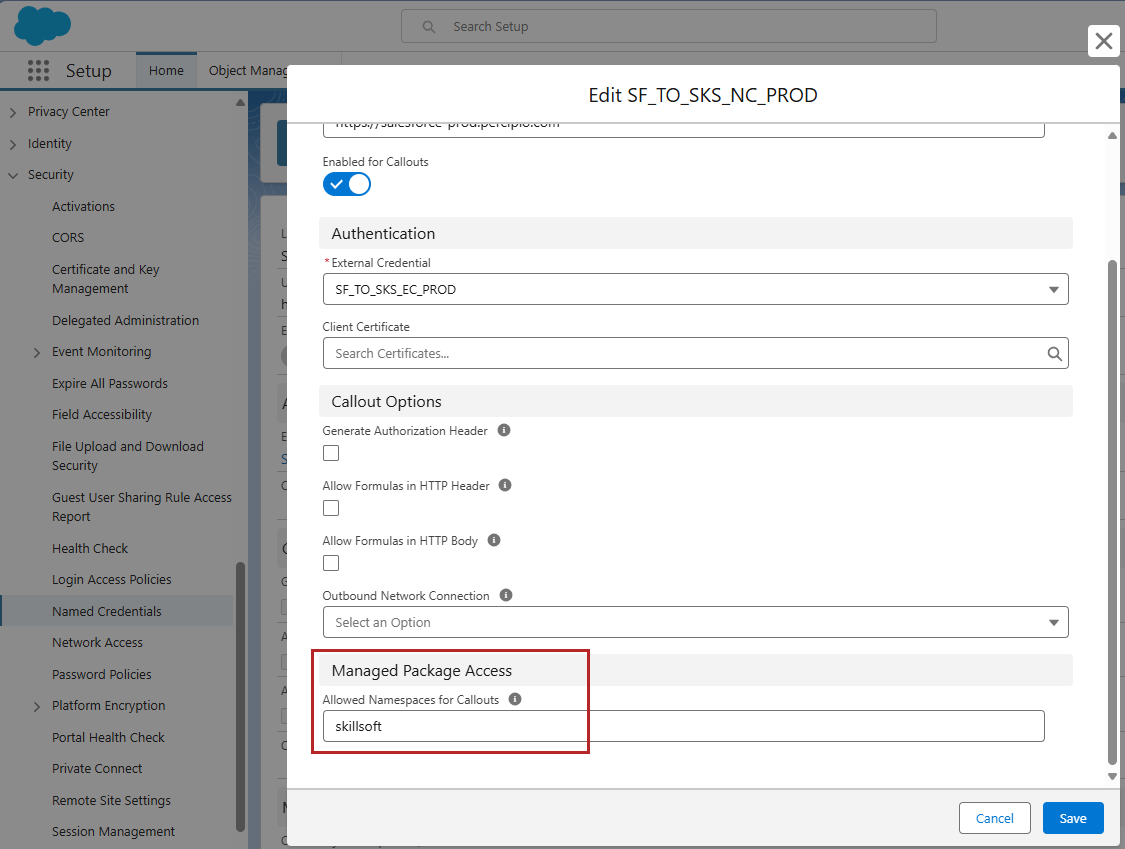
Locate SF_TO_SKS_NC_PROD and select to open its details.
-
Select Edit.
-
From the Manage Package Access section, locate the Allowed Namespaces for Callouts section.
-
Enter skillsoft, in all lowercase letters.
-
Save your changes.
-
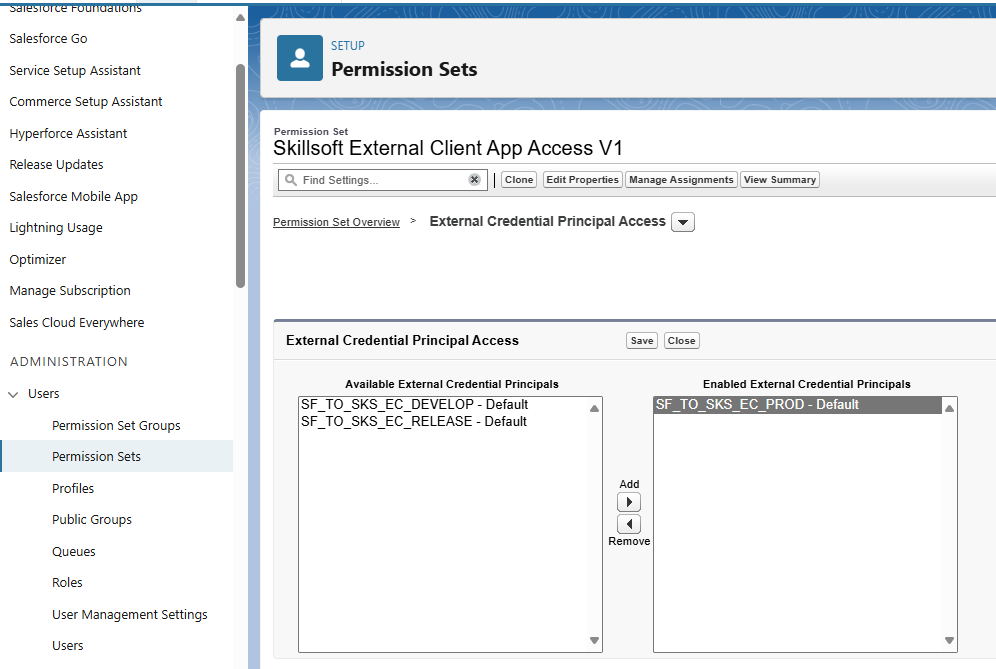
From the Permission set list, open the additional permission set you created or are using for the CAISY Base package. We recommended: Skillsoft External Client App Access V1.
-
From the list of apps, select External Credential Principal Access.
-
Move SF_TO_SKS_EC_PROD from the Available to the Selected External Credential Principles box.
-
Save your changes.
Register Salesforce with Skillsoft
Before learners can access CAISY in Salesforce, you must register the CAISY app with Skillsoft. The person who registers CAISY must have:
- A Salesforce profile of System Administrator
- The name of a person who can be named as the Integration User.
- The name and contact details of the person who will maintain the contract relationship with Skillsoft
To register CAISY for Salesforce with Skillsoft:
- From App Launcher search for Skillsoft Admin and select it from the results.
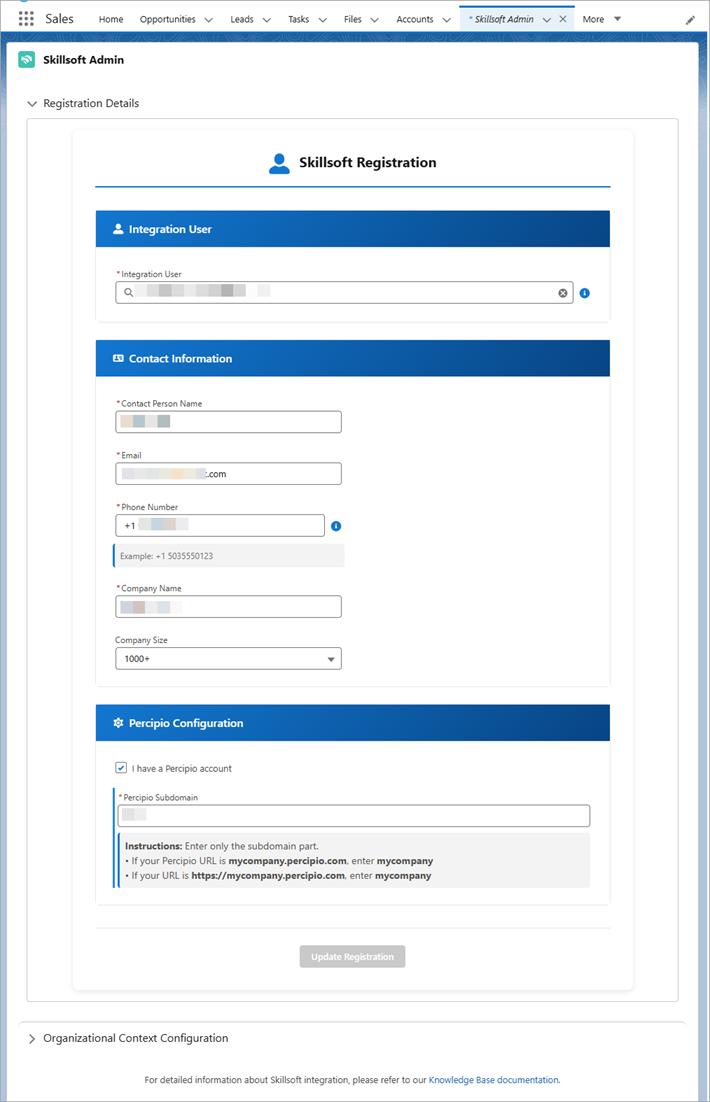
- Under the Registration Details section, enter the following information:
- Integration user: Required. Start typing in the list to choose the integration user. This user must have the following:
- OAuth access with the following scopes: api, refresh_token, openid, offline_access
- The additional permission set, Skillsoft External Client App Access V1, assigned
- Contact person name: Required. This is the person who will receive direct contact from Skillsoft regarding licensing of CAISY.
- Email: Required. The email of the person to receive contact from Skillsoft.
- Phone number: Required. The phone number of the person to receive contact from Skillsoft.
- Company name: Required. Your company name.
- Company size: The size of your company.
- Percipio Configuration: Check this box if your company already has an implementation of the Skillsoft Percipio Platform. If your company already has the Skillsoft Platform, specify the subdomain. The subdomain is the identifier in the URL before .percipio.com. For example: If your Skillsoft Platform URL is: https://mycompany.percipio.com, the subdomain would be mycompany.
- Integration user: Required. Start typing in the list to choose the integration user. This user must have the following:
- Save your changes. The contact person receives an email from Skillsoft to finalize the contract and enable the app. You can continue to configure the organization context while you wait for approval.
Configure organizational context
Because CAISY is an AI simulator, it requires some background information about your company to help set context when devising simulations. This context helps ensure that learners are experiencing close to real world situations as it pertains to your business. The more descriptive you are in setting the context, the better the learner experience.
If you specify specific issues and solutions, CAISY can use those scenarios when learners launch a Skillsoft CAISY from the app.
To set your organizational context:
- From App Launcher search for Skillsoft Admin and select it from the results.
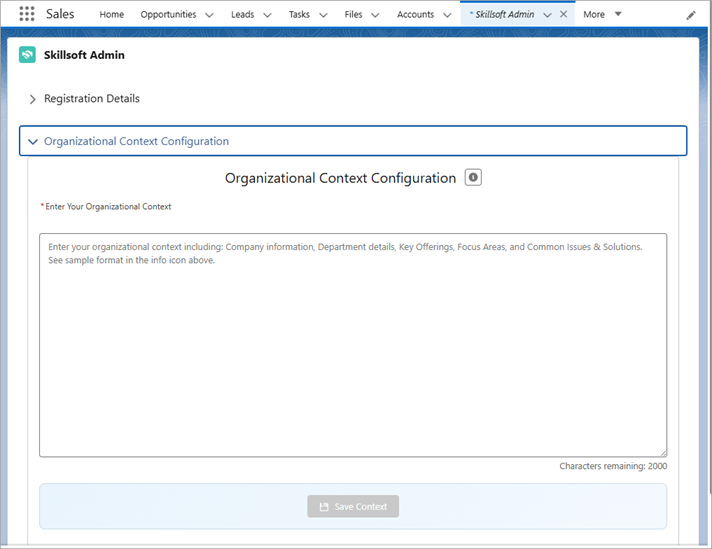
- Under the Organizational Context Configuration section, enter details about your company, department, key offerings, focus areas, and common issues and solutions.
- Save your context. You can enter information here prior to having a signed Skillsoft contract for CAISY. You can update and refine this context at any time.
The following is an example that you can use as a template for setting business context:
Company: Akara, a global leader smart home technology. Akara operates in the consumer electronics industry. Akara designs, manufactures, and sells innovative smart devices to enhance home automation, energy efficiency, and security.
Department: Customer Support department which handles inquiries from both residential and small business customers.
Key Offerings: Akara offers the following products:
- Nexus Hub - A central smart home hub that connects and manages all smart devices in a home or office.
- Sentinel Pro - A high-tech smart security camera system with motion detection, night vision, and cloud storage.
- ThermaSense Smart Thermostat - An AI-powered thermostat for energy-efficient heating and cooling.
- AeroVoice Smart Speaker - A voice-activated assistant that integrates with other smart home devices.
- LumaBright Smart Lights - Customizable smart lighting systems with app control and energy-saving features.
Focus Areas: Support team members need to focus on the following skill sets:
- Product Troubleshooting and analytical thinking: Diagnosing and resolving technical issues with smart devices. Breaking down complex issues to identify the root cause.
- Customer Empathy: Handling frustrated or confused customers with patience and clear communication.
- Active listening: Understanding the customer's problem by fully concentrating, understanding, and responding appropriately.
- Clear and Concise Communication: Explaining solutions or processes in simple, easy-to-understand language.
- Upselling and Cross-Selling: Identifying opportunities to recommend additional products or services to enhance customer satisfaction.
- Technical Guidance: Walking customers through complex installations or configurations.
- Conflict Resolution: Managing and de-escalating tense situations with frustrated or angry customers.
- Knowledge Sharing: Contributing to team knowledge bases and sharing tips or solutions with colleagues.
- Building Rapport: Establishing trust and a positive connection with customers.
Common Issues & Solutions:The Support team handles many types of queries, some of the most common are:
-
Issue: Nexus Hub is not connecting to Wi-Fi.
- Solution: Verify the Wi-Fi credentials entered are correct. Ensure the router is operating on a 2.4 GHz frequency (Nexus Hub does not support 5 GHz). Restart both the Nexus Hub and the router. Check for firmware updates via the Akara app.
- Issue: Sentinel Pro camera feed is not displaying in the app.
- Solution: Confirm the camera is powered on and within range of the Nexus Hub. Restart the camera and the Nexus Hub. Check the app for any pending updates. Verify cloud storage subscription status.
- Issue: ThermaSense Smart Thermostat is not adjusting temperature as expected.
- Solution: Ensure the thermostat is correctly wired and connected to the HVAC system. Recalibrate the thermostat through the app. Check if the "Eco Mode" is enabled, which may limit temperature adjustments.
- Issue: AeroVoice Smart Speaker is unresponsive to voice commands.
- Solution: Verify that the microphone is not muted. Restart the speaker and ensure it is connected to the Nexus Hub. Check for software updates in the app. Re-train the voice recognition feature if needed.
- Issue: LumaBright Smart Lights are flickering or not responding to the app.
- Solution: Ensure the lights are securely installed in the fixture. Check for power supply issues in the home. Reset the lights by turning them off and on three times in quick succession. Re-sync the lights with the app via the Nexus Hub.
- Issue: App login
- Look up account information. Offer to reset password and username.
Configure the CAISY launch experience
For learners to be able to access CAISY, you must set up how they can launch it. There are two use cases with the Base package for launching CAISY.
-
Skillsoft CAISY simulations: Created with instructional designers to focus on key skills needed by the customer service team member, these scenarios come with your base package. Learners can launch these from the App menu.
-
Case-specific CAISY simulations: Using details from a specific Salesforce case, these scenarios are tailored directly to a current case. With a case open, the learner can launch a CAISY with the case details and practice how their next interaction will go.
Depending on how you have your case pages set up, follow one of the following to setup CAISY so learners can access it within any Salesforce case:
- Navigate to Setup > Object Manager > Case > Case Page layouts.
- Select the case page layout(s) (maybe more than one) from where you want the Skillsoft CAISY button to be accessed.
- From the Case Page Layouts page, select the Mobile and Lightning Actions section.
- Move the Skillsoft CAISY action to the Actions section below. This ensures the learner sees the Skillsoft CAISY button from an open case.
- If there is no messaging session that is connected or linked to a specific case, you can use the custom object Chat Transcripts under Related Lists. From the left navigation, select Related Lists.
- Drag and drop the Chat Transcripts to the bottom of the page as a new tab.
- Save your changes.
- Go to Setup > Feed Tracking > Case. The case opens.
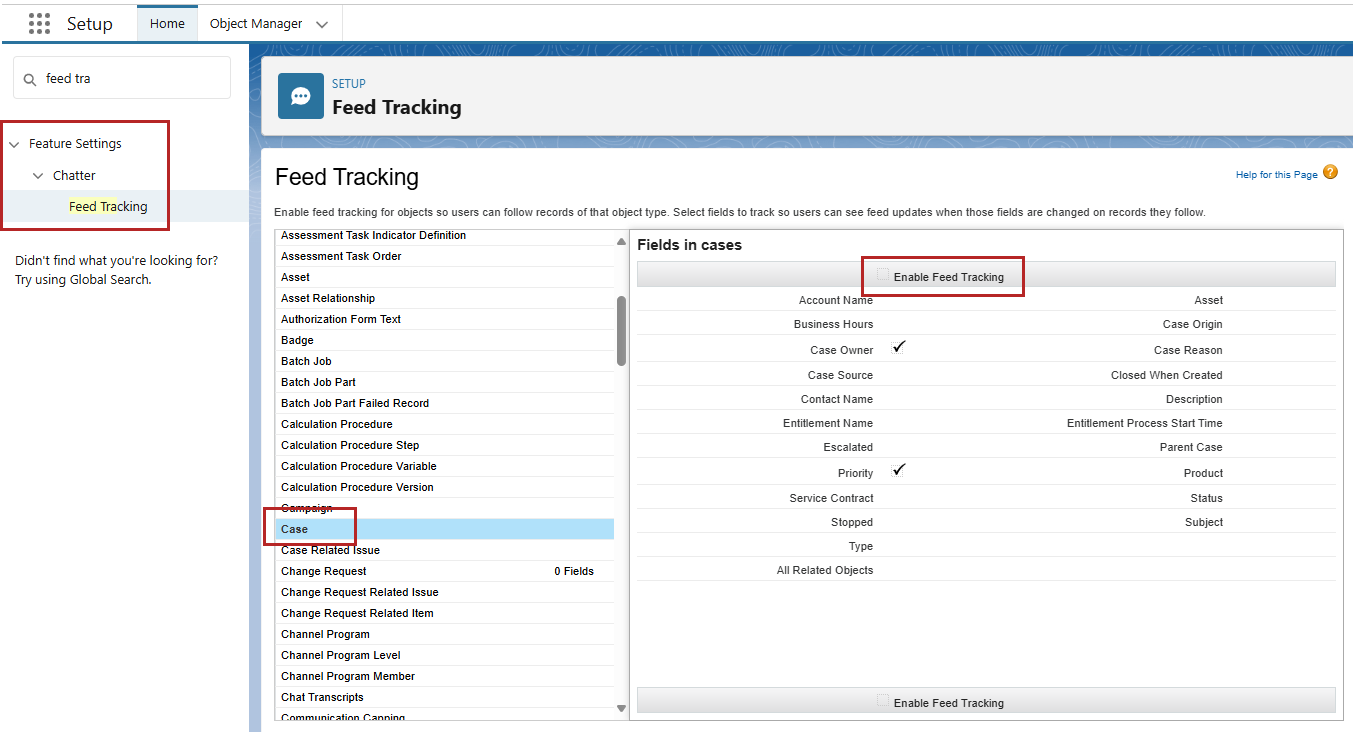
- Ensure the check box next to Enable feed tracking is unchecked.
- Save your changes. Once your contract is signed, learners can access CAISY from inside a case or from the Apps icon.
- Navigate to Setup > Object Manager > Case > Lightning Record pages.
- Select the lightning record page (s) from where you want the Skillsoft CAISY button to be accessed.
- From the Lightning Record page, select the Mobile and Lightning Actions section.
- Move the Skillsoft CAISY action to the Actions section below. This ensures the learner sees the Skillsoft CAISY button from an open case.
- If there is no messaging session that is connected or linked to a specific case, you can use the custom object Chat Transcripts under Related Lists. From the left navigation, select Related Lists.
- Drag and drop the Chat Transcripts to the bottom of the page as a new tab.
- Save your changes.
.