Assessment Upload Template
When you create an assessment in LX Design Studio, you have the opportunity to have AI create objectives, questions, and answer choices based on your input, or if you have a set already created from another tool, you can upload them as your starting point.
To upload an existing set of questions for an assessment, you need to add them to a CSV template file, save it, and import it.
Download the CSV template file
To download the CSV template file, you first have to locate it:
- From the Home page or Apps page, select Assessments. You now see the Assessments page. You can also start with the Design Assistant on the main page and have a conversation. The information you share in the Design Assistant will carry through to the Assessment app, so you don't have to enter all the details separately. Details required are outlined below.
- Select Create new and choose a Project for the assessment you plan to create.
- Select Next.
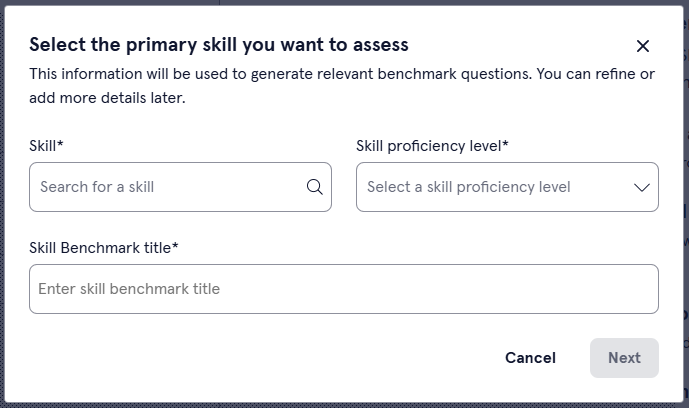
- In the dialog box, Select the primary skill you want to assess, complete the following fields:
- Skill: Enter the primary skill that the assessment tests. Skill benchmarks are designed to test one skill and one level at a time so that you can measure skill gain and proficiency.
- Skill proficiency level: Select the question difficulty for the assessment. The level options are Beginner, Intermediate, and Advanced.
- Skill Benchmark title: Use the suggested title or create your own. This is the title learners see when browsing for Skill Benchmarks.
- Select Next. You now see the Build Question Pool page on the left and the Design Brief on the right.
- Select Import question pool from a file.
- Select Download the question pool template. As a best practice, you may want to keep the template file in a location that is easily accessible for future assessments. The template file contains an example of how to add different question types.
Add your data to the template file
To complete the template file:
- Open the template in an editor.
- Add a row for each question you want to add. Within the row specify the associated learning objective, the type of question, the question, the answer options, and the correct answer. You can add multiple questions for the same objective each on a separate row.
- Save your file as a CSV.
Template format and instructions
Add a new row for each question. Use the template file that you downloaded as an example of how to specify your data.
For each row specify the following:
| Column Heading | Description |
| Learning Objective |
Enter a string of characters to indicate the learning objective that the question satisfies. If a learning objective has multiple questions, repeat the learning objective for each question row. Learning objectives should answer the question, What will the learner be able to do as a result of the learning experience? Use the SMART framework (Specific, Measurable, Achievable, Relevant, Time-bound) as a helpful guide in crafting effective objectives. |
| Difficulty Level |
Specify how difficult the question is to answer. Enter one of the following options in this column for each question:
|
| Question Type | Specify they type of question the user will answer. Enter one of the following options in this column for each question:
|
| Question Text | Enter the question text. For each question, add a new row. Ensure the language of the question matches the question type, difficulty level, and objective. |
| Option A - F |
There are six columns where you can enter answer options. You will want to provide distractors (wrong answers) as well as the correct answer options. You do not need to complete all six columns. Use only the number you need. In the Option columns, you do not specify if the option is right or wrong, just the options, one per column, that you want the learner to be able to pick from when they are answering the question. |
| Match options |
If you chose Matching as your question type, this column is where you specify the set of items that the learner will match the A-F Options. You can add multiple items in this cell. Number each item and separate each item with three pipe characters, no spaces. You can see an example in the downloaded template file. Here is an example of four items specified in the one column, notice the format for numbering the items is number+period+text. There is no space. Also note that between the end of the first item and the beginning of the second there are three pipe characters with no spaces.
|
| Correct Answer(s) |
In this column you provide the answer. Follow the examples in the template you downloaded for formatting. If it is a matching question, specify the answer as follows: Option A, B, C, D, E, F followed by a colon then a number in Match Option Column followed by a comma and then the next sequence. Use no spaces. An example is:
If it is a multiple choice question, only include the correct options separated by a comma, no spaces. An example if you want to indicate that options A and F are correct, specify:
If it is a single choice question, only include the one option that is the correct answer. An example is:
|