Create a Course
With the Course Designer app, you can create courses for your learners so they can develop their skills. You can create a course for:
- Onboarding new hires.
- Upskilling someone for a promotion or new role.
- Preparing an employee for a certification.
- Making a company policy more engaging.
- Seamlessly covering multiple objectives in one place.
Within a course, learners watch videos to learn new material and complete knowledge checks to test their knowledge as they go. At the end of the course, learners complete the course assessment as a way to gauge what they remember. Courses are a great tool for presenting information on one topic in small, manageable chunks that connect in a cohesive, structured learning solution.
Best practices for creating a course
When you create a course, we recommend the following:
- Keep the course as short as possible to keep learners engaged and make completion achievable.
- Identify specific goals and objectives that learners should achieve by completing the course.
- Keep in mind the specific group of learners the course targets.
- Assemble any company policies or other documents that may be relevant to the course.
- After you generate the video for each slide within a topic, you need to also generate the video for the entire topic in order for the topic to be considered complete and ready for publishing.
- There are different topic types. Course Designer by default adds content topics and knowledge checks. From the content topics, the Course Designer generates slides, a transcript and a video. In the Outline stage, you can add other topic types such as an mp4 video file from the Media Library or from the Skillsoft library or CAISY for conversations.
Course Designer Overview
When you create a course using the Course Designer, you need to specify details in six distinct areas. As you work through the details to make the course as effective and engaging as possible, the system saves your changes automatically so you can go back to any area without losing changes.
The six areas when creating a course are:
- Inputs: This area is where you chat with the Course Assistant to create a Design Brief for your course.
- Outline: This area is where you review and edit the AI-proposed topics for your course including their learning objectives, descriptions, and slide content. By default, the Course Designer adds content topics from which it creates a transcript, slides, and a video. The Course Designer also adds knowledge checks by default. When in this area, you can also add mp4 video topics.
- Script: This area is where you review and edit the AI-generated scripts for the videos covering each of the topics that you confirmed in the Outline.
- Build: This area is where you create the videos for each of the topics in your course.
- Assess: This area is where you generate the questions for the course's knowledge checks and course assessment.
- Content details: This area is where you review and edit the course's meta data such as the title, description, skills, and expertise level.
Create a course workflow
To get started creating a course:
- From the Home page or the Apps page, select Course Designer. You now see the Course Designer list page.
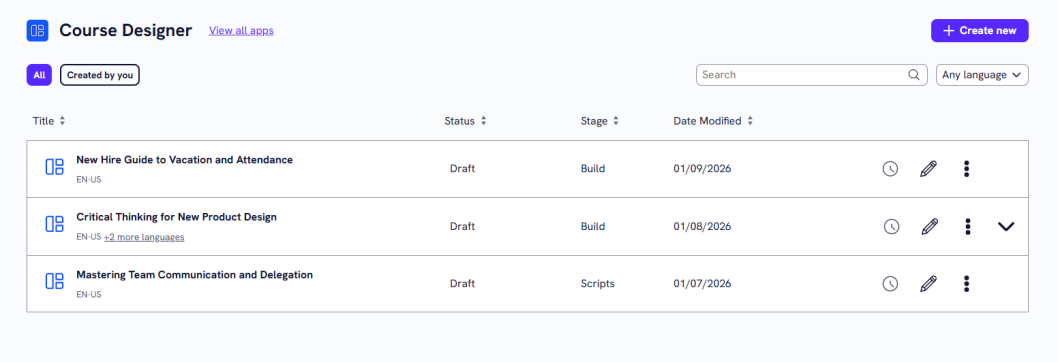
- Select Create new and choose a project for the course you want to create.
- Select Next.
- Either choose to upload a file to use as reference content, or choose to create a course from scratch. When you add knowledge source content, it acts as reference material to help the Course Assistant tailor learning objectives and content to your specific needs.
- After you choose how to create your course, start chatting with the Course Assistant and work through each of the areas to create your course. You can go back to a previous area and make edits at any time. For more details on each area, please refer to that section on this page:
- Once you have created your course, you can build translations for it in other languages. See the Language section for more details on how to create translations of your course.
-
Once you have completed all required fields, generated the video for each slide, generated the video for each topic, and confirmed updates, you have the following options:
- Publish: Note, you only see this option if you have LX Design Studio publishing privileges. This option publishes your content to the platform. You can make it available to a specific group of learners via search only, or add it to a channel or journey.
- Select Publish.
- Check the box: I also want to make this available to learners right away. Ensure the users who should see your draft content are included in an audience. See Create audience for details on how to create an audience and add users.
- Select Select learners, and then choose your audience from the list. By default all users in your company are selected.
- Select Save.
- Select Publish again. When you publish content, it shows in the Manage Content Items list in the platform.
- Select Go to Percipio. You see your new content in the list. People in the audience you selected should be able to search on your content title to find it. At this point they cannot browse to it.
- If you want, you can also add your new content to a channel or journey and make that channel or journey available to a select audience of reviewers that can test the new content to make sure it meets organization standards. Visit the Create Custom Journey or Create Custom Channel pages for more information on how to add custom content to a channel or journey and entitle it for just one audience.
- Exit: Be sure you see the word Saved in the upper right corner before you exit. When you exit, your course saves as a draft that you can return to and edit at any time.
- Publish: Note, you only see this option if you have LX Design Studio publishing privileges. This option publishes your content to the platform. You can make it available to a specific group of learners via search only, or add it to a channel or journey.
Inputs
In this area, you chat with the Course Assistant to create a Design Brief for the course you want to create.
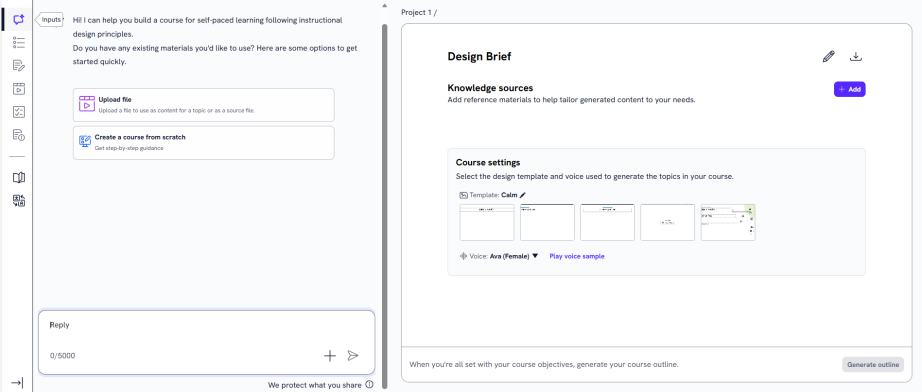
Follow the steps below to complete this section:
- Start by choosing one of three paths. You can upload files that can be used as reference material for the designer, choose a Skillsoft course to base your custom course on, or create the course from scratch.
- To upload reference files, select Upload file. Choose from existing knowledge sources or import a new file. When you add knowledge source content, it acts as reference material to help the Course Assistant tailor learning objectives and content to your specific needs. To add files that can be referenced:
- Select Add to add a new knowledge source to the content, project, or workspace.
- Locate the file you want to add as a knowledge source. This can be an file of type: .txt, .html, .pdf, .pptx, .xlsx, .csv, and .doc files, with a maximum size of 100MB per file.
- Select Next.
- Select whether the file should be accessible at the workspace, project, or content level. To help you determine the right level:
- Workspace level: The file is accessible across all projects and can be shared to other projects or workspaces later if needed. Use mostly for brand, legal, or voice guidelines.
- Project level: The file is accessible to all content items within your project and can be shared to other projects or workspaces later if needed. Use mostly for collaborating on project-specific content and standards.
- Content level: The file is applied only to specific content and cannot be shared later. It won't surface in search or be discoverable elsewhere in the platform. Use for highly tailored or one-off content.
- Select Next.
- Add a Title and Description. This helps you remember why you uploaded the content.
- Select Next.
- Select Next to confirm the file.
- Select Got it acknowledging that the file is being processed.
- If you are aware of a Skillsoft course that has the fundamental content you want to include in your custom course, select Start from existing course. The Course Designer will not directly use the videos or assessment questions, but will reference them along with your criteria to create a new course specifically for you. If you do not know of a course that contains relevant content, you can select Discover an existing course from the Design Brief pane to try to find one. You can also chat with the assistant and after it has enough information, it will suggest up to three Skillsoft courses that might have relevant content. You can review each course and choose one to use as reference when creating your course.
- To start from scratch, select Start course creation with guidance.
- To upload reference files, select Upload file. Choose from existing knowledge sources or import a new file. When you add knowledge source content, it acts as reference material to help the Course Assistant tailor learning objectives and content to your specific needs. To add files that can be referenced:
- Your next step varies depending on how you chose to get started. As you provide information, you see that the design brief on the right populates. You can edit the design brief at any time during this step.
- If you chose to start by adding a knowledge source, the Course Assistant generates learning objectives and a recommended duration based on the content in the knowledge source. Review the learning objectives, keep the ones you want, edit them in the Design Brief pane, or remove the ones you don't want. Adjust the duration. The Course Assistant will not let you proceed if there is a mismatch between the duration and the number of objectives. When you have the learning objectives and duration set, you can select Proceed to continue providing information about your course such as the target audience, title, and expertise level. Watch as your design brief updates in the right pane. Edit the design brief at any time during this step.
- If you chose to start with a Skillsoft course, the Course Assistant creates a full design brief using the course as a guide. You can edit the design brief to ensure the target audience, objectives, expertise level, and duration meet the goals of the course you are trying to create. At this point, you may want to update the course title to avoid confusion with the Skillsoft course.
- If you chose to start from scratch, chat with the Course Assistant to specify the learning outcomes, audience, topics, and any other specific instructions you have for your course.
The more specific you are in your answers, the better the Course Assistant will be in creating a tailored course for your business needs. In addition, the Course Assistant can make better recommendations for referencing Skillsoft courses that you can use for proven content during the development of your custom course.
- Review the design brief to ensure all information is accurate. Make any adjustments necessary. The information in the design brief is used to create the outline and content for the course.
- Decide on your Course Settings. These settings include a theme and voice for your course videos. It is important to specify these here because changing them later means regenerating content that you may have tailored to meet your needs.
- Add any additional knowledge sources you may want referenced when the Course Assistant generates content.
- After you review your design brief, selected a template and voice, added any additional knowledge sources or added any Skillsoft courses for reference, select Generate Outline from the bottom of the Design Brief panel.
Once you generate your outline, the Outline area becomes active. You may return to the Input area at any time to make edits to the design brief. If you edit the design brief after you generate the outline, you will need to regenerate your outline to include changes you made.
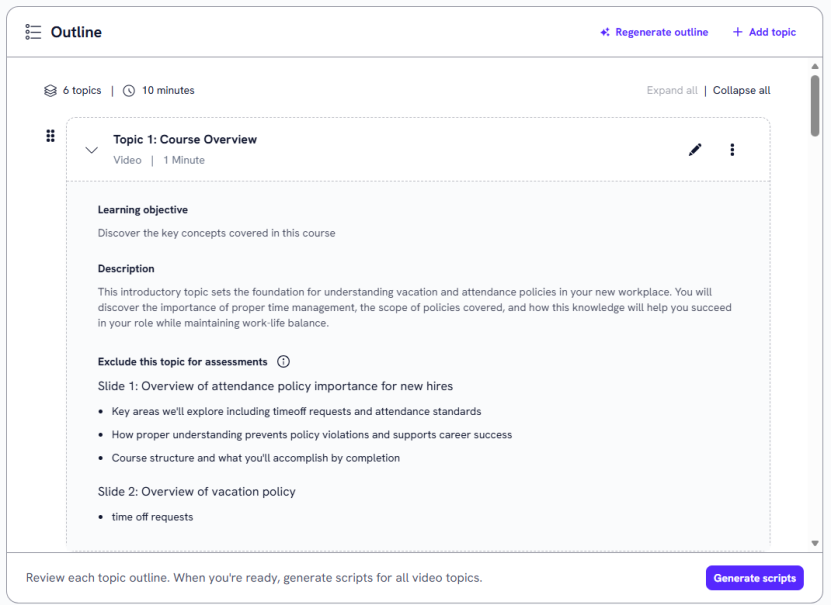
Outline
Once you have created a design brief and generated an outline, the Outline area becomes available to you. In this area, you review and edit the content topics the Course Designer created for you, add and remove topics, adjust learning objectives, and approve slide information for your course.
We recommend following the steps below to ensure the outline meets your course expectations:
-
Read through each of the topics and their descriptions to get a sense of the structure of the course. If the outline as a whole does not fit your expectations or is missing key information, you can regenerate it by selecting Regenerate outline at the top of the window. If you choose to regenerate the whole outline, provide a description of any changes you want the Course Assistant to make so it can adjust the outline to meet your needs.
-
If the outline as a whole looks good, you can just make adjustments to individual topics or add a new topic. You can make the following changes your outline:
- Add topic: Select the Add topic button at the top of the Outline window to add a topic to your course. Use this option if you feel there is content missing from your course outline or if you want to an mp4 file as its own topic. Select the type of topic to add. Your choices are:
- Generate video: Select this option when you want the Course Designer to create the slides, video, and transcript based on the information you specify in the title, objective, and description fields.
- Add Video: Select this option if you want to upload a custom video or use a Skillsoft video as the topic. When you choose video, you can
- Select a video from the Media Library you previously uploaded
- Add a new video to the Media Library and then select it
- Choose a relevant Skillsoft video.
- Add Knowledge check:Select this option if you want to add a question for the learner to check their retention of the content within the course. You must add these after topics of substance, not overview or summary topics.
- Add CAISY for Conversation: Select this option to add an interactive practice event to your course. You can select a custom or Skillsoft CAISY to add to your course.
- Reorder topics: To change the order of any topics in the course outline, select and drag the 6-dot icon
 next to the topic. Note, you cannot change the location of the course assessment which must be at the end.
 - Regenerate topic: To regenerate a specific topic, select the Show options icon
 , then Regenerate topic. Write any specific changes you want the Course Assistant to make and select Regenerate topic. The Course Assistant updates the topic based on your instructions. Use this option if there are changes you want to make to the topic as a whole so that it better aligns with the course objectives. You cannot regenerate a video-only (mp4) topic.
 - Add next topic: To add a topic directly below an existing topic, select the Show options icon , then Add next topic. Select the type of topic to add.
- Generate video: Select this option when you want the Course Designer to create the slides, video, and transcript based on the information you specify in the title, objective, and description fields.
- Add Video: Select this option if you want to upload a custom video or use a Skillsoft video as the topic. When you choose video, you can
- Select a video from the Media Library you previously uploaded
- Add a new video to the Media Library and then select it
- Choose a relevant Skillsoft video.
- Add Knowledge check:Select this option if you want to add a question for the learner to check their retention of the content within the course. You must add these after topics of substance, not overview or summary topics.
- Add CAISY for Conversation: Select this option to add an interactive practice event to your course. You can select a custom or Skillsoft CAISY to add to your course.
- Delete topic: If you wish to delete a topic entirely, select the Show options icon , then Delete topic. Use this option if you feel a topic is not relevant to the course objectives.
- Add topic: Select the Add topic button at the top of the Outline window to add a topic to your course. Use this option if you feel there is content missing from your course outline or if you want to an mp4 file as its own topic. Select the type of topic to add. Your choices are:
-
To fine tune the details within a topic, locate the topic whose details you wish to edit and select the Edit icon
 . You can change the following fields within a topic:
- Topic title: The title of the topic as it displays in the course.
- Duration (in minutes): The approximate time it takes learners to complete the topic.
- Learning objective: What a user should learn by completing the topic.
- Topic description: The information covered in the topic.
- Include this topic for assessments: Choose whether you want the topic included in the next knowledge check and the course assessment. You may choose, for example, to exclude a topic that contains a Webinar recording that you want learners to watch, but do not necessarily want to test them on. Note, the first and last topic are not included in assessments because they are the overview and review topics.
- Slide title: The title that displays at the top of a slide when it shows in the topic video.
- Talking points: The specific points that are covered by a slide.
For each of the above text fields, you can manually change the text, or select Rewrite to have the Course Assistant make any changes. When you select Rewrite, provide instructions for changes you want the Course Assistant to make and select one of the following options:
- Regenerate: When you select Regenerate, the Course Assistant uses your instructions to laterally adjust the information in the field.
- Improve: When you select Improve, the Course Assistant uses your instructions to improve the information in the field.
- Shorter: If you like the information in a particular field but want it to be shorter, you can select the Shorter button. The Course Assistant keeps the information the same but shortens the wording.
You also have the following options for editing slides within a topic:
- Add slide: To add an additional slide to a topic, select Add slide. Provide a title and talking points for the new slide. Once you have provided some information in each of the fields, you can have the Course Assistant help you with wording and details by using the Rewrite option.
- Delete slide: To delete any slide from a course, select the Show options icon
 , then Delete slide.
 - Reorder slides: To change the order of slides, click and drag the 6-dot icon next to any slide.
Be sure to select Save changes before returning to the course outline.
- Once you are satisfied with all details in your outline, select Generate scripts at the bottom of the Outline window. This brings you to the next step in your course design workflow. You can come back to the Outline area at any time to make adjustments.
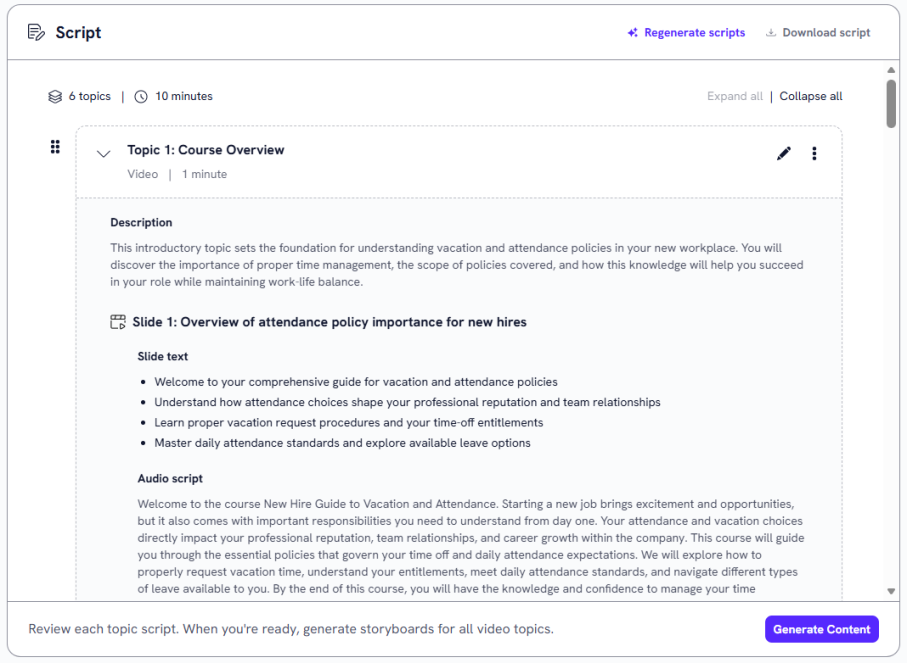
Script
After completing the Outline step by generating the script, the Script area becomes available to you. In this area, the Course Assistant displays the video scripts for each of your topics based on the outline from the previous step. In this area you can make edits to any of the topic information or audio scripts.
We recommend following the steps below to ensure your video scripts align with course expectations:
- Read through each of the AI generated scripts and ensure they adequately cover all course objectives. If there are any problems with the scripts as a whole, you can select Regenerate scripts from the top of the scripts window. Provide any information on how you would like the scripts changed and select Regenerate scripts.
-
Next, focus on any topic level changes. You can make the following changes to topics at this point in your course design workflow:
- Regenerate topic: If you wish to rewrite an entire topic, select the Show options icon , then Regenerate topic. Add any additional instructions you have and select Regenerate topic. The Course Assistant updates the topic based on your suggestions.
- Reorder topics: To change the order of the topics in your course, click and drag the 6-dot iconnext to any topic.
- Regenerate topic: If you wish to rewrite an entire topic, select the Show options icon
-
To fine tune the details within any topic, select the Edit icon next to that topic. You can change the following fields within a topic:
- Topic title: The title of the topic as it displays in the course.
- Topic description: The information covered in the topic.
- Slide title: The title that displays at the top of a slide when it shows in the topic video.
- Slide text: The bullet points that display on a slide when it shows in the topic video.
- Audio script: The text read aloud by the AI voice over while the slide is showing in the topic video.
For each of the above text fields, you can manually change the text, or select Rewrite to have the Course Assistant make any changes. When you select Rewrite, provide instructions for changes you want the Course Assistant to make and select one of the following options:
- Regenerate: When you select Regenerate, the Course Assistant uses your instructions to laterally adjust the information in the field.
- Improve: When you select Improve, the Course Assistant uses your instructions to improve the information in the field.
- Shorter: If you like the information in a particular field but want it to be shorter, you can select the Shorter button. The Course Assistant keeps the information the same but shortens the wording.
- Regenerate all slides: To make an overall change to all slides in a topic, select Regenerate all slides and provide any specific instructions you have for changing the slide information. The Course Assistant uses your instructions to rewrite the slides.
- Add slide: To add an additional slide to a topic, select Add slide. Provide a title and talking points for the new slide. Once you have provided some information in each of the fields, you can have the Course Assistant help you with wording and details by selecting the Rewrite button.
- Regenerate slide: To rewrite all of the fields on one slide, select the Show options icon , then Regenerate slide and provide any specific instructions you have for changing the slide information. The Course Assistant uses your instructions to rewrite the fields on that slide.
- Add slide below: To add an additional slide directly below an existing slide, select the Show options icon
 , then Add slide below.
 - Delete slide: To delete any slide from a course, select the Show options icon , then Delete slide.
- Reorder slides: To change the order of slides, click and drag the 6-dot icon next to any slide.
You also have the following options for editing slides within a topic:
Be sure to select Save changes before returning to the course outline.
If there are other members of your organization that you want to read over and approve the script that are not collaborators on the project in LX Design Studio, you can select Download script and send it to them outside the platform. You can then wait for their feedback and return at any time to make edits to the script before moving on to the next step.
Once you are satisfied with all topics and scripts, select Generate slides at the bottom of the Script window.
Build
In this area, you review and edit the slide and topic videos generated by the Course Assistant. You must build first each slide video within each topic. After you finish building each slide video within a topic, you must build the topic video. You must generate all topic videos before you can move to the next step to create assessments.
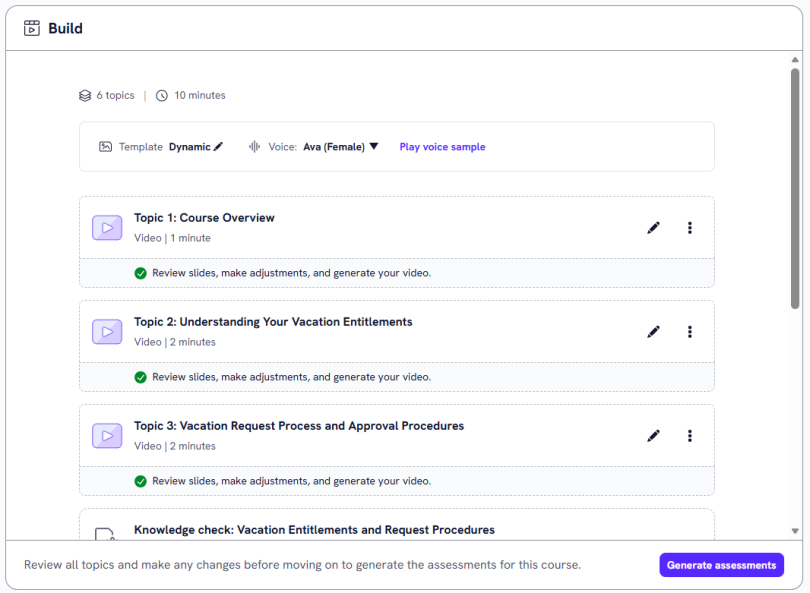
We recommend following the steps below in order to most efficiently build your topic videos:
-
Before reviewing each of the topics, select a Template and Voice for your videos from the drop-downs at the top of the window. Be sure to select Regenerate topics in order to apply these changes. Note, if you make adjustments to these fields after building your videos, you have to rebuild your videos with the new features.
-
Review the details for each topic by selecting the Show options icon
, then Edit details. Read over the title and description for the topic and make any necessary changes. Optionally, upload a thumbnail image for the topic. Be sure to select Save changes before returning to the Build view. -
The next step is to build the slides and voice overs for each of the topics. Select the Edit topic icon
next to a topic to open it. You must generate the video for each slide and then generate the video for the entire topic. Before you generate the slide videos, you can make edits to the following text fields for each slide:- Slide title: The title that displays on the slide in the topic video.
- Slide text: The bullet points that display on the slide in the topic video. Slide text is animated to match the slide's associated audio.
- Audio script: The voice over script that plays along with the slide in a topic video.
For the above text fields you can manually change any text or select Rewrite to have the Course Assistant make changes. If you select Rewrite, you can enter any instructions you have for changes to the field and then select one of the following options:
- Regenerate: When you select Regenerate, the Course Assistant uses your instructions to laterally adjust the information in the field.
- Improve: When you select Improve, the Course Assistant uses your instructions to improve the information in the field.
- Shorter: If you like the information in a particular field but want it to be shorter, you can select the Shorter button. The Course Assistant keeps the information the same but shortens the wording.
Once the text is how you like, you have the following options for adjusting your slides and videos:
- Choose Select slide layout to change the layout of the slide you are viewing.
- If you want to make adjustments to the layout of a slide manually, you can select Download slide. Make adjustments to the slide in PowerPoint or another editor that handles .pptx files and save it. Then select Upload slide and choose the new slide.
- Select the Animation tab at the top to adjust the text animation so it better fits the voice over. As you are reviewing the topic video, you can pause at any time and select Add current time next to a slide text bullet point so that it displays at that time stamp in the video. This way, you can ensure your text animation aligns with voice over.
-
When the video to the right plays as expected, select Slide 1: Generate video. This process may take a moment. Once the video has finished generating, navigate to the next slide in the topic from the view on the left and repeat the steps above to make edits to this slide.
-
After all slide videos have been generated, the button Topic #: Generate video becomes active in the upper right. Select Topic #: Generate video to complete the building process for that topic.
-
Review the topic video and script, then select Back to course from the upper left. You should see a green check mark in the topic you just reviewed.
-
Repeat the steps above for each of the topics in the course.
-
When all topics have been built, select Generate assessments to take you to the next step.
Assess
In this section you generate the knowledge check and course assessment questions to align with your video topics.
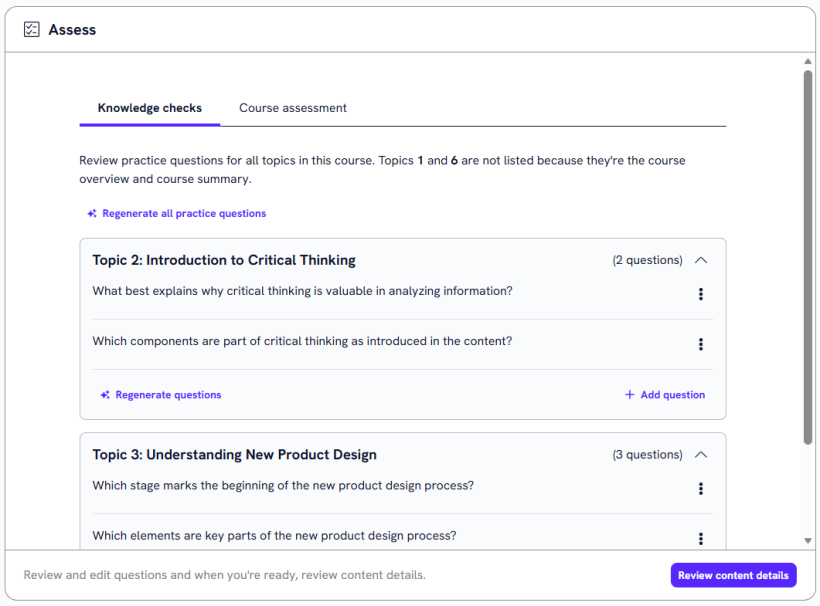
Follow the steps below to create the assessment questions:
- By default, the Knowledge checks tab shows. Choose how many of each type of question you would like to create for each topic. This different types of questions are as follows:
- Single choice: The user chooses one correct answer from a list of potential answers.
- Multiple choice: The user chooses all correct answers from a list of potential answers.
- Matching: The user matches a series of statements to their corresponding counterparts.
- Ranking: The user ranks a series of statements.
- Once you have specified how many questions should be generated for each topic, select Generate questions.
- Read through all knowledge check questions to ensure they align with the topic videos and information. If you are unsatisfied with the questions as a whole, select Regenerate all practice questions from the top left corner of the window. Provide any details on how you want the Course Assistant to improve the questions and select Regenerate all practice questions.
- Next, focus on any topic level changes. To change all questions for a specific topic, select Regenerate questions from the topic box. Provide any details on how you want the Course Assistant to improve the questions for that topic and select Regenerate questions. Use this option if the questions from one topic do not assess the information you want, or if you want the wording to be altered.
- You can also make changes to individual questions and their answers. For editing individual questions, you have the following options:
- View question: From the Show options menu , select View question. The question and its answer options display with the correct answer marked.
- Edit question: From the Show options menu , select Edit question, or from the top of the View question page, select the Edit question icon
 . From this view, you can manually change the text of the question or any of its answers. You can also delete an answer by selecting the Delete icon
  , or add an answer by selecting Add response option. Be sure to select Save changes before moving on.
 - Regenerate question: From the Show options menu , select Regenerate question, or from the View question page, select the Regenerate icon
 . Provide any details on how you want the Course Assistant to improve the question and select Regenerate this practice question.
 - Delete question: From the Show options menu , select Delete question, or from the View question page, select the Delete question icon
 . Use this option if you feel a question is not relevant to the learning objectives of the course.
Note, when you are on the View questions page, you can navigate to the other questions in that topic using the Previous question and Next question buttons. To return to the Assess page where you can see all topics and questions, select Finish review.
- View question: From the Show options menu
- When you are satisfied with all knowledge check questions, navigate to the Course assessment tab and repeat steps 1-5.
- For the course assessment, you have the option to have learners take all, or only half of the questions per topic on any given attempt. If you chose to have learners take half of the questions, they see different questions if they have to take the assessment multiple times. At the bottom of the Course assessment tab, you see a box called Course assessment. Select Edit settings and choose either Show all questions, or Show half the questions per topic. Select Save.
- Once you have finished editing all questions, select Review content details to take you to the next step.
You can choose to have the same number of each type of question for each topic, or select Customize number of questions by topic and then specify different numbers of questions for each topic.
Content details
In the Content details section, you review the details for the course. These are the details that learners see and can search for when looking for a course in the platform such as title, description, and skill level.
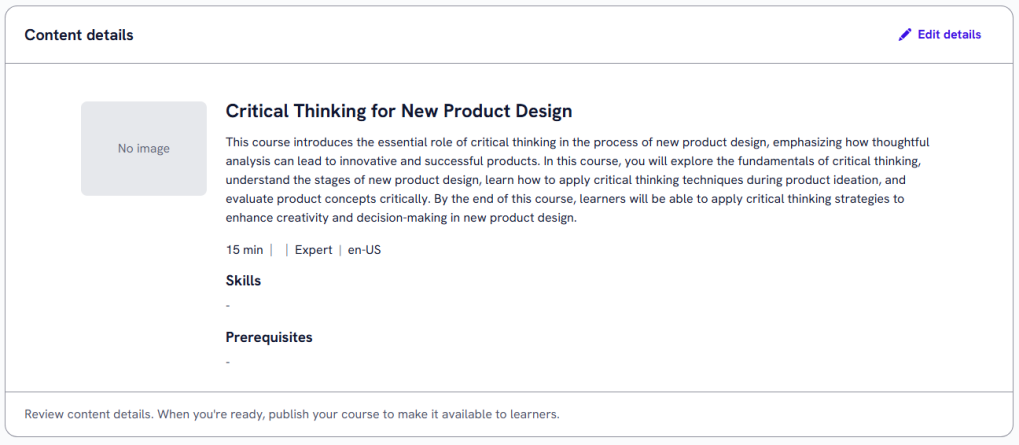
When you land on the Content details page, select Edit details to view and edit the details of the course. On the Edit content details page, you see the following fields:
- Title: The title of the course that learners see and can search for in the platform.
- Description: A brief description of the content and learning objectives of the course.
- Duration: The estimated amount of time it takes a learner to complete the course.
- Content source: Content sources help learners discover your content and informs them about who created it.
- Expertise level: Choose either Beginner, Intermediate, or Expert as the Expertise level that learners can use as part of their search filter criteria.
- Select thumbnail: Choose an image that learners see in the content card of the course.
- Alt text: Optionally, add a brief description of your thumbnail image.
- Prerequisites: Optionally, add the title of any course or content prerequisites that learners should complete before starting your course.
Once all details are complete, select Save changes. Your course is now ready to be published or saved as a draft. See Create a course workflow for more details about these options.
Language
Completing the Language area is not required when creating a course in LX Design Studio. You can publish your course to the Skillsoft Platform as soon as you complete the six main sections above. In the Language area, you can create translations of your course in any of the available languages.
To create a translation of your course:
- Select the Language area within your course.

- From the drop-down, select up to 10 languages to translate your course into. Note, you can create as many translations as you want for your course, but you must do 10 or fewer at a time.
- Select Create translations.
- In the Translations status tab below, you should see the languages you just selected as Translations in progress. It may take some time for your translations to process. If you exit the course, the translations will continue processing.
- When the translations have finished processing, they show in the Translations status tab under Translations completed. You must now build the videos and assessments for these new languages.
- Return to the Build section. From the language drop-down at the top, select the new language you just created. Follow the steps from the Build, Assess, and Content details sections in the new language to finish creating your course translations.
- Be sure to publish your translations to the platform once they are complete so learners can access them.
If you create translations for a course, you can see them on the Course Designer list view page. Locate the course from the list, and select the Show translations icon ![]() . This opens a drop-down that shows all of the translations you have created for that course and their creation status.
. This opens a drop-down that shows all of the translations you have created for that course and their creation status.
![]()