Sharing Custom Content, Journeys, and Channels to Child Sites
You can share the following from a parent to a child site:
Custom content items
Before sharing custom content across your sites, review the content sharing behaviors and settings to ensure you have the right setup for your organization.
You can share or stop sharing custom content at any time.
Share custom content
To share content from one site to another:
- Sign in to the site where the content items were published (source site). In order to share content, your login ID must be one of the following roles:
- Domain administrator can share from and to any site.
- Site administrator of the source site can only share content to other sites if the option to allow sharing is enabled.
- Content curator of the source site can only share content to other sites if the option to allow sharing is enabled.
- From the Content menu in the left navigation bar, select Content items.
- In the list of content items that displays, choose one of two actions.
- Share one item
- Select the Actions menu
 next to the item.
 - Select Manage content sharing.
- Select the Actions menu
- Share more than one item to the same set of sites
- Click Bulk Actions.
- Click the check box next to each item you want to share.
- Click Manage content sharing.
- Share one item
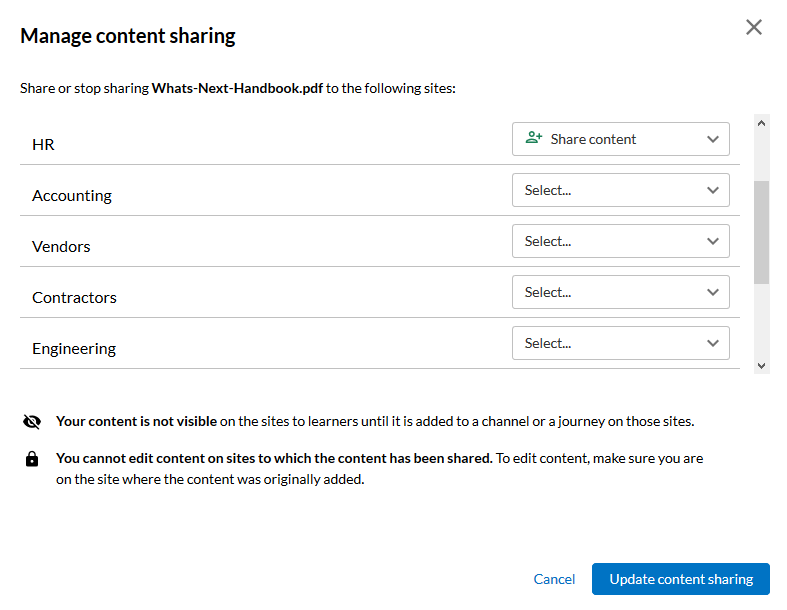
- In the list of sites available for sharing click Select, then Share Content next to each site where you want to share the content item.
- When done, click Update content sharing.
- You can tell a content item is shared when you see this icon:
 .
. - An item shared to your site is indicated by this icon:
 .
. - When you choose to View Details for a content item, you see sharing details.
- You can tell a content item is shared when you see this icon:
- Notify site administrators or content curators that you shared content to their site so that they can add it to relevant channels, journeys or assignments that are accessible by learners.
Stop Sharing Content Across Sites
Choosing to stop sharing content removes the content from a shared site.
To stop sharing content from a site:
- Sign in to the site where the content items were published (source site). In order to share content, your login ID must be one of the following roles:
- Domain administrator can share from and to any site.
- Site administrator of the source site.
- Content curator of the source site.
- From the Content menu in the left navigation bar, select Content items.
- In the list of content items that displays, choose one of two actions.
- Stop sharing one item
- Select the Actions menu next to the item.
- Select Manage content sharing.
- Select the Actions menu
- Stop sharing more than one item to the same set of sites
- Click Bulk Actions.
- Click the check box next to each item you want to share.
- Click Manage content sharing.
- Stop sharing one item
- In the list of sites available for sharing click Stop sharing next to each site where you want to stop sharing the content item.
- When done, click Update content sharing.
Share custom journeys
Only domain admins can share custom journeys to child sites.
You can share or stop sharing custom journeys at any time.
Share custom journeys
To share custom journeys from one site to another:
- Sign in to the site where the journeys were published (source site). In order to share journeys, your login ID must a domain admin. Site admins and content curators cannot share journeys.
- From the Content menu in the left navigation bar, select Journeys.
- In the list of journeys that displays, select the Actions menu next to the item, then select Manage journey sharing.
- In the list of sites available for sharing, next to each site where you want to share the journey, click Select, then Share journey.
- For each site where you shared the journey, select Edit audiences.
- Choose which audiences from the child site should have access to the custom journey. Start typing the audience name, then select it from the list by clicking the plus sign. If you want all users in the child site to see the journey, select All users. All audiences you select display on the Selected Audiences tab. When you are done adding all the audiences, select Done.
- When done selecting child sites and adding audiences for each child site, click Update journey sharing.
- Select Done.
- On the Journey page of a parent site, you can tell a journey is shared when you see Shared in the Scope column.
- When you click on Shared from the Scope column, you see sharing details.
- A journey shared to your child site shows a Shared badge to the left of the title on the Journey page.
- Notify site administrators or content curators that you shared a journey to their site so that they can add it to relevant subjects or assignments that are accessible by learners.
Stop sharing custom journeys
To stop sharing custom journeys from one site to another:
- Sign in to the site where the journeys were shared. In order to stop sharing journeys, your login ID must a domain admin. Site admins and content curators cannot stop sharing journeys.
- From the Content menu in the left navigation bar, select Journeys.
- In the list of journeys that displays, select the Actions menu next to the item, then select Manage journey sharing.
- In the list of sites available for sharing, next to each site where you want to share the journey, click Share journey, then Stop sharing. Be sure that removing shared journey doesn't affect any assignments or learning programs. Learners may not be able to complete their work.
- When done click Update journey sharing.
- Select Done.
- Notify site administrators or content curators that you stopped sharing a journey to their site so that they can add it to relevant subjects or assignments that are accessible by learners.
Share custom channels
Only domain admins can share custom journeys to child sites.
Share custom channels
To share custom channels from one site to another:
- Sign in to the site where the channels were published (source site). In order to share channels, you must have the role of domain admin.
- From the Content menu in the left navigation bar, select Channels.
- In the list of channels that displays, select the Actions menu next to the item, then select Manage channel sharing.
- In the list of sites available for sharing, next to each site where you want to share the channel, click Select, then Share channel.
- For each site where you shared the channel, select Edit audiences.
- Choose which audiences from the child site should have access to the custom channel. Start typing the audience name, then select it from the list by clicking the plus sign. If you want all users in the child site to see the channel, select All users. All audiences you select display on the Selected Audiences tab. When you are done adding all the audiences, select Done.
- When done selecting child sites and adding audiences for each child site, click Update channel sharing.
- Select Done.
- On the Channel page of a parent site, you can tell a channel is shared when you see Shared in the Scope column.
- When you click on Shared from the Scope column, you see sharing details.
- A channel shared to your child site shows a Shared badge to the left of the title on the Channel page.
- Notify site administrators or content curators that you shared a channel to their site so that they can add it to relevant subjects that are accessible by learners.
Stop sharing custom channels
To stop sharing custom channels from one site to another:
- Sign in to the site where the channels were shared. In order to share channels, you must have the role of domain admin.
- From the Content menu in the left navigation bar, select Channels.
- In the list of channels that displays, select the Actions menu next to the item, then select Manage channel sharing.
- In the list of sites available for sharing, next to each site where you want to share the channel, click Share channel, then Stop sharing.
- When done, click Update channel sharing.
- Select Done.
- Notify site administrators or content curators that you stopped sharing a channel to their site so that they can add it to relevant subjects that are accessible by learners.