Assign a Percipio User Attribute
Because the Percipio User attribute values are user-specific (the attribute is assigned to multiple users, but each value of the attribute is typically only assigned to a single user), you must create the value within a user's profile.
To assign a Percipio User attribute to an individual user
- Select Users > User Management from the left navigation bar.
- Select New User. The Create User page displays.
- Complete all required fields.
- In the User Attributes section, locate the Percipio User attribute.
- Type in a corresponding user ID or email address. (For example, if the Percipio User attribute is manager, enter the user ID or email address of the user's manager. The email address must be associated with the manager's profile in Percipio.) This becomes a value of the attribute.
- Select Create. The user ID is added to the attribute, and the attribute is assigned to the user.
Example
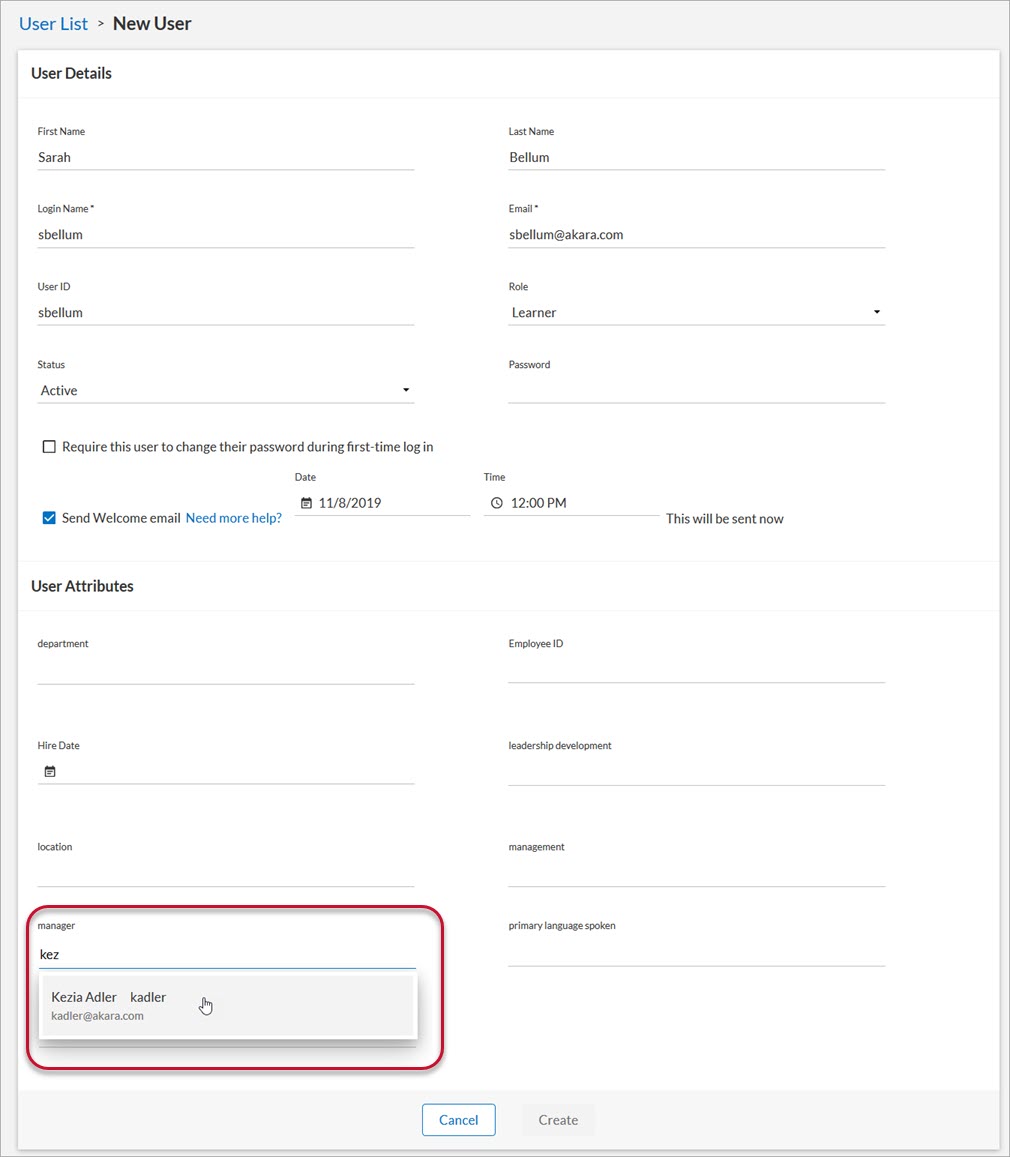
You create a new user named Sam Bellum. They report directly to Kezia Adler (whose user ID within Percipio is ka_adler), so you want to create an association from Sam to Kezia because this association is used when creating audiences, and you want Sam to be in Kezia's audience for assignments and reporting data.
On the Create User page, when creating Sam's user profile, you would begin typing their manager's name in the manager attribute field and select it from the drop-down.

- Select Users > User Management from the left navigation bar.
- Locate the user you want to edit.
- In the Actions column, click
 >
>  . The Edit User page displays.
 - In the User Attributes section, locate the Percipio User attribute.
- Type in a corresponding user ID. (For example, if the Percipio User attribute is manager, enter the user ID of the user's manager.) This becomes a value of the attribute.
- Select Update. The value is added to the attribute, and the attribute is assigned to the user.
Example
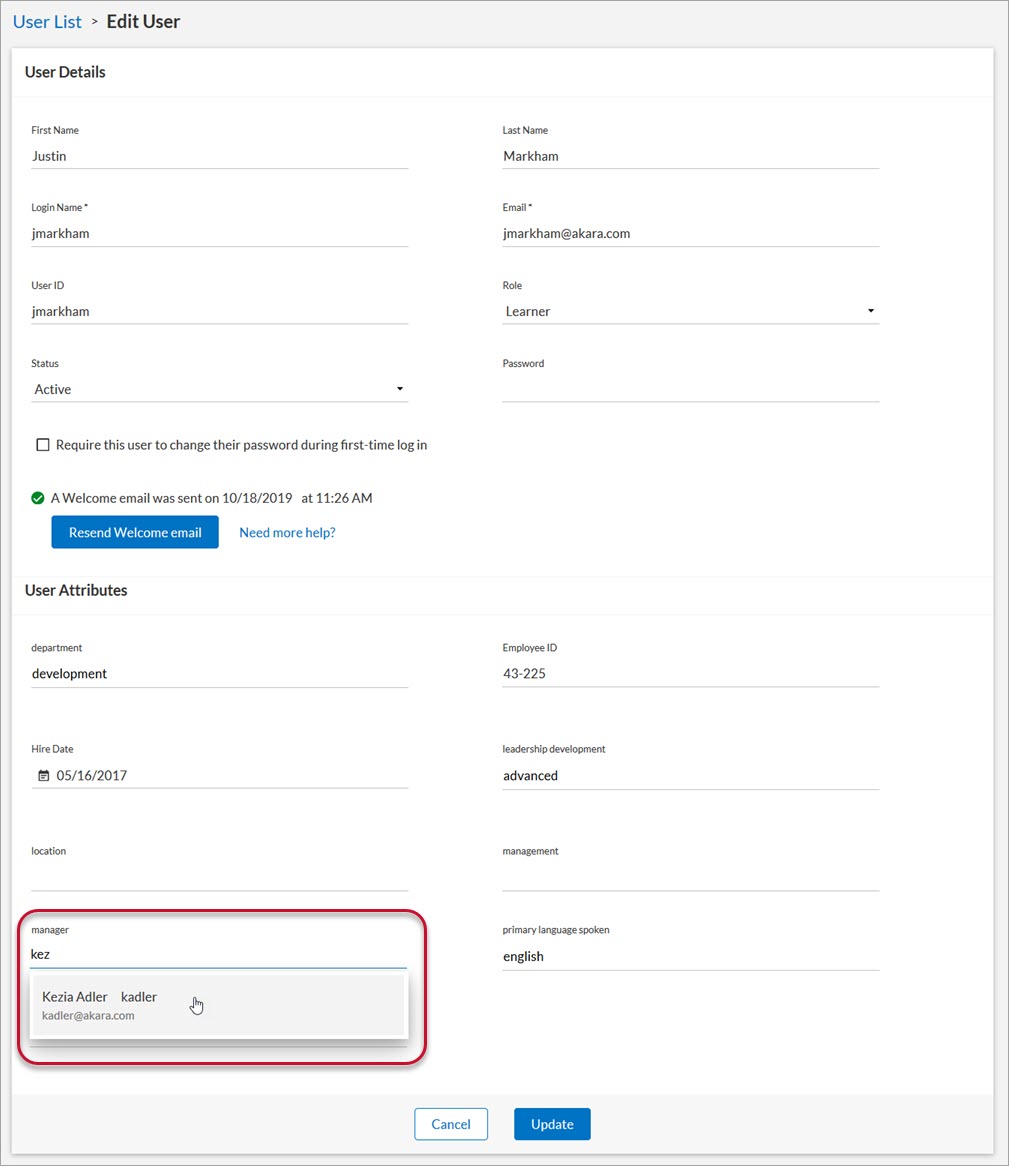
You edit an existing user named Jamie Markham. They recently moved teams and now report directly to Kezia Adler (whose user ID within Percipio is ka_adler), so you want to create an association from Jamie to Kezia because this association is used when creating audiences, and you want Justin to be in Kezia's audience for assignments and reporting data.
On the Edit User page, when modifying Jamie's user profile, you would begin typing their manager's name in the manager attribute field and select it from the drop-down.

To assign a Percipio User attribute to multiple users
- Select Users > User Management from the left navigation bar.
- Click Download Template to download a blank CSV file.
- Once downloaded, open the CSV file and enter your users' data. For details about the fields, see Download a CSV File.
- In the column with the header name that matches your Percipio User attribute, enter an existing, corresponding user ID. (For example, if the Percipio User attribute is manager, enter the user ID of the user's manager. The manager must already be set up in Percipio.) User IDs entered here become values of the attribute.
- Save the CSV file.
- On the User List page, click Import.
- Click the PREVALIDATE tab.
- Click Browse to locate your CSV file.
- Click Prevalidate users.
- Fix any errors that may occur. See Bulk Import Error Messages for details.
- Click the IMPORT tab.
- Click Import. The values are added to the attribute, and the attribute is assigned to the users.
- Select Users > User Management from the left navigation bar.
- Select Download List to download a CSV file containing all of your users and their profile data.
- Once downloaded, open the CSV file.
- In the column with the header name that matches your Percipio User attribute, enter an existing, corresponding user ID. (For example, if the Percipio User attribute is manager, enter the user ID of the user's manager. The manager must already be set up in Percipio.) User IDs entered here become values of the attribute.
- Save the CSV file.
- On the User List page, select Import.
- Select the PREVALIDATE tab.
- Select Browse to locate your CSV file.
- Select Prevalidate users.
- Fix any errors that may occur. See Bulk Import Error Messages for details.
- Select the IMPORT tab.
- Select Import. The values are added to the attribute, and the attribute is assigned to the users.
- Select Users > User Management from the left navigation bar.
- Select Download List to download a CSV file containing all of your users and their profile data.
- Once downloaded, open the CSV file and enter additional new user data at the bottom of the list.
- In the column with the header name that matches your Percipio User attribute, enter an existing, corresponding user ID. (For example, if the Percipio User attribute is manager, enter the user ID of the user's manager. The manager must already be set up in Percipio.) User IDs entered here become values of the attribute.
- Save the CSV file.
- On the User List page, click Import.
- Click the PREVALIDATE tab.
- Click Browse to locate your CSV file.
- Click Prevalidate users.
- Fix any errors that may occur. See Bulk Import Error Messages for details.
- Click the IMPORT tab.
- Click Import. The values are added to the attribute, and the attribute is assigned to the users.
Once you've assigned the Percipio User attribute, return to the User Attributes list (Users > User Attributes) and locate it in the list. It now displays the number of values assigned to the attribute, and when you click that number, a list of all values for the attribute display.