Self Registration
Self registration allows learners to create an account on your Skillsoft Platform site without an administrator creating it for them. You may want to turn on self registration if you require your vendors or partners to take your training, but they are not part of your HRIS data feed into the platform.
On this page you turn on the ability for learners to self register and then configure the parameters. To get started:
- Access this page from the left navigation bar, Site Settings > Site Configuration
- From the left navigation in the Site Configuration page, select Self Registration.
- If you want to use self registration, make sure the top-most setting is On. Self registration is Off by default.
- When self registration is on, you can choose how you want learners to interact with it by specifying the parameters on this page:
- Which email domains to allow
- Whether to show a registration link on the login page
- Whether to require admin approvals
- Whether to add a custom message on the registration page
- Whether to show your internal support contact
- What user attributes the learner must specify to create their account.
- After you specify all your parameters, select Save self registration.
To see how your changes impact the self registration process for a user, view the Self Registration Learner Experience.
Self registration link
The platform offers a unique URL that you can share directly with learners or put on a web page that when accessed by a learner takes them to the self-registration page.
If you prefer to restrict where learners can register from, use this URL instead of turning on the link from the login page.
Security
To help prevent unauthorized learners from self registering on your site, you can limit who can self register.
- Allowed domains:Email address is a required field for self registration. To limit which email addresses the platform accepts from learners who are self registering, enter the specific email domains that you will allow. For example: You do business with Akara. Enter akara.com on the Allowed domains line. If a learner mistypes their email address or tries to enter a gmail address, they will not be able to self register.
- Show a link to register on the login page: This option is off by default to help limit who sees the self registration link. However, if you want learners to self register when they reach the login page, select this option. A link for Create an account displays under the Forgot Password link.
- Require approval for self registration requests: This option is off by default. Select this option to require a site admin to approve any registration request.
- When selected, all site admins receive a notification and can approve self registration requests from the Self Registration tab of User Management.
- To limit the number of site admins receiving self registration request notifications, select Edit, then choose only those admins who should receive notifications. If you do not select any site admins, all site admins receive the notification.
- To approve or deny a request follow the link in the notification or navigate to the Self Registration tab of User Management.
Note: If you limit the number of site admin(s) who receive self registration request notifications, you are also limiting who will see the Self Registration Approvals tab from the User Management page in the platform. Only site admins who are set to receive notifications are able to approve pending requests.
Languages
Within this section you can customize what appears on the self registration page. See the learner experience for a visual of how this displays to the learner.
- Custom welcome message: Using 255 characters provide brief instructions for learners arriving at the self registration page.
You can add the same message in multiple languages. After entering in the English version, select another language from the Language drop down and then add the localized copy. If your learner uses a language not supported by the platform, the default display is English.
- Show the internal support contact on the self registration page: If you specified an internal support contact, you can have their name display on the self registration page. This way if learners have issues, they can contact someone.
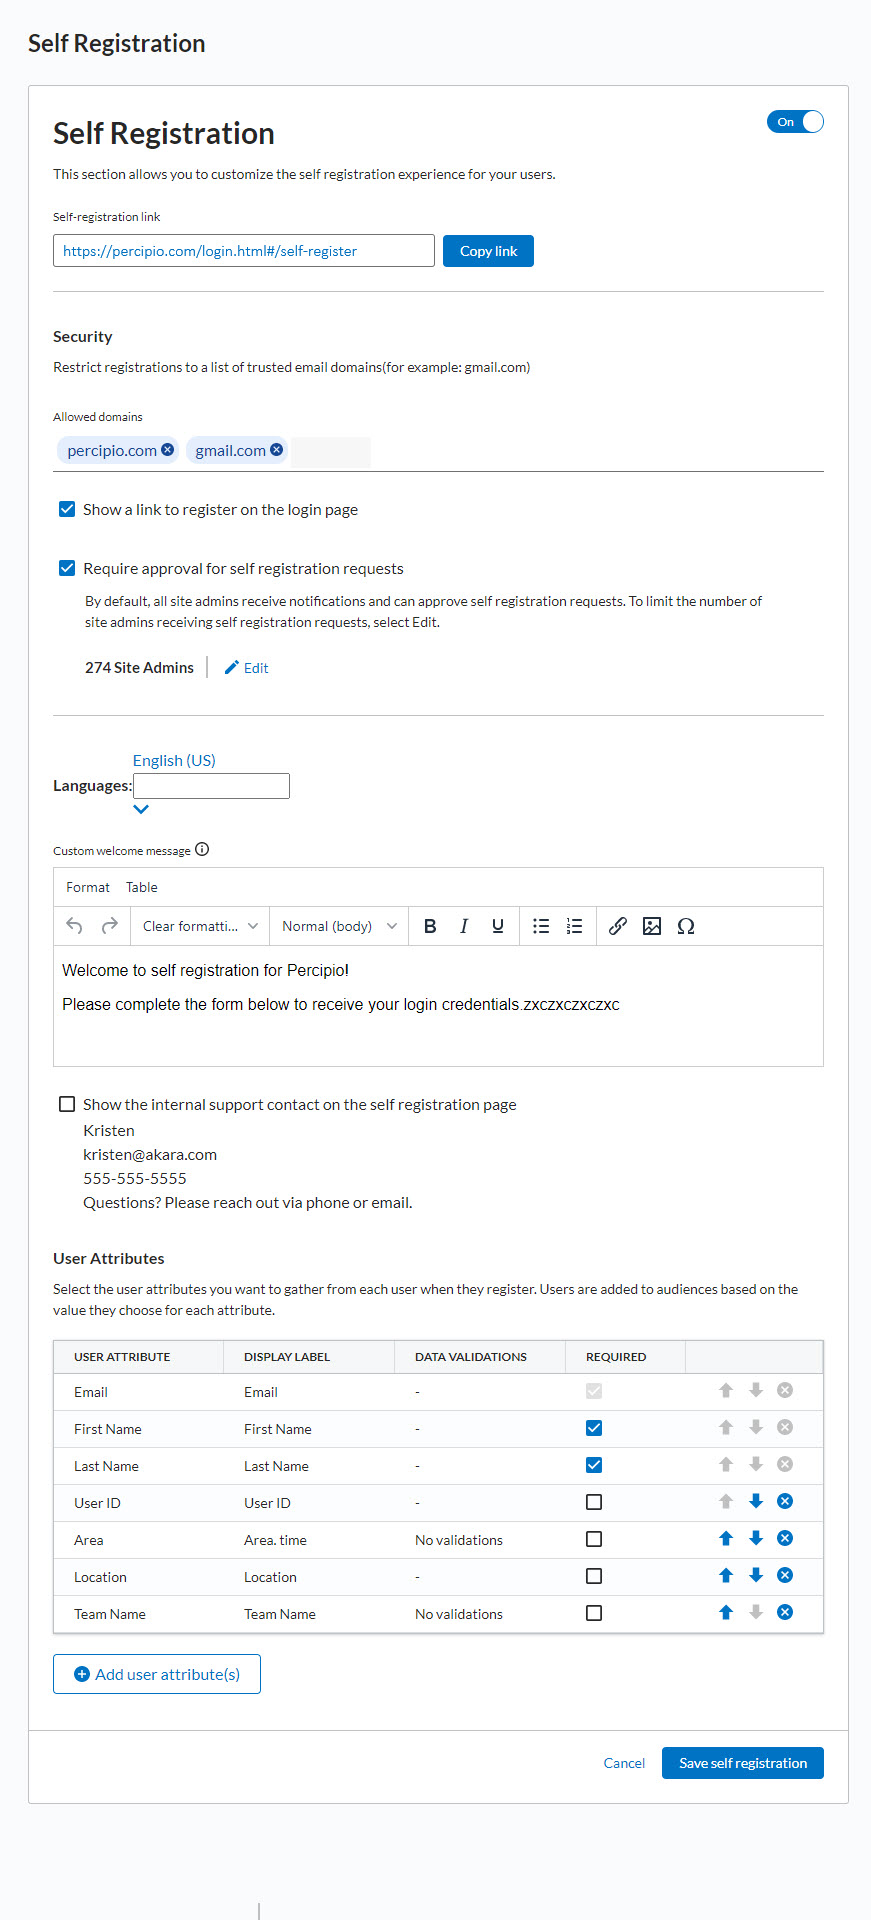
User attributes
In this section, you choose which of your user attributes you want learners to specify when they create their account. This is useful because the platform automatically adds learners into audiences based on values they specify. This helps you avoid manual user administration.
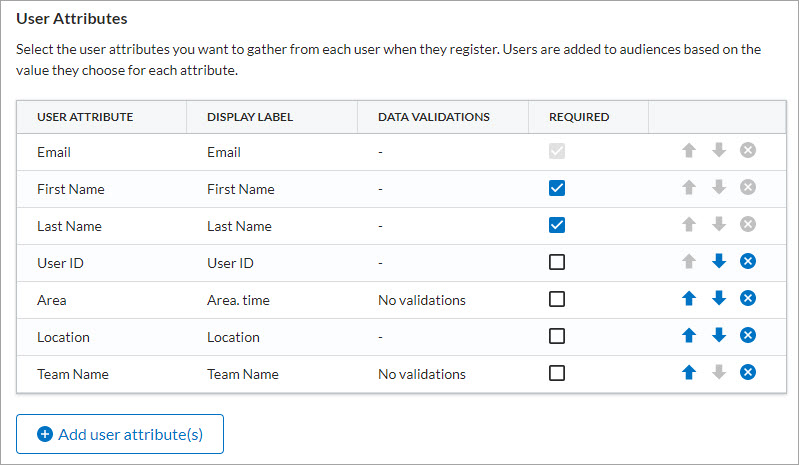
To add user attributes:
- Select the Add user attributes button.
- Select the attributes you want users to see when they self register.
- For each string attribute you select, identify if you want the platform to validate a user's entry. Validation options include:
- No validations: Users can enter any characters; the platform does not check.
- Allow only letters: The platform checks that the user only entered letters. You might use this setting if the string attribute is for a city or country.
- Allow only numbers: The platform checks that the user only entered numbers. You might use this setting if the string attribute is for a telephone number or postal code.
- Allow only alphanumeric: The platform checks that the user only entered letters or numbers. You might use this validation when the string attribute is a street address.
- Allow special characters: The platform checks that the user entered letters, numbers, or accepted special characters of: @ - _ & . , ? ( ) / and space. You might want to use this validation if the string is for capturing an alternate email address.
- Select Add user attribute(s).
When adding user attributes:
- Email address is the only required field. The platform uses the email address to provide a verification code to the learner authorizing them to log in.
- To prevent learners from seeing any personal information related to your company and its employees, only list, string, and date attribute types are available for selection. You cannot add a Skillsoft Platform user type.
- You have the option to make any attribute, other than email, required or optional by selecting the Required check box. Required fields show to the learner with an asterisk. You may want to make an attribute required if it is used in defining an audience.
- You can choose the order the attributes display to the learner by using the up and down arrows.
- If you define an attribute name in another language using the display label field, and the user's browser is configured for that language, the user sees the field in that language.
To remove a user attribute from the list, select the X to the right of attribute in the main list.