Schedule Reports
If you need to regularly run a report, you can schedule it to run automatically and have the system notify you when it's ready. Setting a schedule allows you to focus on other things until you get notified. Scheduled reports are stored in the Percipio Downloads tab for 14 days. If you want the report available for a longer period of time, you can choose to have the reports sent to an external location, such as an SFTP site of your choosing. From the external location, other business systems can import the reports for further analysis and storage.
When you set up a schedule, you can also choose to share the scheduled report with users in your company who have a Skillsoft Platform user account. These users get notified when the report is ready. These users can have any Skillsoft Platform role. If a shared user only has a role of learner, they can only download the report itself, they do not see any other admin feature or function. If the recipient of the shared report is a learner or another role who is not an owner of an audience, they will not see any user data records in the report if the data access setting is set to restricted.
If the shared user is a learner and you set the data access option to restricted, the learner will not see any user data in the report because learners cannot be an owner of audience.
Because downloaded reports are only available for 14 days, you can only share a report during that 14-day duration. On the fifteenth day, the report is removed from the download list and shared users lose access to it in the platform.
Schedule a report
To schedule a report and share it with others:
- From the left navigation bar, select Analytics, then select the All reports tab.
- Select the report you want to schedule and customize the report data you want to see.
- Depending on the report you selected:
- If you selected a Standard report, select Create report schedule. The schedule always uses whatever filters you defined at the time you created the schedule.
- If you selected a Report template, from Actions, select Create report schedule. If you don't save the template first as a custom template, the schedule uses the default settings of the report template to generate the scheduled report. If you save the template first, the schedule always uses the last saved template to generate the scheduled report.
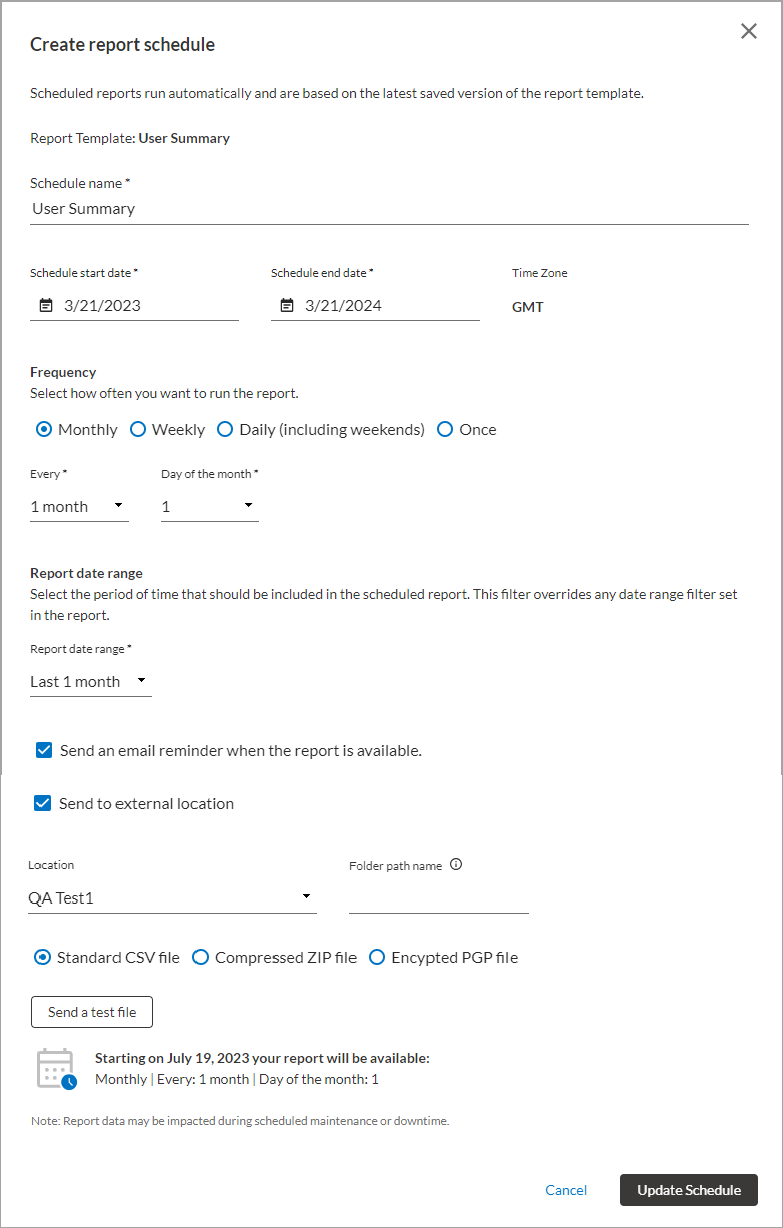
- Enter the schedule information, including:
- Schedule name: The name of the schedule so you can find it in the Scheduled reports list.
- Schedule start and end dates: Specify the date that the schedule should start and end. Both are required.
- Frequency: Select how often the report should run: Daily, Weekly, Monthly, or One time. When you select Daily as your frequency, the report is generated each day based on the selected report date range.
- Report date range: Select the period of time for the data included in the report. This filter overrides any date range filter you set when creating this report and applies to all schedule frequencies, including Daily. If you are a user with the role of manager and are running either Assignment Summary by User or Assignment Detail by User report, you can choose the option All History from the date range to see all activity recorded. All History can be used with any frequency.
- Send an email reminder when the report is available: Select this option if you want to get an email reminder when your report is ready.
- Send to external location: Select this option if you want to send your scheduled report to a location outside the platform such as an SFTP site. The file name of the report that is sent to the external location is of the format: [report name + time stamp of when the report was generated]. This ensures that previous reports do not get overridden.
If you select this option, you must also specify:
- Location: From the drop down list select the location to receive the file. If you do not see the location in the list, reach out to your Skillsoft account team.
- Folder path name: Enter the directory path to the folder on the location where you want to send the file. If the folder does not exist, it will be created. If you leave this field blank, the file is delivered to the default folder used when logging into the external location.
- Type of file: Standard CSV, Compressed ZIP file, or Encrypted PGP file.
After making all the specifications, we recommend that you send a test file by selecting the Send a test file button. This ensures the report is going to the right location and can be accessed.
- Select Create schedule. You get a confirmation that your report is scheduled. Your new scheduled report will run within the next 24 hours and display between 9:00 a.m. and 1:00 p.m. UTC the next day.
- You have three options, select one:
- Done: Returns you to the report.
- Edit report schedule: Returns you to the Schedule page so you can make modifications to the report schedule.
- Share scheduled report: Takes you to the Share schedule report page so you can specify names or audiences with whom to share the report.
- Enter up to 10 users or 10 audiences.
- Check whether users should get an email notification when the scheduled report is ready.
- Change the Sender name if applicable. This shows in the From line in the recipient's email. We recommend using an email the recipient recognizes so it does not end up in a junk folder or ignored.
- Enter up to a 250 character message letting the recipients know what is in the report and why they are getting it.
- Determine whether recipients getting this report should have a restricted view. If the recipient is a learner, they will not see any user data on the report if you set it to restricted view.
- Restricted view: Select this option if you want recipients of the report to see only learner data from audiences that they own. For example, a manager in the APAC region owns an audience with only learners from the APAC region, and the report includes users from all regions. If you select Restricted, the manager only sees learners on the report that in the APAC region that are part of their audience. If the recipient of the shared report is a learner or another role who is not an owner of an audience, they will not see any user data records in the report.
- Global view:Select this option if you want recipients of the report to see all learner data regardless of audiences that they own.
- To share the report, select Share scheduled report. Otherwise, you can Cancel to return to the report.
Remove a report schedule
When you remove a report schedule, the schedule and any sharing associated with the report is removed. Reports already run stay active in the Downloads tab for the full 14 days.
To remove a schedule:
- From the left navigation bar, select Analytics, then select the Scheduled reports tab.
- Locate the report schedule that you want to remove, and from the Actions column, select Remove report schedule.
- Select Yes, remove schedule. If you change your mind you can select No, keep schedule.
Edit a report schedule
When you edit a report schedule, any new reports generated after editing assume the new schedule parameters. Reports already run stay active in the Downloads tab for the full 14 days.
To edit a schedule:
- From the left navigation bar, select Analytics, then select the Scheduled reports tab.
- Locate the report schedule you want to edit, and from the Actions column, select Edit report schedule.
- Make any changes to the report schedule.
- Select Update schedule. If you change your mind you can select Cancel.
Change sharing on scheduled report
You can add or remove users or audiences from a scheduled report that you shared. The users and audiences you add get the next report run. Users or audiences you remove, still see existing reports already run for the full 14 days, but do not get any new reports.
To change sharing on a scheduled report:
- From the left navigation bar, select Analytics, then select the Scheduled reports tab.
- Locate the report schedule for which you want to change sharing, and from the Actions column, select Manage schedule sharing.
- Make any changes to the sharing.
- Select Share scheduled reports. If you change your mind you can select Cancel.
File naming convention for downloaded reports
When you schedule a report, the platform names the file as follows depending on whether the report is a standard report or based on a report template.
- The schedule name that shows on the download list is as follows for each type of report:
- Standard report: {Schedule Name}_{Generic Report Name} Report.csv
- Template report: {Schedule Name}_{Template Name} Report-{date and time of last data refresh}.csv
- If you send the report to an SFTP, the file name of the report includes the completed time of the report (run time).
- Standard report: {Schedule Name}_{Generic Report Name} Report-run {completed date and time report ran}.csv
- Template report: {Schedule Name}_{Template Name} Report-{time of last data refresh} Report run {completed date and time report ran}.csv