Policy Management
To help ensure compliance with your corporate polices and procedures, Skillsoft provides you with settings to help manage your policies with regards to using the Skillsoft Platform, LX Design Studio, Certifications, and CAISY. You can manage whether:
- To show the standard Skillsoft license agreement and privacy notice from the login page and footer.
- Users have to accept your corporate policy before they access Skillsoft Percipio Platform.
- Users have to accept your corporate AI policy before they access AI components such as CAISY AI simulations.
- Users have to accept your Certification policy before accessing a Certification path.
- Users have to accept your LX Design Studio policy before accessing LX Design Studio to create, edit, or collaborate on custom content.
To get started, from the left navigation bar, select Site Settings > Policy Management.
Skillsoft license agreement
From Policy Management, select License Agreement.
By default, users can view the standard Skillsoft license agreement from the footer of all pages including the login page. If you do not want users to see the license agreement, turn this setting Off.
Skillsoft privacy notice
From Policy Management, select Policy Notice.
By default, users can view the standard Skillsoft privacy policy (privacy notice) from the footer of all pages including the login page. If you do not want users to see this policy, turn this setting Off.
Cookie preferences
Individuals may use browser settings to refuse or disable cookies. If an individual has disabled or refused all cookies, some parts of Skillsoft Percipio Platform may become inaccessible or not function properly.
See Cookies for more information on how Skillsoft Percipio Platform uses cookies.
Custom policies
When you add custom policies, you help to inform your users about how your company should use the platform and the features within it.
You can create multiple custom policies.
-
Custom corporate policy: Displays to users when they first log into the platform.
-
AI custom policy: Displays to users when they launch CAISY AI simulations.
-
Certification path policy: Available from designated certification paths pages and to specific audiences.
To access custom policies, from Policy Management, select Custom policies.
Custom corporate policy
The custom corporate use policy only displays for each user once unless you update the policy.
If you create a policy for a language other than English, your users' browser language determines which policy displays. If a user's browser language is not one of Skillsoft Percipio Platform's supported languages, the English policy displays, so you must have an English version prior to creating it in any additional languages.
- From the left navigation on the Policy Management page, select Custom Policy.
- Select On to have the policy viewable to users from the footer and sign-in pages. If set to Off, your policy will not display to your users.
- Enter a Policy Title.
- Enter the Policy Content and format your text using the toolbar options (keyboard accessible instructions).
- If users need to accept the policy when they sign in, select the check box next to Require users to accept this policy before accessing Skillsoft Percipio Platform. If you leave this blank, your policy appears only in the footer and the sign-in page. This setting applies to all languages.
- Click Save custom policy.
- From the left navigation on the Policy Management page, select Custom Policy.
- Select Select display language dropdown, then Manage display languages.
- Choose the languages from the list and select Save to save changes. For each language you select you need to define all criteria.
- Select a language from the list to enter its details.
- Enter a Policy Title and the Policy Content in the language you chose.
- Repeat steps 4 and 5 for each additional language.
- Select Save custom policy. You cannot save changes until all details are entered for all selected languages.
- From the left navigation on the Policy Management page, select Custom Policy.
- If applicable, select the language drop-down and select the language of the policy you wish to edit.
- Modify the Policy Title or Policy Content.
- Click Save custom policy.
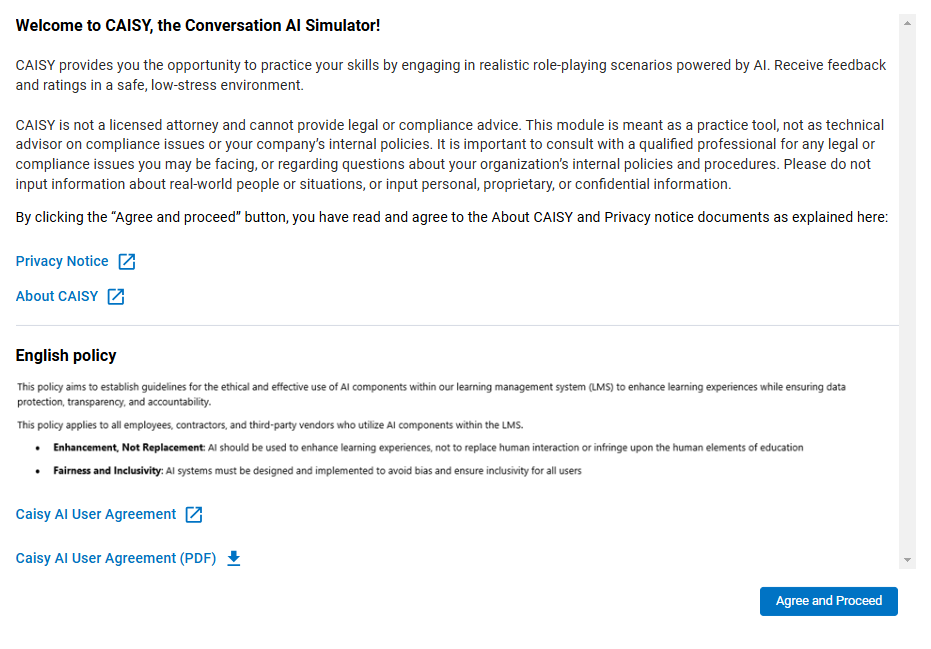
Custom AI policy
This section allows you to add a custom AI policy that’s shared across your Skillsoft Platform experience. When turned on, your custom AI policy will display as a modal on applicable pages.
If you create an AI policy for a language other than English, your users' browser language determines which policy displays. If a user's browser language is not one of Skillsoft Percipio Platform's supported languages, the English policy displays, so you must have an English version prior to creating it in any additional languages.
- From the left navigation on the Policy Management page, select Custom Policy.
- Scroll to the AI Policy section.
- Select On to have the policy viewable to users from the footer and settings pages of AI components. If set to Off, your policy will not display to your users.
- Enter a Policy Title.
- Enter the Policy Content and format your text using the toolbar options (keyboard accessible instructions).
- To provide additional information about your policies, optionally, add a Custom URL and URL title that shows under your Policy content in the policy modal.
- To provide additional information about your policies, optionally, upload a PDF file that shows under your Policy content in the policy modal.
- You can set this policy to display when users access CAISY AI simulations. You can choose:
- If users need to accept the policy only the first time they access CAISY, select the check box next to: Users accept this policy only the first time they launch a simulation.
- If users need to accept the policy every time they access CAISY, select the check box next to: Users must accept this policy at the beginning of every simulation.
- Click Save custom policy.
- From the left navigation on the Policy Management page, select Custom Policy.
- Scroll to the AI Policy section.
- Select Select display language dropdown, then Manage display languages.
- Choose the languages from the list and select Save to save changes. For each language you select you need to define all criteria.
- Select a language from the list to enter its details.
- Enter a Policy Title and the Policy Content in that language.
- To provide additional information about your policies, optionally, add a Custom URL and URL title that shows under your Policy content in the policy modal in that language.
- To provide additional information about your policies, optionally, upload a PDF file that shows under your Policy content in the policy modal in that language.
- You can set this policy to display when users access CAISY AI simulations in that language. For each, you can choose:
- If users need to accept the policy only the first time they access CAISY, select the check box next to: Users accept this policy only the first time they launch a simulation.
- If users need to accept the policy every time they access CAISY, select the check box next to: Users must accept this policy at the beginning of every simulation.
- Repeat steps 5 through 9 for each additional language.
- Select Save custom policy. You cannot save changes until all details are entered for all selected languages.
- From the left navigation on the Policy Management page, select Custom Policy.
- Scroll to the AI Policy section.
- If applicable, select the language drop-down and select the language of the policy you wish to edit.
- Modify the any of the fields.
- Click Save custom policy.
Custom certification policy
You can add a certification policy to one or more certification paths to help your users stay informed about your company requirements for certification. You can also target each certification policy to a specific audience so only specific learners see it when they access a certification path. By default, this setting is off and no certification paths have a policy associated with them. If you add a certification policy, it displays on the main certification path page for the learner in the designated audience to access. Each certification path can display multiple policies.
For example, you might have an overall certification policy that you make available for all certification paths and all audiences. You can then add an additional policy that only software engineers see when they access programming certification paths.
- From the left navigation on the Policy Management page, select Custom Policy.
- Scroll to the Certification Policy section.
- Select On to have the policy viewable to users from the certification path page. If set to Off, your policy will not display to your users.
- Select Add new policy.
- Enter a Policy Title.
- Enter the Policy Content and format your text using the toolbar options (keyboard accessible instructions).
- To provide additional information about your policies, optionally, add a Custom URL and URL title that shows under your Policy content in the policy modal.
- To provide additional information about your policies, optionally, upload a PDF file that shows under your Policy content in the policy modal.
- Optionally, Select an audience. When you select an audience, the policy only displays to learners in that audience. If you do not select an audience, the policy displays to all learners.
- Optionally, Select a certification path. When you select a certification path, the policy only shows on that certification path's page and no other. If you do not select a certification path, the policy displays on all certification paths. This allows you to enter specific information for specific policies.
- Select Save changes.
- To enable the policy on the designated certification paths, ensure the check box is checked. If you do not check the box, the policy does not display.
- Select Save changes. If you do not select Save changes after checking the box, the policy will not show.
- From the left navigation on the Policy Management page, select Custom Policy.
- Scroll to the Certification Policy section.
- Select Add new policy.
- Select Select display language dropdown, then Manage display languages.
- Choose the languages from the list and select Save to save changes. For each language you select you need to define all criteria.
- Select a language from the list to enter its details.
- Enter a Policy Title and the Policy Content in that language.
- To provide additional information about your policies, optionally, add a Custom URL and URL title that shows under your Policy content in the policy modal in that language.
- To provide additional information about your policies, optionally, upload a PDF file that shows under your Policy content in the policy modal in that language.
- Repeat steps 6 through 9 for each additional language. You cannot save changes until all details are entered for all selected languages.
- Select Save changes.
- To enable the policy on the designated certification paths, ensure the check box is checked. If you do not check the box, the policy does not display.
- Select Save changes. If you do not select Save changes after checking the box, the policy will not show.
- From the left navigation on the Policy Management page, select Custom Policy.
- Scroll to the Certification Policy section.
- Locate the policy to edit in the list, and select Edit next to it.
- If applicable, select the language drop-down and select the language of the policy you wish to edit.
- Modify the any of the fields.
- Select Save changes.
- From the left navigation on the Policy Management page, select Custom Policy.
- Scroll to the Certification Policy section.
- Locate the policy to edit in the list, and select Delete next to it.
- Confirm that you want to delete it. Deleting the policy removes all languages.
Custom LX Design Studio policy
The custom LX Design Studio policy only displays for each user once unless you update the policy.
If you create a policy for a language other than English, your users' browser language determines which policy displays. If a user's browser language is not one of Skillsoft Percipio Platform's supported languages, the English policy displays, so you must have an English version prior to creating it in any additional languages.
- From the left navigation on the Policy Management page, select LX Design Studio Policy.
- Select On to have the policy viewable to users when they first access LX Design Studio. If set to Off, your policy will not display to your users.
- Enter a Policy Title.
- Enter the Policy Content and format your text using the toolbar options (keyboard accessible instructions).
- If users need to accept the policy when they sign in, select the check box next to Require users to accept this policy before accessing LX Design Studio. If you leave this blank, your policy appears only in the footer. This setting applies to all languages.
- Click Save custom policy.
- From the left navigation on the Policy Management page, select LX Design Studio Policy.
- Select Select display language dropdown, then Manage display languages.
- Choose the languages from the list and select Save to save changes. For each language you select you need to define all criteria.
- Select a language from the list to enter its details.
- Enter a Policy Title and the Policy Content in the language you chose.
- Repeat steps 4 and 5 for each additional language.
- Select Save custom policy. You cannot save changes until all details are entered for all selected languages.
- From the left navigation on the Policy Management page, select LX Design Studio Policy.
- If applicable, select the language drop-down and select the language of the policy you wish to edit.
- Modify the Policy Title or Policy Content.
- Click Save custom policy.