Edit an Assessment
- From the Home page or Apps page, select Assessments. You now see the Assessments page.
- Locate the assessment you want to edit and select the edit icon
 . You land on the Question Generation page. To expand the left navigation and see the other pages, select the right arrow icon at the bottom. You can edit any of the pieces of the assessment or re-generate the whole assessment if you want.
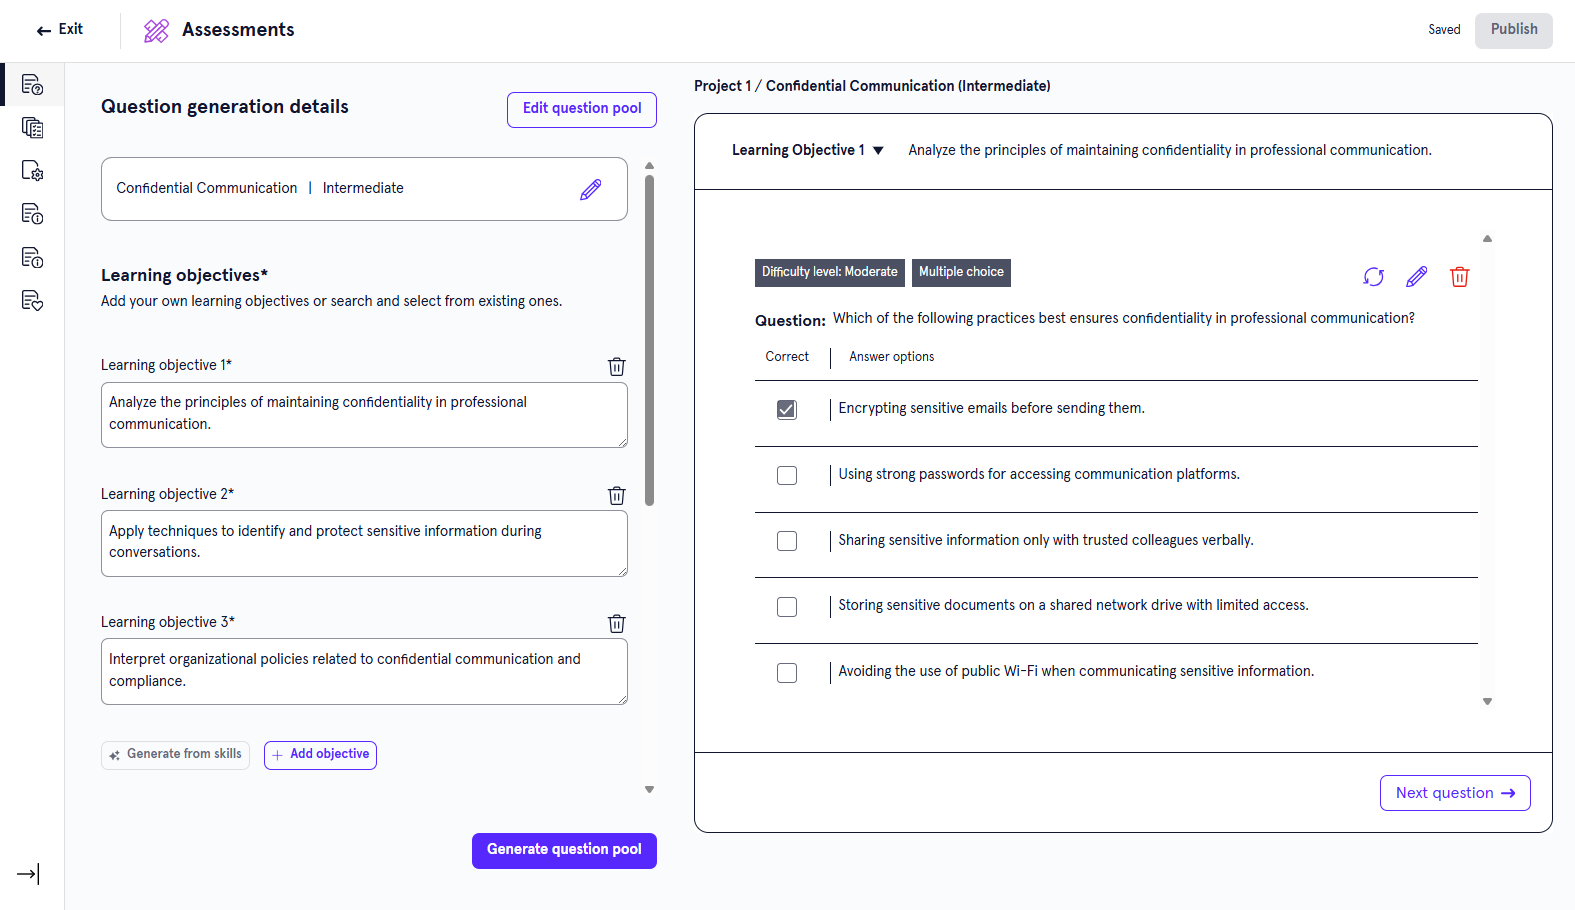
- Edit any of the following components:
- Now that your assessment is complete, you can:
- Exit: This saves your assessment as a draft that you can return to later.
- Preview: This opens your assessment in the learner view so that you can ensure it works as expected.
- Publish: This publishes your assessment to your Skillsoft Platform site for learners to see.
Edit question criteria and learning objectives
-
At the top of the Question Generation page you see the skill and proficiency level for the assessment. You can select the edit icon
to make any changes to this field. This is the primary focus skill of your assessment. - Specify the learning objectives. Learning objectives are what learners should achieve upon completing this assessment. If you came from the Design Assistant, AI creates the learning objectives for you based on your conversation. You can edit whatever learning objectives the Design Assistant creates for you. If you started in the app, we recommend you start with the Generate from skills option and then refine, but you can also add your own. To generate objectives, you can:
- Select Generate from selected skill and allow your Design Assistant to create learning objectives based on the skills you entered. You can then edit or delete any of the learning objectives until they are to your liking. You can also add objectives to the AI-generated list.
- Select Add learning objective and write out what learners are being assessed on. Continue to add objectives until your list is complete.
- Select Find objective to search for learning objectives from a Skillsoft Platform course.
To help ensure the Assessment app generates questions that measure what you want, the app runs a check on the learning objectives. This check ensures the learning objectives meet standards for clarity and instructional quality defined by Blooms taxonomy. If learning objectives do not meet the criteria of the design brief, you will not be able to continue to generate questions. However, if the objective is in your own taxonomy format but relevant to design brief criteria, you can continue to generate questions.
Review the objectives before continuing to make sure they meet your requirements. For each objective, you can manually change the text, or select Rewrite to have the assistant make any changes. When you select Rewrite, provide instructions for changes you want the assistant to make and select one of the following options:
- Regenerate: When you select Regenerate, the assistant uses your instructions to laterally adjust the information in the field.
- Enhance: When you select enhance, the assistant uses your instructions to improve the information in the field.
-
In the Select Difficulty Level field, choose one or more question difficulty levels that you would like included in your assessment. The available levels are:
- Easy
- Moderate
- Difficult
- In the Question type field, select the different types of questions you want to include in the assessment. The following question formats are offered:
- Single choice: Learners select one correct answer from a list of possible answers.
- Multiple choice: Learners select all correct answers from a list of possible answers.
- Matching: Learners match a series of statements to their correct counterparts.
- Scenario based questions: Learners read a scenario and then answer one or more questions based on the scenario. The questions within the scenario can be of the type single, multiple or matching.
-
In the Question per learning objective field, choose how many questions should be generated for each learning objective. For example, if you have 5 learning objectives and you select 2 questions per learning objective, the assessment will have 10 total questions.
-
Optionally enter any Additional details to help the Design Assistant in creating your assessment. These additional details could be guiding the Design Assistant on particular topics to focus on, a specific audience, or style instructions about which tone to use.
Edit Questions
-
Select Generate question pool. Your Design Assistant generates the questions for your assessment. It may generate more questions than will actually be in the assessment so that learners get different questions if they retake it. Depending on the number of objectives, questions per objective, and types of questions, it may take several minutes to generate a question bank for you to review.
- Once your questions have been generated, you can select Review questions from the window on the right. Review each question to ensure they are testing the right skills and that the answers look correct. For each question, you can:
- Delete it. Select the Delete icon
 next to any question to delete it.
 - Edit specific components of the questions or answers. Select the Edit icon
 . When you edit a question, you can:
- Change the difficulty rating of that question. Select from the difficulty drop-down.
- Add more answer options. Select Add answer option to add another answer option to the list.
- Remove answers. Select the Delete icon
 next to an answer to remove it.
 - Edit the question or answer text by typing in the box or by selecting the Rewrite option and have the assistant provide suggestions.
- Switch the associated learning objective. Use the drop-down at the top to change which learning objective the question falls under.
- After you make changes to each question, select Save before moving onto the next question. Use the Next question and Previous question buttons to navigate between questions.
- Delete it. Select the Delete icon
Edit assessment structure
After you have finished making any changes to your questions, move on to the Set up assessment area by selecting Next step in the bottom of the left pane. Specify the Questions per learning objective. This is how many questions you want learners see for each learning objective when they take the assessment. This may be different than the total number of questions you generated for each learning objective in your assessment. If you choose a number here that is less than how many questions you generated per learning objective, learners see different questions if they retake the assessment.
Add knowledge sources
When all your questions are set, move to the Source Content area by selecting Next step in the bottom of the left pane. Choose which knowledge sources you want to be applied to your assessment. The Design Assistant can recommend knowledge sources that would be relevant and useful. In addition, when you upload knowledge sources, the Design Assistant can use them to answer queries.To add files that can be referenced:
- Select Add to add a new knowledge source to the content, project, or workspace.
- Locate the file you want to add as a knowledge source. This can be an file of type: .txt, .html, .pdf, .pptx, .xlsx, .csv, and .doc files, with a maximum size of 100MB per file.
- Select Next.
- Select whether the file should be accessible at the workspace, project, or content level. To help you determine the right level:
- Workspace level: The file is accessible across all projects and can be shared to other projects or workspaces later if needed. Use mostly for brand, legal, or voice guidelines.
- Project level: The file is accessible to all content items within your project and can be shared to other projects or workspaces later if needed. Use mostly for collaborating on project-specific content and standards.
- Content level: The file is applied only to specific content and cannot be shared later. It won't surface in search or be discoverable elsewhere in the platform. Use for highly tailored or one-off content.
- Select Next.
- Add a Title and Description. This helps you remember why you uploaded the content.
- Select Next.
- Select Next to confirm the file.
- Select Got it acknowledging that the file is being processed.
If you add more knowledge sources at this point, we recommend that you regenerate your question pool. If you do not, your new information is not included.
Add content recommendations
After you add knowledge sources, move on to the Add content recommendations area by selecting Next step in the bottom of the left pane or select it from the left navigation bar . Add Skillsoft Platform content that is relevant to your assessment to help learners practice the skills needed to succeed on the assessment.
Add content details
From the left navigation bar, select Content Details. Content details are the metadata tags that the platform uses to categorize the assessment in search results and reports. These details help learners find your assessment in the platform and help admins distinguish it in reports. Provide information for the following fields:
- Title: This is the title that learners see when browsing for Skill Benchmarks.
- Description: This is the description that learners see when browsing for Skill Benchmarks.
- Expertise Level: The level of difficulty of the assessment, either Beginner, Intermediate or Advanced.
- Duration: How long the assessment is expected to take based on the number and difficulty level of questions.
- Image: Choose an image for the content card of the assessment.
- Alt text (optional): Optionally add alternate text to describe the image you uploaded.
- Technology type (optional): If the assessment is about a technology such as Microsoft, enter it here.
- Technology version (optional): If the assessment is about a particular level of technology such as Microsoft 365, enter it here.
- Skills (optional): If the Skill Benchmark is intermediate or advanced and requires prior knowledge, choose what skill learners should know to take the assessment. For example, an advanced Python assessment requires basic Python knowledge.