Create an Assessment
The Assessments app allows you to create different types of assessments. Currently, you can only create assessments of the type Skill Benchmarks.
-
Skill Benchmarks: When learners take a Skill Benchmark they answer questions testing skill knowledge and proficiency. Learners receive instant feedback on their performance, as well as content recommendations, to help them improve. Skill Benchmarks are a great way for learners to keep their learning focused and tailored to address skill gaps.
Best Practices for Creating an Assessment
When you create an assessment, we recommend the following:
- Choose specific, fact-based skills to test.
- Add knowledge sources prior to starting to build your question pool so the app can reference the content during creation.
- Have a list of content to reference that may be useful for improving the skills needed for the assessment.
- Start with a Skillsoft assessment if available for your skill.
Create an Assessment
To create an assessment:
- From the Home page or Apps page, select Assessments. You now see the Assessments page. You can also start with the Design Assistant on the main page and have a conversation. The information you share in the Design Assistant will carry through to the Assessment app, so you don't have to enter all the details separately. Details required are outlined below.
- Select Create new and choose a Project for the assessment you plan to create.
- Select Next.
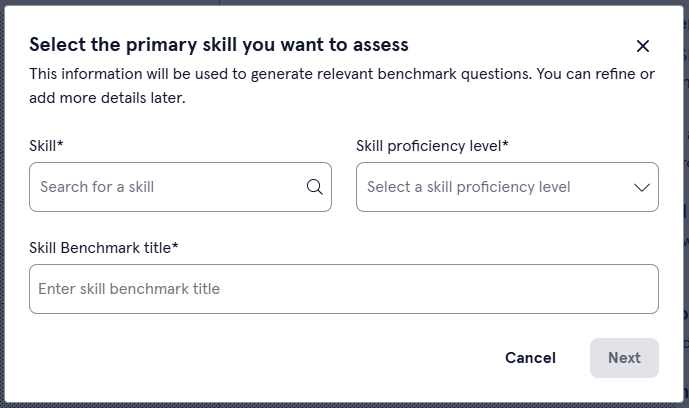
- In the dialog box, Select the primary skill you want to assess, complete the following fields:
- Skill: Enter the primary skill that the assessment tests. Skill benchmarks are designed to test one skill and one level at a time so that you can measure skill gain and proficiency.
- Skill proficiency level: Select the question difficulty for the assessment. The level options are Beginner, Intermediate, and Advanced.
- Skill Benchmark title: Use the suggested title or create your own. This is the title learners see when browsing for Skill Benchmarks.
- Select Next. You now see the Build Question Pool page on the left and the Design Brief on the right.
- From the left navigation, ensure Build Question pool is selected. This is where you start building your questions. You have three options of where to start:
- Generate question pool with AI: With this option, you use AI to generate the objectives and question pool based on the skill you selected. If you choose to have AI generate your questions, continue to step 7.
- Import question pool from a file. With this option, you specify your own questions in a CSV file and then import your file. To import your question pool from a file:
- Select Download the question pool template.
- Open the template in an editor and add your objectives, questions, answer choices, and answers.
- Save your file as a CSV.
- Drag and drop or browse to upload your file.
- Select Import questions.
- Select Review imported questions. Continue to step 14 to review your questions.
- Select and edit existing Skill Benchmark. With this option, the platform recommends a set of Skillsoft skill benchmarks that use the skill you specified.
- Specify the learning objectives by selecting Add learning objective. Learning objectives are what learners should achieve upon completing this assessment. If you came from the Design Assistant, AI creates the learning objectives for you based on your conversation. You can edit whatever learning objectives the Design Assistant creates for you. If you started in the app, you can choose one of four options and then refine. To generate objectives, you can:
- Select Generate from selected skill and allow your Design Assistant to create learning objectives based on the skill you entered. You can then edit or delete any of the learning objectives until they are to your liking. You can also add objectives to the AI-generated list.
- Select Add manually and write out what learners are being assessed on. Continue to add objectives until your list is complete.
- Select Find objective to search for learning objectives from a Skillsoft Platform course.
- Select Generate from knowledge source to have AI only use content from the knowledge sources you added to the assessment to create objectives. If you didn't previously add knowledge sources, you can do that at this point.
To help ensure the Assessment app generates questions that measure what you want, the app runs a check on the learning objectives. This check ensures the learning objectives meet standards for clarity and instructional quality defined by Blooms taxonomy. If learning objectives do not meet the criteria of the design brief, you will not be able to continue to generate questions. However, if the objective is in your own taxonomy format but relevant to design brief criteria, you can continue to generate questions.
Review the objectives before continuing to make sure they meet your requirements. For each objective, you can manually change the text, or select Rewrite to have the assistant make any changes. When you select Rewrite, provide instructions for changes you want the assistant to make and select one of the following options:
- Regenerate: When you select Regenerate, the assistant uses your instructions to laterally adjust the information in the field.
- Enhance: When you select enhance, the assistant uses your instructions to improve the information in the field.
-
In the Select Difficulty Level field, choose one or more question difficulty levels that you would like included in your assessment. The available levels are:
- Easy
- Moderate
- Difficult
- In the Question type field, select the different types of questions you want to include in the assessment. The following question formats are offered:
- Single choice: Learners select one correct answer from a list of possible answers.
- Multiple choice: Learners select all correct answers from a list of possible answers.
- Matching: Learners match a series of statements to their correct counterparts.
- Scenario based questions: Learners read a scenario and then answer one or more questions based on the scenario. The questions within the scenario can be of the type single, multiple or matching.
- In the Question per learning objective field, choose how many questions should be generated for each learning objective. For example, if you have 5 learning objectives and you select 2 questions per learning objective, the assessment will have 10 total questions.
- Optionally enter any Additional details to help AI in creating your assessment. These additional details could be guiding the Design Assistant on particular topics to focus on, a specific audience, or style instructions about which tone to use.
- Optionally, add files that the Design Assistant can reference to generate relevant content. These are called knowledge sources. It is best to add knowledge sources before you generate your question pool so the app can reference the content in your files to assist in creating questions and answers. To add files that can be referenced:
- Select Add to add a new knowledge source to the content, project, or workspace.
- Locate the file you want to add as a knowledge source. This can be an file of type: .txt, .html, .pdf, .pptx, .xlsx, .csv, and .doc files, with a maximum size of 100MB per file.
- Select Next.
- Select whether the file should be accessible at the workspace, project, or content level. To help you determine the right level:
- Workspace level: The file is accessible across all projects and can be shared to other projects or workspaces later if needed. Use mostly for brand, legal, or voice guidelines.
- Project level: The file is accessible to all content items within your project and can be shared to other projects or workspaces later if needed. Use mostly for collaborating on project-specific content and standards.
- Content level: The file is applied only to specific content and cannot be shared later. It won't surface in search or be discoverable elsewhere in the platform. Use for highly tailored or one-off content.
- Select Next.
- Add a Title and Description. This helps you remember why you uploaded the content.
- Select Next.
- Select Next to confirm the file.
- Select Got it acknowledging that the file is being processed.
- After you add all your knowledge sources, you can decide whether the Design Assistant should only use knowledge source content to generate questions. If you only want the Design Assistant to use content from knowledge sources to generate questions, you must:
- From the left navigation, select the Source Content option.
- Turn on: Only use knowledge sources when generating content. This option ensures that the Design Assistant only uses content in the knowledge source to generate questions and no other sources.
- Select Generate question pool. Your Design Assistant generates the questions for your assessment. It may generate more questions than will actually be in the assessment so that learners get different questions if they retake it. Depending on the number of objectives, questions per objective, and types of questions, it may take several minutes to generate a question bank for you to review.
Once your questions have been generated, you can select Review questions from the window on the right. Review each question to ensure they are testing the right skills and that the answers look correct.
For each objective in the left pane, you see the following options:
- Stock questions: In the highlighted box, the Design Assistant has searched the Skillsoft library for questions that may apply to the highlighted objective. These questions have been vetted by a subject matter expert and offer a level of proven acceptance. To add one or more stock questions:
- Select Select questions.
- Click on each question in turn to review it. If you like the question and want to add it, select the associated check box.
- When you are done selecting the questions you want, select Add questions to the pool. The questions are added for the selected objective and you can revise them as needed to meet your needs.
- Regenerate questions: Select this option to have the Design Assistant redo all the questions for the one objective. This action cannot be undone.
- Add question: Select this option if you want to add another question. You can choose to add the question manually or have AI generate it.
For each question for each objective, you can:
- Delete it. Select the Delete icon
 next to any question to delete it.
 - Generate a new question and improve answers and answer options. Select Rewrite next to t he question. When you select Rewrite, provide instructions for changes you want the assistant to make and select one of the following options:
- Regenerate: When you select Regenerate, the assistant uses your instructions to adjust the question and all answer options.
- Improve distractors: When you select this, the assistant uses your instructions to improve just the distractors as part of the question.
- Increase options: .When you select this, the assistant uses your instructions to add more correct responses that users can select.
- Edit specific components of the questions or answers. Select the Edit icon
 . When you edit a question, you can:
- Change the difficulty rating of that question. Select from the difficulty drop-down.
- Add more answer options. Select Add answer option to add another answer option to the list.
- Remove answers. Select the Delete icon
 next to an answer to remove it.
 - Edit the question or answer text by typing in the box or by selecting the Rewrite option and have the assistant provide suggestions.
- Switch the associated learning objective. Use the drop-down at the top to change which learning objective the question falls under.
- After you make changes to each question, select Save before moving onto the next question. Use the Next question and Previous question buttons to navigate between questions.
- Stock questions: In the highlighted box, the Design Assistant has searched the Skillsoft library for questions that may apply to the highlighted objective. These questions have been vetted by a subject matter expert and offer a level of proven acceptance. To add one or more stock questions:
After you have finished making any changes to your questions, move on to the Set up assessment area by selecting Next step in the bottom of the left pane.
Specify the Questions per learning objective. This is how many questions you want learners see for each learning objective when they take the assessment. This may be different than the total number of questions you generated for each learning objective in your assessment. If you choose a number here that is less than how many questions you generated per learning objective, learners see different questions if they retake the assessment.
- When all your questions are set, move to the Source Content area by selecting Next step in the bottom of the left pane. Choose which knowledge sources you want to be applied to your assessment. The Design Assistant can recommend knowledge sources that would be relevant and useful. In addition, when you upload knowledge sources, the Design Assistant can use them to answer queries.To add files that can be referenced:
- Select Add to add a new knowledge source to the content, project, or workspace.
- Locate the file you want to add as a knowledge source. This can be an file of type: .txt, .html, .pdf, .pptx, .xlsx, .csv, and .doc files, with a maximum size of 100MB per file.
- Select Next.
- Select whether the file should be accessible at the workspace, project, or content level. To help you determine the right level:
- Workspace level: The file is accessible across all projects and can be shared to other projects or workspaces later if needed. Use mostly for brand, legal, or voice guidelines.
- Project level: The file is accessible to all content items within your project and can be shared to other projects or workspaces later if needed. Use mostly for collaborating on project-specific content and standards.
- Content level: The file is applied only to specific content and cannot be shared later. It won't surface in search or be discoverable elsewhere in the platform. Use for highly tailored or one-off content.
- Select Next.
- Add a Title and Description. This helps you remember why you uploaded the content.
- Select Next.
- Select Next to confirm the file.
- Select Got it acknowledging that the file is being processed.
- After you add all your knowledge sources, you can decide whether the Design Assistant should only use knowledge source content to generate questions. If you only want the Design Assistant to use content from knowledge sources to generate questions, you must:
- From the left navigation, select the Source Content option.
- Turn on: Only use knowledge sources when generating content. This option ensures that the Design Assistant only uses content in the knowledge source to generate questions and no other sources.
If you add more knowledge sources at this point, we recommend that you regenerate your question pool. If you do not, your new information is not included.
- After you add knowledge sources, move on to the Content recommendations area by selecting Next step in the bottom of the left pane or select it from the left navigation bar . Add Skillsoft Platform content that is relevant to your assessment to help learners practice the skills needed to succeed on the assessment. To add content recommendations:
- Select Add content.
- Based on your selected skill, the platform presents a list of items that allow the learner to grow in that skill. Select any relevant content that a learner could use to improve the skill you specified. You can browse by content type across the top.
- Select Add content recommendations. The items are added. If you only want learners to access the items you select in this step, use the setting: Disable dynamic recommendations for custom Skill Benchmarks.
From the left navigation bar, select Content Details. Content details are the metadata tags that the platform uses to categorize the assessment in search results and reports. These details help learners find your assessment in the platform and help admins distinguish it in reports. Provide information for the following fields:
- Title: This is the title that learners see when browsing for Skill Benchmarks.
- Description: This is the description that learners see when browsing for Skill Benchmarks.
- Skills: Specify up to 10 skills that learners will gain upon completion. Type one skill in the box at a time and press Enter to add the skill. Note, this field is optional. When you add skills which are mapped to job roles, you allow your employees to focus on skills necessary to progress in their careers.
- Duration: The estimated amount of time it takes a learner to complete the content.
- Expertise level: Choose either Beginner, Intermediate, or Expert as the Expertise level that learners can use as part of their search filter criteria.
- Select thumbnail: Choose an image that learners see in the content card that distinguishes this content from another.
- Alt text (optional): Optionally add alternate text to describe the image you uploaded.
- Technology type (optional): If the assessment is about a technology such as Microsoft, enter it here.
- Technology version (optional): If the assessment is about a particular level of technology such as Microsoft 365, enter it here.
- When you content details are specified, you can move onto Content translations by selecting Next step or selecting Content translations from the left navigation. Before translating, ensure all learning objectives, questions, and answers are correct.
- Select all languages in which you want to offer the assessment. You can only select available options.
- Select Add translations. Your request for translation is added to the queue for processing. At this point you can continue doing other things and come back.
- When translations complete, review each one to ensure it meets your requirements.
- Once you have completed all required fields and confirmed updates, you have the following options:
- Preview: Opens the content you just created so that you can try it for yourself and ensure it works as expected.
- Publish: Note, you only see this option if you have LX Design Studio publishing privileges. This option publishes your content to the platform. You can make it available to a specific group of learners via search only, or add it to a channel or journey.
- Select Publish.
- Check the box: I also want to make this available to learners right away. Ensure the users who should see your draft content are included in an audience. See Create audience for details on how to create an audience and add users.
- Select Select learners, and then choose your audience from the list. By default all users in your company are selected.
- Select Save.
- Select Publish again. When you publish content, it shows in the Manage Content Items list in the platform.
- Select Go to Percipio. You see your new content in the list. People in the audience you selected should be able to search on your content title to find it. At this point they cannot browse to it.
- If you want, you can also add your new content to a channel or journey and make that channel or journey available to a select audience of reviewers that can test the new content to make sure it meets organization standards. Visit the Create Custom Journey or Create Custom Channel pages for more information on how to add custom content to a channel or journey and entitle it for just one audience.
- Exit: Be sure you see the word Saved in the upper right corner before you exit. When you exit, your content saves as a draft that you can return to at any time.
- Preview: Opens the content you just created so that you can try it for yourself and ensure it works as expected.