Implement SAML SSO in Percipio
Configuring and connecting Percipio as a Service Provider (SP) to your SAML SSO Identity Provider (IdP) is a process that involves:


To configure Skillsoft Percipio Platform as a service provider for you IdP, you must:
- Review the prerequisites
- Create a SAML SSO passport in Percipio
- Configure the SAML SSO passport
- Download or generate the Percipio Service Provider SAML metadata
- Activate your Percipio service provider to identity provider connection
- Test your connection
Additional steps you can take to refine SSO include:
For the other aspects of configuring SSO with Skillsoft Percipio Platform, such as downloading your IdP's metadata file, see your IdP's documentation.
Review prerequisites
Before building the connection between your IdP and Percipio, ensure that you have the following:
-
Access to the System Integration option from the Settings menu. If you do not see this option, speak with your Skillsoft account team to have it enabled.
-
 The metatdata file from your IdP. The metadata file contains a series of parameters that Skillsoft Percipio Platform needs to facilitate SAML SSO.
-
Sign In URL: This is the Location value contained within the SingleSignOnService element within the your IdP SAML metadata file. If available, obtain the value associated with the HTTP-POST Binding.
-
Public Key for your IdP: This is the encoded signing certificate found within your IdP SAML metadata file.
-
Sign Out URL: Optionally, you can configure Peripio to display a sign out URL. This is the Location value contained within the SingleLogoutService element within the your IdP SAML metadata file. If available, obtain value associated with the HTTP-POST Binding.
-
User ID Attribute: If you want to pass the user identifier in Skillsoft Percipio Platform as a stand-alone attribute, you must specify the attribute name in Skillsoft Percipio Platform. By default, Percipio uses hard-coded logic to look for the unique identifier in the SAML assertion data as a NameID, with format value, in the SAML Subject block. You can obtain the NameID from your SAML Response file.
We strongly recommend that you select a SAML User/Name ID from the user's profile that is static and will never change, such as an employee number. By selecting a static SAML User/Name ID, you ensure a smooth and more reliable integration experience. For example, if you choose an email address which can be updated for name changes, you may see complications in the authentication process or even potential account duplication.
-
-
Your user attribute list. Work with your Skillsoft account team to determine which user attributes to use in Percipio.
User attributes can be used for:
-
Assigning users into groups called audiences for assignments and content entitlement
-
Filtering reports
-
Allowing managers to manage their team's learning needs
For more information on user attributes and user account creation, see User accounts.
-
Create a SAML SSO passport in Percipio
- Log in to your Skillsoft Percipio Platform site with your admin level account.
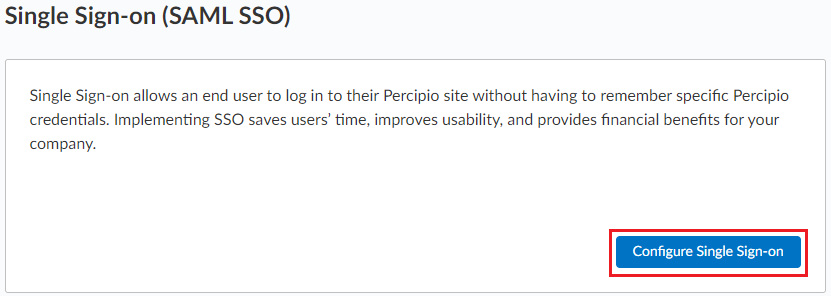
- From the home page click Settings > System Integration.
- On the System Integration page, select Single Sign-on (SAML SSO) > Configure Single Sign-on.
-
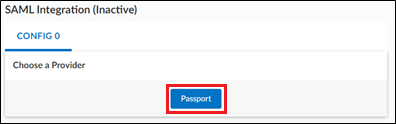
From the SAML Integration page, click the Passport button.
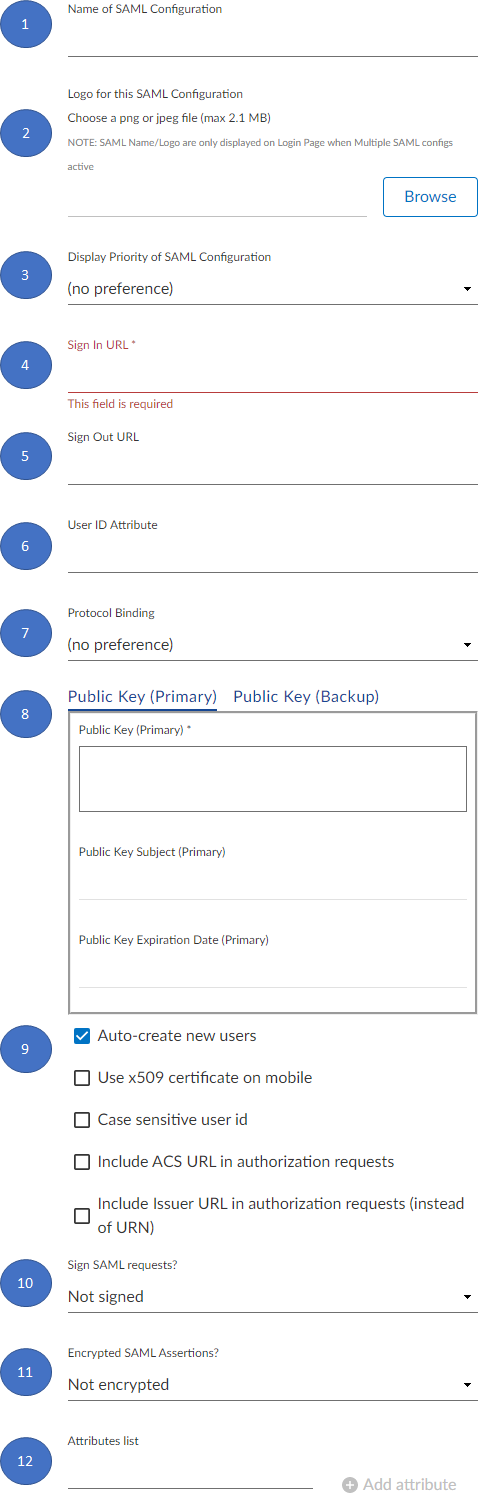
Configure the SAML SSO Passport
-
Use the Name of SAML Configuration field to name the connection in Skillsoft Percipio Platform. The name that you choose is up to you, however, assigning a name that describes the configuration can be helpful if you have multiple SAML configurations. For example, you could name the configuration, "Okta and Skillsoft Percipio Platform connection".
-
If you have multiple SAML configurations, use the Logo for this SAML Configuration field to upload a logo for this configuration. Click the Browse button to start the image upload process. You can skip this step if you have only one configuration.
Note: Upload only one logo per configuration. -
If you have multiple SAML configurations, use the drop-down in the Display Priority of SAML Configuration field to designate the priority level of this SAML configuration based on values from 1- 9. You can leave this filed as no preference if you have only one configuration.
-
Enter your identity provider's Sign In URL in this field. The Sign In URL is the Location value contained within the SingleSignOnService element in the your IdP SAML metadata file. If available, use the value associated with the HTTP-POST Binding. For example:
Copy<SingleSignOnService Binding="urn:oasis:names:tc:SAML:2.0:bindings:HTTP-POST" Location="https://sso.<your_deployment>.com/adfs/ls/"/> -
Optionally, enter a Sign Out URL for your deployment. This filed provides Skillsoft Percipio Platform with a URL to direct the user to when they sign out. This is the Location value contained within the SingleLogoutService element in the your IdP SAML metadata. If available, use value associated with the HTTP-POST Binding.
-
If you want to pass the user identifier in Skillsoft Percipio Platform as a stand-alone attribute, you must specify the User ID Attribute. This step is optional. By default, Percipio uses hard-coded logic to look for the unique identifier in the SAML assertion data as a NameID, with format value in the SAML Subject block. You can obtain the NameID from your SAML Response.
-
Set the Protocol Binding for your configuration. SAML requesters and responders exchange messages to communicate. The tool that is used to exchange messages is called a protocol binding. Choose the protocol binding for your configuration by selecting either redirect or post.
-
Redirect: Enables SAML protocol messages to be transmitted within URL parameters by using an HTTP user agent as an intermediary. The intermediary can be necessary if there is not direct path of communication. The intermediary can also be necessary if the responder requires interaction with an authentication agent.
-
Post: Enables SAML requesters and responders to communicate by using an HTTP user agent as an intermediary. POST is sometimes called Browser POST, particularly when used in single sign-on operations. It uses a self-posting form during the establishment and use of a trusted session between an identity provider, a service provider, and a client (browser).
-
- Public Key: This is the encoded signing certificate found within your IdP SAML metadata file. This field can be updated any time with a back up key when an existing key is set to expire. The field can be populated with either the encoded hash value, or you can include the BEGIN/END certificate headings. For example:
- CopyEncoded hash value
<md:KeyDescriptor use="signing">
           <KeyInfo xmlns="http://www.w3.org/2000/09/xmldsig#">
                  <X509Data>
                      <X509Certificate>
                        <Encoded hash value certificate>
                      </X509Certificate>
                  </X509Data>
           </KeyInfo>
</md:KeyDescriptor> - CopyBEGIN/END certificate headings
-----BEGIN CERTIFICATE-----
MIIDQjCCAiqgAwIBAgIJAJK/dZim7SJMMA0GCSqGSIb3DQEBBQUAMB8xHTAbBgNV...
/rlpQxRvThyojO1B3PyyTnU6IGdRnQ==
-----END CERTIFICATE-----
-
By using the check boxes for the following fields, you can customize additional security features to better suit your needs.
-
Auto-create new users: If the learner sent by the IdP does not exist in Percipio, then a new user is created.
-
Use x509 certificate on mobile: Select this check box if you intend to use x509 security certificates for mobile devices.
-
Case sensitive user ID: Enable this setting if you use case sensitive user IDs in your IdP.
-
Include ACS URL in authorization requests: The assertion consumer service (ACS) URL is the location to which SSO authorization tokens are sent. Enable this setting if your IdP requires ACS SSO authorization tokens to be passed in authorization requests.
-
Include Issuer URL in authorization requests (instead of URN): Enable this setting if your IdP is configured to send SAML assertions to a service provider as a URL. Leave it disabled if your IdP is configured to send SAML assertions to a service provider as a URN.
-
-
Determine how you want to Sign SAML requests with either self-signed certificates, certificate authority (CA) signed certificates, or leave SAML requests unsigned. A CA signed certificate is issued by a trusted third party and ensures that the certificate public key belongs to the entity for which it is issued. The self-signed certificates are public key certificates that users issue on their own behalf, as opposed to a certificate authority issuing them, they do not provide any trust value. Skillsoft recommends that you use CA signed certificates if applicable.
-
Enable Encrypted SAML Assertions if your IdP sends encrypted SAML assertions. In this scenario the IdP encrypts the SAML assertion using the public key and sends it to the service provider. The service provider decrypts the assertion by using the tenant's private key. In most situations the SAML assertion isn't encrypted and privacy is provided at the transport layer using HTTPS. However, if your SAML assertion contains particularly sensitive user information you might use encrypted SAML assertions.
-
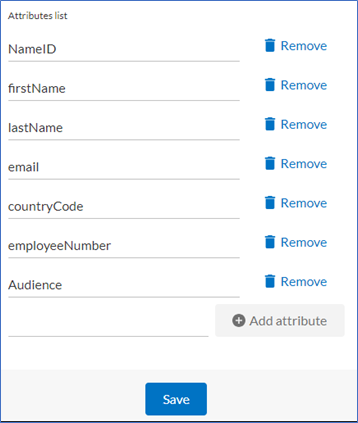
To send additional user attributes to Skillsoft Percipio Platform from your IdP's SAML assertion, you must first define them in the Attributes list. After the list is defined and saved, the additional attributes are made available in the Skillsoft Percipio Platform attribute mapping tool. The attribute values are case-sensitive so it is important to confirm the exact attribute name from your IdP SAML Response.
For example, the attribute firstName is sent in the SAML assertion from your IdP to Percipio. You want the value in that field to be populated in the First Name attribute on Percipio. To do this, you must add the firstName attribute to the attribute list. After the attributes is saved, you map First Name to firstName in the mapping tool.
Note: Skillsoft recommends mapping your first name, last name, and email address attributes so that you can utilize features like Certificates and Badges that require those fields. -
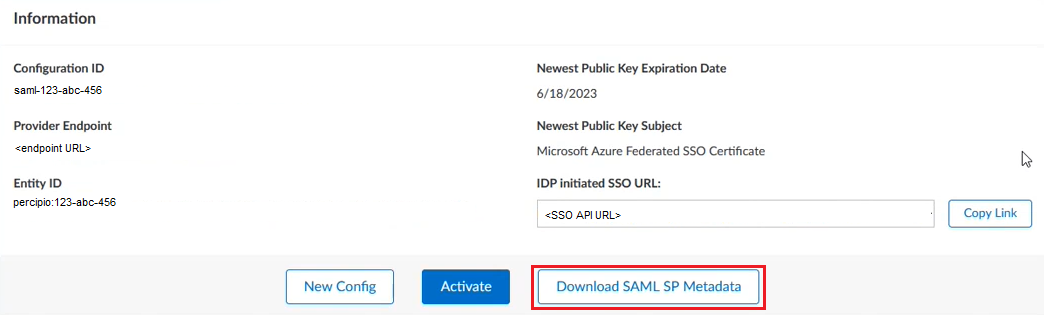
After all necessary fields are filled out, click Save. The page refreshes and, if the connection was successful, you can then see the previous fields that you populated and general information about your connection at the top of the page.
You can now download or generate the Percipio Service Provider SAML metadata or make any additional updates to the configuration as needed.
Download or generate the Skillsoft Percipio Platform Service Provider SAML metadata
To get the SAML SP Metadata, you can either download the file or generate a link to the metadata.
To download the SAML SP metadata file
-
Go to the top section of the configuration page.
-
Click the Download SAML SP Metadata button.
-
The metadata file downloads and is available for use.
To generate the Skillsoft Percipio Platform SP SAML metadata link
-
Determine which data center for your deployment is in, and choose from one of the following URLs accordingly:
-
North America: https://api.percipio.com/saml/spmetadata?connection={Configuration ID}
-
European: https://dew1-api.percipio.com/saml/spmetadata?connection={Configuration ID}
Note: For assistance determining your data center, complete this form and send to Skillsoft Support. -
-
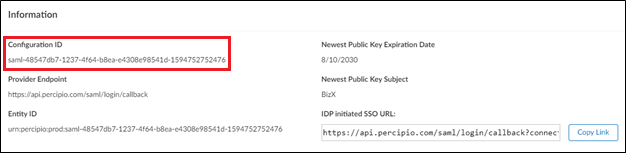
After choosing a data center and URL, locate your Skillsoft Percipio Platform Configuration ID by going to Settings > System Integration > Single Sign-on (SAML SSO).
-
Find the configuration that your just created, go to the Information section, and copy the Configuration ID.
-
Now that you have the Configuration ID, go back to the URL that you chose and insert the Configuration ID into the section of the URL where it displays {Configuration ID}.
For example, if your Configuration ID is:
saml-48547db7-1237-4f64-b8ea-e4308e98541d-1594752752476 Then your download URL would look like:
https://api.percipio.com/saml/spmetadata?connection=saml-48547db7-1237-4f64-b8ea-e4308e98541d-1594752752476
You can use this URL as you normally would when configuring a new Service Provider in your IdP.
It is at this point in the IdP to Skillsoft Percipio Platform SP configuration process that you can return to your IdP with the Skillsoft Percipio Platform metadata file and configure your IdP according to your IdP's specifications.
Activate your Percipio service provider to identity provider connection
-
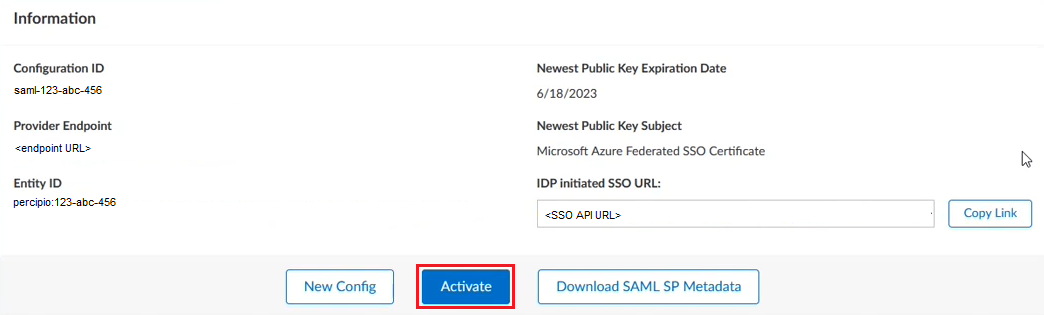
Log in to your Skillsoft Percipio Platform site with your admin level account.
-
From the home page click Settings > System Integration.
-
On the System Integration page, select Single Sign-on (SAML SSO) > Configure Single Sign-on.
-
From the SAML Configuration page, select the Activate button. Your connection is now active.
Test your connection
After your connection is activated and you have set your security settings, it is time to test your connection. Testing is a simple process of attempting to log in to Skillsoft Percipio Platform with a user account from your platform. If you chose to enable automatic user account creation during the Skillsoft Percipio Platform SP configuration process, then Skillsoft recommends that you use account credentials that do not yet exist in Skillsoft Percipio Platform. Testing is successful if you are able to log in by using single sign on. If testing proves unsuccessful, complete this form and send to Skillsoft Support.