Integrate the Skillsoft Platform with Multiple LMS's
Overview
This is a step-by-step guide on how to integrate the Skillsoft Platform with multiple LMS platforms using the API-based content sync option when you perform a Content export job. This allows you to export different content to different LMS platforms.
Because this is an enhancement as of October 2023, if you previously set up your integration prior to that date, this document also contains information on how to migrate so you can integrate with multiple LMS platforms.
Before you begin
To set up multiple LMS platform configurations for your Skillsoft Platform site using the API-based content sync option, you need:
-
The content identified that needs to be exported to each LMS
-
The frequency of each job, start date/time, end date/time, and maximum number of attempts to try if a failure occurs
-
The list of people to notify about job status
-
The LMS configured to pass a system parameter whenever it calls the v2/catalog-content endpoint. This is a one-time setup. Work with the LMS partner to set up the system parameter as follows:
| System parameter | LMS |
|---|---|
| CSOD | Cornerstone Learning Management System |
| Degreed | Degreed |
| Docebo | Docebo |
| Moodle | Moodle |
| SABA | Saba Cloud LMS |
| SuccessFactors | Success Factors Learning |
| SumTotalLearn | SumTotal Learn |
| Workday API | Workday |
| Workday EIB | Workday |
| SkillsoftCoaching | Skillsoft Coaching |
| LinkedIn Learning | LinkedIn Learning |
| Oracle | Oracle Learning Cloud |
For Skillsoft Platform sites without any API-based content sync integrations
When you have a Skillsoft Platform site that does not have any content export jobs, you can add one or more content export jobs that use the API-based content sync. For example, you can create two content export jobs, one for CSOD that uses just the Expert collection and one for Skillsoft Coaching with just the SLDP collection.
It is best to always set up the LMS export job first. The job you schedule first with a custom rule set, is the content rule set that shows in the Content Selection and Sync area for editing separate from the Scheduled job. If you need to modify a custom content rule set, you need to open the scheduled job and modify the rule set from there.
1. From the left navigation bar, select Site Settings > System Integration.
2. From the left navigation on the System Integration page, select Catalog config- API based.
3. Select Manage Catalog Configuration.
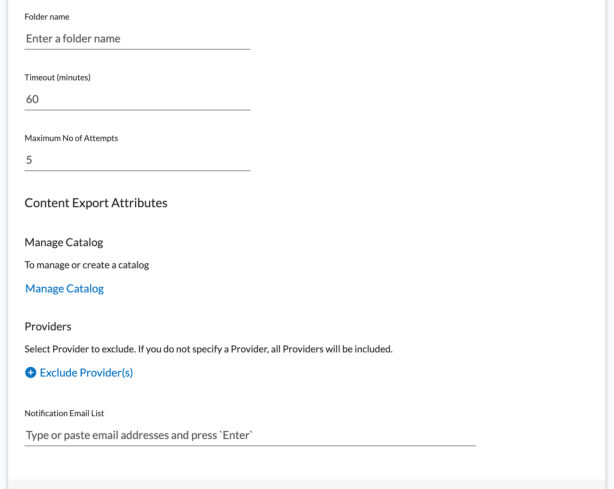
4. On the Edit job page that displays, specify at least System, Action, and Job name, which are required before you can proceed to step 5. Other details for the content export job include:
-
System: Select the name of the LMS with which you want to integrate. The LMS must also be configured to pass this same system parameter whenever it calls the v2/catalog-content endpoint. If you are integrating with Skillsoft Coaching, select it from the list (no need to configure the system parameter for Skillsoft Coaching, it is there by default).
-
Action: Select API-based Content Sync. You can't change this option after you select Manage Catalog in step 5.
-
Job name: Give the job a name
-
Frequency: Specify how often this job runs.
-
Start date and time: Specify when the job starts.
-
End date: Specify when the job ends. Select no end date, if you want it to continue.
-
Timeout: Specify how long the job attempts to run before it times out and stops running.
-
Maximum number of attempts: Specify how many times you want the job to try running if it times out.
5. Before proceeding, ensure you specified API-based Content Sync in the Action field.
6. Under the Content Export Attributes section of the Edit jobs page, select Manage Catalog. The Skillsoft Platform immediately creates an inactive job so that we can map the catalog to it after we create the rule. If you want all content associated with this job, you can skip steps 6-8 and go to step 9. If you need to make changes to this catalog at a later time, you need to Edit the scheduled job and select Manage Catalog. The first scheduled job you create with a catalog is the content rule set you see if you were to access Content Selection and Sync from the System Integration menu.
7. Select Create content rule and using the Content selection and sync process, specify the content that should be part of this content export job.
8. After you finish selecting the desired content, select Return to scheduler. You see the Edit job page.
9. Specify any remaining fields if you left any blank from step 4.
10. At this point you have three options:
-
To activate the job, select Update job as active.
-
To save the job as inactive, select Update job.
-
To cancel any changes to the job since the last time you saved it, select Cancel.
You can repeat these steps for every LMS integration you want to add.
For Skillsoft Platform sites with an existing API-based content sync integration
If an existing Skillsoft Platform site already has a content export job that uses API-based content sync, and the customer does not need to support additional LMS integrations, you can keep the existing configuration as it is. If an existing site has a content export job that uses API-based content sync and you want to add more LMS integrations, you need to migrate the existing job to the new format.
To migrate an existing job so you can add more LMS integrations:
-
From the left navigation bar, select Site Settings > System integrations.
-
From the left navigation on the System Integration page, select Scheduled jobs.
-
Select Manage jobs.
-
Locate and select the content export job from the list that you need to migrate.
-
Ensure the System field shows the exact LMS with which you are integrating, and that the LMS has been configured to pass a system parameter whenever it calls the v2/catalog-content endpoint. This is a one-time setup for the LMS.
-
With the Job details page open, scroll to the Content Export Attributes section.
-
If the job was created using the existing filters, you need to change it by selecting Use the content rule set I created. (You can not go back to using existing filters once you make this selection)
-
If the job was created using the content rule set, you see the option to Manage catalog. Select Manage Catalog.
7. Select Create Content Rule, and using the Content selection and sync process, specify the content that should be part of this content export job
8. After you finish selecting the desired content, select Return to scheduler. You see the Job details page.
9. Specify any remaining fields if you left any blank from step 5.
10. At this point you have three options:
-
To activate the job, select Update job as active.
-
To save the job as inactive, select Update job.
-
To cancel any changes to the job since the last time you saved it, select Cancel.
You can repeat these steps for every LMS integration you want to add.