Create a Template
You create a template by copying an existing one. This allows you to quickly change just the aspects that must differ.
To create a template
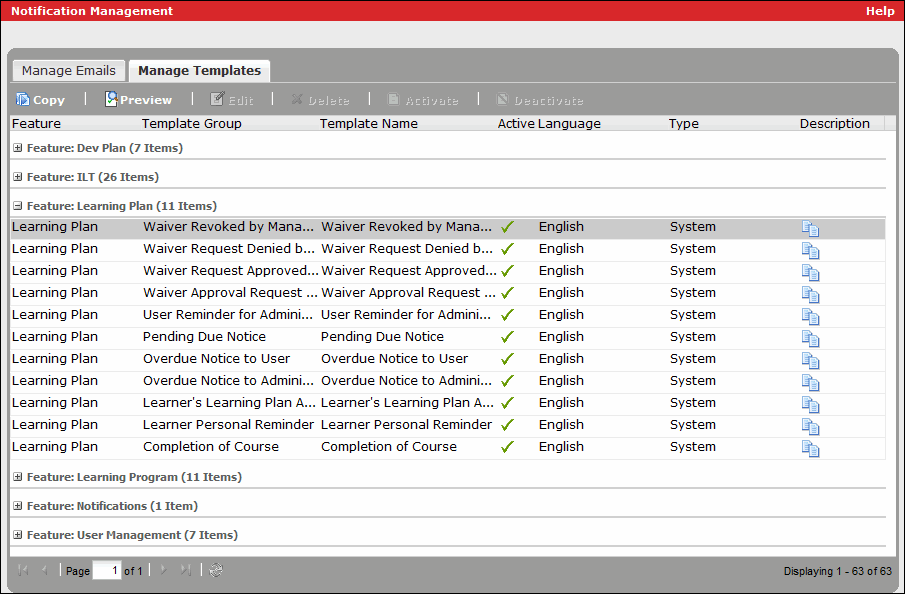
- On the Notification Management page, click the Manage Templates tab.
A complete list of all templates display:

- Find the template that you want to copy.
- Cick Copy.
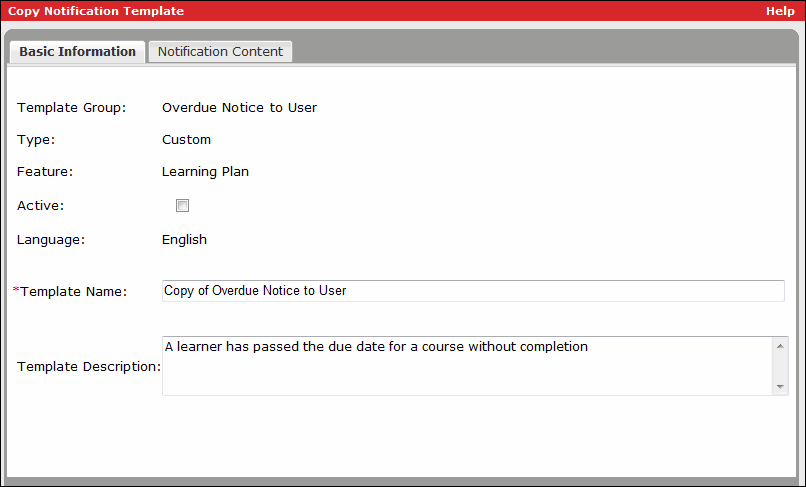
The Copy Notification Template dialog box displays.

- On the Basic Information tab, enter the information about the new template:
- Active: If you do not want the template to be used, keep this check box cleared to keep the template inactive. If you want to be able to use the template, select this check box to activate the template. Activating the template allows you to assign the template to a Skillport event, so that it is sent whenever that event occurs.
- Template Name: (Required) The name of the template. Change this value to differentiate your custom template from the original on which it was based. All template names must be unique.
- Template Description: The purpose and contents of the template. You can also change this value to differentiate the template from the original.
You cannot change a custom template's template group, type, feature, or language.
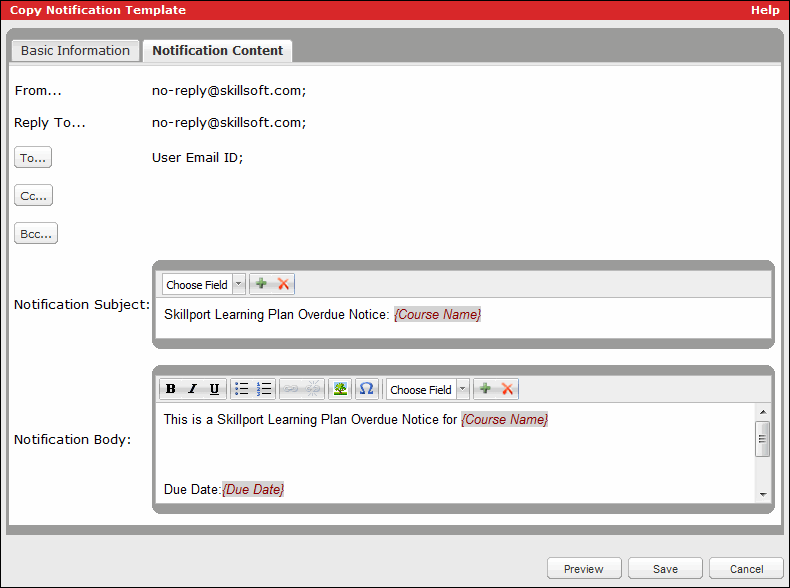
- Click the Notification Content tab.

Note: The From and Reply To fields are not editable. These fields use the values specified in the following two notification settings:
- Default 'From' email address for notifications
- Default 'Reply To' email address for notificationsIn the next steps, you specify the recipients and the content for the email. In all of the fields, you can select variables to insert, which are populated with actual data when the email is sent. The system restricts the list of available variables to only those that are appropriate for the field.
- Specify the recipients:
- To: The individuals to whom to send the email.
- Cc: The individuals to whom to send a copy of the email.
- Bcc: The individuals to whom to send a blind copy of the email.
To change a default value, do the following:
- Click To, Cc, or Bcc.
The Select Variables dialog box displays.
- To add a variable to the field, select it in the Available Variables pane, and click
 . You can use Ctrl-click or Shift-click to select multiple variables.
 - To remove a variable from the field, select it in the Selected Variables pane, and click Remove. You can use Ctrl-click or Shift-click to select multiple variables.
- Click OK.
- In the Notification Subject field, modify the text as necessary.
- In the Notification Body field, modify the text as necessary. The message can include a combination of plain text, formatted text, and symbols (accessible via the
 button).
Be aware that when using the Enter key to add line breaks, the text appears to be double-spaced in the editor, but in the actual email is only single-spaced. It is recommended that you use Preview to view an example email and adjust the formatting if necessary.
You cannot format a selection of text that includes a field (variable). To apply the formatting, first format the selection of text (without the field), then insert the field. This applies the formatting to both the text and the field.
Note: You can add hyperlinks and fields (variables) to both the subject and body, and you can also add images to the body.
- To insert a field:
- Put the cursor in the desired location.
- Select the field from the drop-down list on the toolbar.
- Click
 .
.
(To remove a field, select it, and click
 .)
.) - To add a hyperlink:
- Select the text to convert to a hyperlink, and click
 .
.The Insert/edit link dialog box displays.
- For Link URL, enter the URL. This value is required. The URL must be complete and, therefore, must begin with the following:
http:// - For Target, specify whether the URL should be launched in a new browser window or the existing browser window. If you do not specify a value, the link is launched in a new window. This setting affects browser-based email clients only, and the recipient’s own browser settings determine whether or not it is respected. Non-browser-based email clients always use a new window.
- For Title, enter a short description. In browser-based email clients only, this appears as a “tool tip” when the user moves the cursor over the link.
Note: You do not have to configure the Class setting. It is not used.
- Click Insert.
(To remove a link, place the cursor inside it, and click
 .)
.) - Select the text to convert to a hyperlink, and click
- To add an image:
- Put the cursor in the desired location, and click
 .
.The Insert/edit image dialog box displays.
- For Image URL, enter the complete URL for the location of the image. The image must be a JPEG or GIF file that is hosted on a web site elsewhere. In the recipient's email, the URL will render as a link that, if clicked, will render the image itself. This value is required.
- For Image description, enter a description of the image. In text-only environments (browsers that cannot display inline images), this text is displayed instead of the image. This value is required.
- For Alignment, select how to align the image relative to the line of text in which it is inserted. For example, select "Left" to align the image with the left margin and have the text wrap around the image's right side.
- For Dimensions, enter in pixels the size (width x height) of the image if you want it to be resized before being inserted into the email.
- For Border, enter in pixels the width of the border to add around the image.
- For Vertical space, enter in pixels the width of the padding to add before and after the image.
- For Horizontal space, enter in pixels the width of the padding to add to the left and right of the image.
- Click Insert.
- Put the cursor in the desired location, and click
- Click Preview to view an example of an email based on the template as it appears to a recipient.
- Make changes as necessary.
- Click Save, and then click OK.
At this point, you may want to activate the template and then assign it to an event.