![]()
![]()
|
|
|
Quick Links provide access to specific sites (URLs) that are available from the main toolbar in the Skillport interface. Any company administrator or administrator can enable or disable Quick Links.
![]() Watch: Configure the Quick Links Menu
Watch: Configure the Quick Links Menu
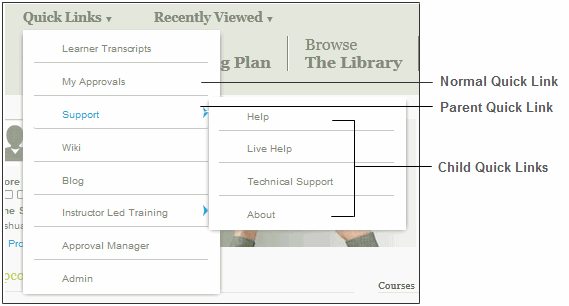
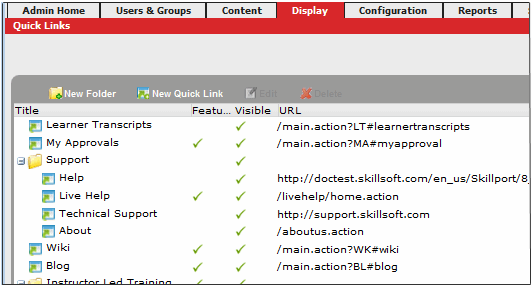
The following image compares an end user's view of a customized set of Quick Links with your view of the same Quick Links as you configure them in Skillport Administrator.
To configure Quick Links
The Quick Links page displays.
The New Quick Link page displays.
Field |
Description |
Title |
Specifies the text name of the link that appears in the Quick Links Menu. If the value is too long, the title will be shown with an ellipsis (…), but the tooltip will display the full Quick Link name. The titles of company-wide navigation Quick Links must be unique. The titles of normal/parent Quick Links must be unique within an advanced group. The titles of child Quick Links must be unique with respect to all other Quick Links with the same parent Quick Links. Note: The following characters are not allowed: " <> [] () \ " \\ ; ' + % @ " |
URL |
Specifies a relative or an absolute URL path to the Quick Link's target page. For more information on the valid format for absolute and relative paths, see Working with Hyperlinks. You can add a Quick Link to any type of text file, including HTML (.HTM, .HTML), Microsoft Word (.DOC), Acrobat PDF (.PDF), plain text (.TXT), etc. |
Display |
Indicates how to display the target page.
|
Visible |
Indicates whether the Quick Link appears in Skillport. Select this check box to make the Quick Link available in the Skillport interface. Clear this check box to hide the Quick Link. |
Manager and Admin |
Controls the availability of the Quick Link based on a user's role. Select this check box to make the Quick Link appear only for users with roles other than End User. |
508 accessible |
Select (check) this check box if the target page supports Section 508 (also known as Web Accessibility) for users with disabilities.
|
The New Folder dialog box displays.
Note: Skillport adds Quick Links if optional Skillport add-on modules are installed, for example, Community or KnowledgeCenters. You cannot change the value for the URL setting or the Display setting for these Quick Links.