Create a New Email Campaign
When you create an email campaign, you specify the details for the campaign, customize the email design, add recipients, and schedule the delivery. You can select your design from existing email campaign templates or start your design from scratch.
After you finish designing your email campaign, you can save your design as a template that you can use later.
To create a new email campaign
- From the left navigation bar, select Learning > Email Campaigns. The Email Campaigns page displays.
- Select Create Email Campaign. The Create Email Campaign workflow has four steps.
-
 Step 1: Describe your campaign
Enter all the details describing your campaign.
-
Title: Enter a title in a convention that is easy for you to find in the list. We recommend that you adopt guidelines for writing titles that help you and others remember why you created the campaign. The title only shows in the Email Campaign list and does not show to recipients.
- Theme (optional): Enter text that describes the overarching concept or motif that guides the design and messaging of your marketing efforts. Use themes to help categorize your campaigns. You might want to work with your team to define themes that you can use repeatedly, such as: topic promotion, book of the month club, what our leaders are learning, skill promotion, or learning contest.
-
Subject line: Enter a headline for the email that captures the essence of the email’s content. We recommend being specific and concise to spark interest. The recipient will see this subject line in their email inbox.
-
Preview text (optional): Enter a short summary of the email that displays in an inbox preview pane. Preview text is crucial for catching the recipient's eye and prompting them to open the email. The recipient will see this preview text in their email.
- From name: The from name defaults to the organization name you specified in Settings > Engagement & Notifications > Email Settings > Organization name . If you have not set an organization name in the Email Settings, emails will show as sent by Percipio. Open and click through rates of emails increase significantly when the learner sees it coming from a department or person in your organization.
-
From email: The from email defaults to the email address you specified in Settings > Engagement & Notifications > Email Settings > Alternate email address. If you have not set an alternate email address, emails will show as sent by no-reply@percipio.com. Open and click through rates of emails increase significantly when the learner sees it coming from a department or person in your organization.
-
- After you describe your email campaign, you can:
- Cancel: Closes the email campaign without saving changes.
- Save as draft: Closes the new email campaign, saves your changes into a Draft status, and returns you to the Email Campaigns page. You can modify this campaign later.
- Next: Design your email: Saves your current changes and takes you to the next step.
-
 Step 2: Design your email
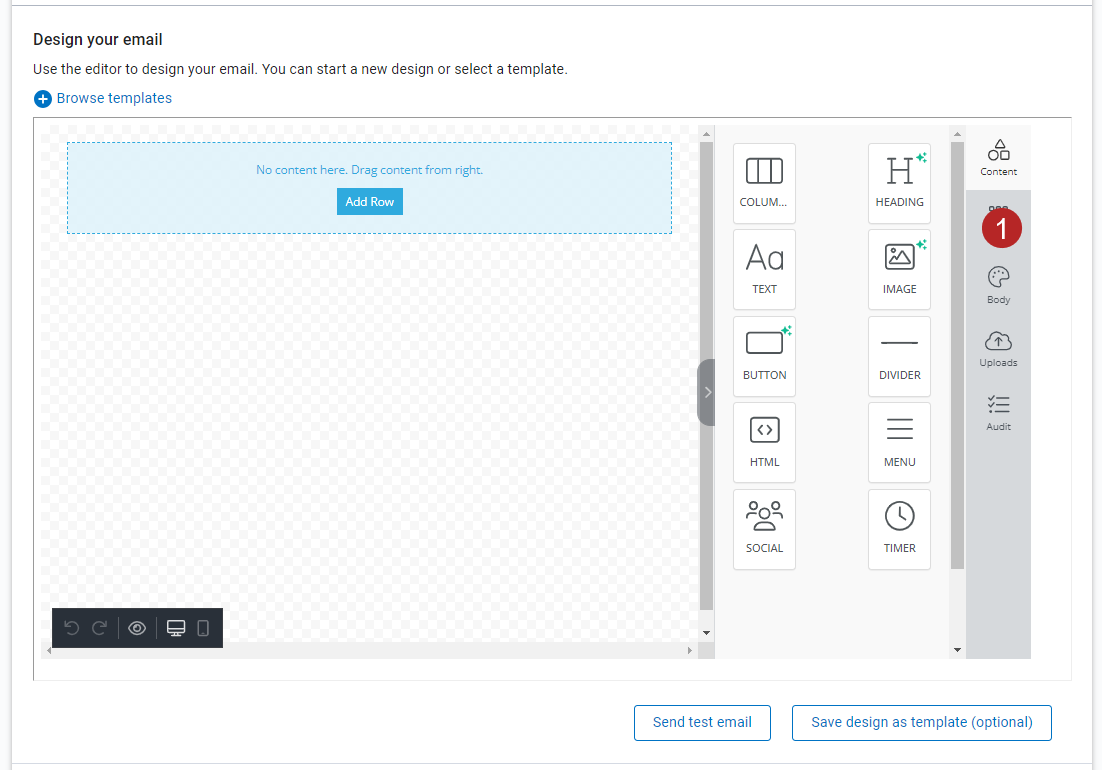
The designer has a WYSIWYG (what you see is what you get) Editor pane on the left with a set of design components on the right.
You can do one of the following:
 Design a new email from scratch
- In the Editor pane, you see a Block in a single column format. A block is a row that can contain content. The block segments the page into columns. You can add content to the existing block or remove it and choose another block style. From the right hand menu, you can choose different block styles and click and drag them to the Editor pane. You must have at least one block in the Editor pane before you can add content.
- After you add a block, you can add a Content type to each column of the block by clicking and dragging from the Content menu on the right to the Editor pane on the left. For example, if your block has two columns, you might choose the left column to have a headline and the right column to have an image.
- After you add your content types to your blocks, you customize each content type by selecting it in the Editor pane to open the formatting box on the right. From the formatting box, you can add URLs to hyperlink somewhere, you can format text, add images, and change settings like padding and responsive design.
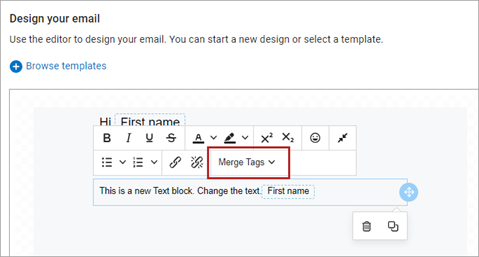
When you add Text as the content type, you can add variables or placeholders to the text to personalize the message with a first name, last name, or login name. To add a variable or placeholder, select it under the Merge Tag drop down on the text formatting bar. The Merge tag gets replaced with the user's information when the email is sent.

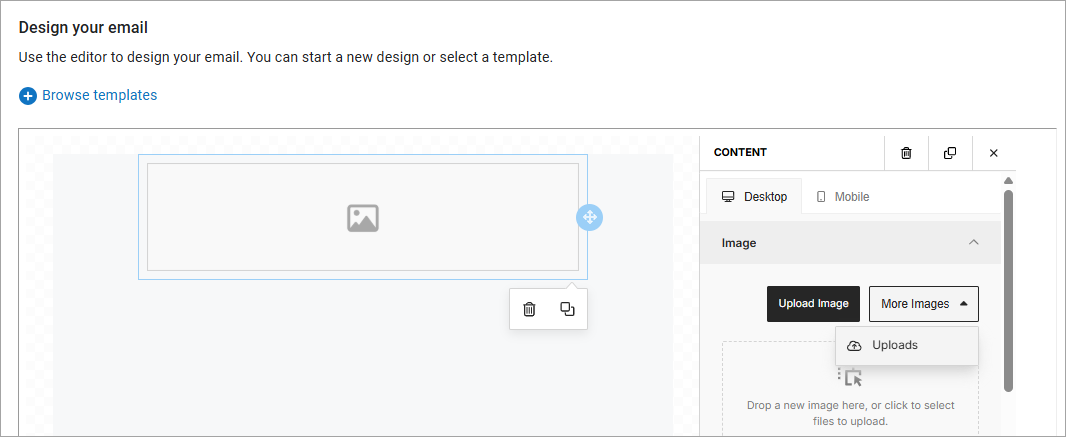
When you add an Image, you can choose to upload directly to this campaign or select from more images which is an image library list that you can configure so you can easily select the same images for future campaigns.
- You can add as many content types as you want and the page stays segmented into the same column format of the block you added.
- If you want to change the number of columns, add a new block and continue adding content. You can add as many blocks on the page as you wish.
- When you are done designing, select the Preview icon to see how your email will look on a desktop, tablet, or mobile device.

- You can Send a test email to make sure your design works as expected in your email inbox.
- If you want to be able to use your design as a template in the future, select Save design as template (optional).
 Select a template
-
Select Browse templates to find a template to use for this campaign.
-
Select a template from the list, then select Done.
-
Use the template as is or edit it in the Editor. You can change text, images, and button copy. You can also add and remove content.
-
When you are done designing, select the Preview icon to see how your email will look on a desktop, tablet, or mobile device.
-
You can Send a test email to make sure your design works as expected in your email inbox.
-
Optionally, you can either Save changes which overwrites the existing template or Save as copy which creates a new template with all your changes.
- After you design your email, you can:
- Cancel: Closes the email campaign without saving changes.
- Save as draft: Closes the new email campaign, saves your changes into a Draft status, and returns you to the Email Campaigns page. You can modify this campaign later.
- Next: Add recipients and schedule: Saves your current changes and takes you to the next step.
-
 Step 3: Add recipients and schedule
To select recipients and schedule the email:
- Select Add recipients
- In the search field, enter the name of an audience or individual learner.
- Locate the audience(s) or user(s) you want to send the email to and select
 . Learning admins and managers with permissions to create email campaigns can only add users from audiences that they own.
 - Repeat these steps until you've added all users and/or audiences. View your selections from the Selected users and audience tab.
- Select Done.
- Identify a date that you want the email to be sent.
- Choose a time from the drop down. The time you select is based on your current time zone.
- After you add recipients and schedule your email campaign, you can:
- Cancel: Closes the email campaign without saving changes.
- Save as draft: Closes the new email campaign, saves your changes into a Draft status, and returns you to the Email Campaigns page. You can modify this campaign later.
- Next: Review and launch: Saves your current changes and takes you to the next step.
-
Step 4: Review and launch. Review all your settings for this email campaign. Edit anything that looks amiss.
-
When you are ready, select one of the following options:
- Cancel: Closes the email campaign without saving changes.
- Save as draft: Closes the new email campaign, saves your changes into a Draft status, and returns you to the Email Campaigns page. You can modify this campaign later.
- Launch campaign: Prepares to launch the email campaign.
- Confirm you are ready to send your email campaign by selecting Launch email campaign. This action puts the email campaign in the queue to send at the specified date and time.


