Create a Custom CAISY Simulation (limited preview program)
Skillsoft offers CAISY™, a Conversation Artificial Intelligence Simulator. CAISY provides interactive, scenario-based content powered by AI where a learner can practice new skills in a safe space by providing secure and realistic simulations. This AI simulation content allows learners to choose a role, practice specific skills by responding to AI prompts, and receive adaptive, personalized feedback to guide their development. Having CAISY in your developmental toolkit can reduce the need for expensive, time-consuming, instructor-led training because the solution is scalable across departments, employee-levels, and situations. Employees can train at their own pace, eliminating scheduling conflicts and time away from work. When your employees receive the targeted training and coaching they need, it can lead to better decision making reducing your legal risks and increasing your operational efficiencies.
Percipio makes it easy to create your own custom CAISY simulations so that your learners can practice skills they need to excel at their specific roles, tailored to your organization's unique perspectives.
If you are interested in creating your own custom CAISY simulations, speak with your Skillsoft account team for more information.
Best practices for creating a custom CAISY simulation
When you create a custom CAISY, we recommend the following:
- Avoid fact-based topics such as compliance. Choose scenarios where learners practice interactive, real-world conversations.
- Decide what you want the tone of the simulation to be. Add details in the description to indicate if the tone should be professional, casual, or serious.
- Use specific terminology in your description that you want the AI to use. For example: Use the term "team member" instead of "employee" if that is the standard practice for your organization.
- Keep your description as simple and straightforward as possible.
- Remember to design the simulation for a two-person interaction.
- Limit the core learning objectives to three. Make sure to clearly state them in the description if you want them to be referenced in the conversation.
Create a custom CAISY
To create a custom CAISY simulation:
-
From the left navigation bar, select Content > Content Items, then Create Custom CAISY. The Create Custom CAISY workflow shows. The workflow consists of five steps.
-
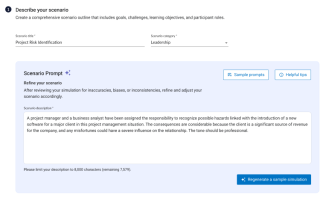
The first step in the Create Custom CAISY workflow is Create Simulation. You must complete the following fields:
- Scenario title: Enter a title that displays to learners so it should reflect the main topic of learning. This field is required.
- Scenario Category: Enter a category or select one from the list that displays to learners. The category is a broader topic or skill that learners using the simulation are trying to improve. This field is required.
- Scenario Prompt: The tool uses the answers you supply in this section to generate the sample simulation. All fields are required.
- What is the primary goal or desired outcome for this scenario?: Be specific about the main thing a learner should gain by using this simulation.
- What are up to 3 key learning objectives for this scenario?: Be specific about the most important objectives that learners should be able to do upon completion of the simulation.
- What role should the AI play?: Enter a role that you want the AI to simulate. The role determines how AI responds to the learner, for example, the types of questions it will ask.
- What role should the learner play?: Enter a role that you want the learner to assume when going through the simulation. The role of the learner determines what they will be asked and how they are expected to respond.
-
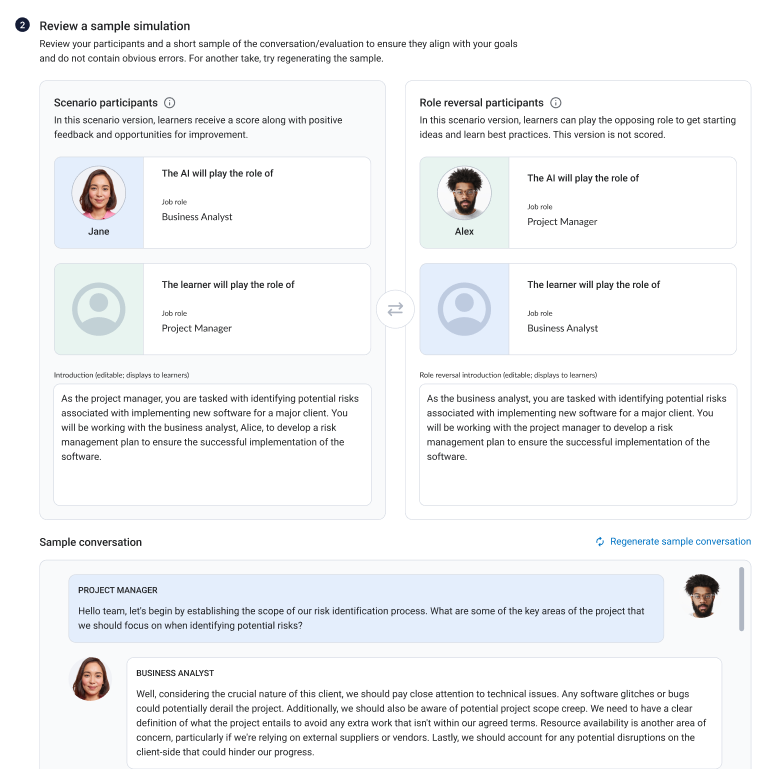
After you specify all the information for the scenario prompt, select Generate a sample simulation. The tool returns a Scenario prompt, Sample simulations, and a Sample conversation. There are two sample simulations, one for when the learner picks practice mode, and the other for when the learner picks role model mode. The Sample simulations are what show to learners when they launch this CAISY.
Review all three together to see the full results of what the tool provided and how you can expect it to behave for the learner. If they are not what you expected, follow this process:
-
First review the Scenario prompt. This is what the tool uses to generate the Sample simulation roles and introductory text that shows to the learner. Ensure that it provides enough detail about what the simulation is about and the expectations for completing it.
If you want you can edit the Scenario prompt inline so that it best meets your learning objectives, roles, business context, and overall scenario. You can also select Sample prompts to see other examples for different scenarios.
After you have the prompt as you like it, you can then Regenerate a sample simulation.
-
If you feel the Scenario prompt is good, read through the Sample simulations section. The two sample simulations show the roles and introductory text for both the practice and role model mode. What shows in this section, displays to learners when they launch the CAISY simulation. Ensure the roles are accurate and the introduction text provides enough context for the learner to interact with the simulation, but not too much as to discourage them from engaging. You can modify the introduction text for both simulations by typing in the Introduction box.

After making any modification to the Sample simulations, select Regenerate sample conversation.
-
Review the Sample conversation. Make sure the conversation adheres to your learning objectives. If it does not, go back and revise either or both of the Scenario prompt or Simulation introductions. Then select Regenerate sample conversation. Continue in the manner until you feel the simulation and sample conversation are going to meet your requirements. If you need recommendations for improvement, select the recommendations link under the Its not quite right box.
-
If everything looks good, you can continue.
-
-
Select Test Simulation. You can run through an actual simulation in a practice environment to see how it plays out without publishing anything to your production site.
If you want others to test too, select Save as draft. When other admins locate the CAISY simulation in the Content list, they can choose to edit it to see the Test simulation button.
-
When you are done testing, select Next: Provide simulation details.
-
On the Simulation Details page, complete the following fields:
- Title: This is the title that displays to learners. You can keep the default title which is the one you created earlier, or change it.
- Description: This is the description that displays to learners. The tool generates a default description based on your responses in step one. You may chose to alter the description in this step.
- Image: Choose an image that the learners will see in the content card of the CAISY simulation.
- Images should be in a 16x9 aspect ratio.
- The recommended size for the image is 1920 x 1080px.
- The file size must be 300k or less.
- A .jpg format is preferred, but you can upload .jpg, .png, and .gif files.
- If you do not have a custom image, you can select a royalty-free one from the image gallery or use the default Percipio image.
- Language: The CAISY simulation will automatically be available in the user's preferred language, however, you must publish it in each language you want linked content to show in.
-
Once you have finished creating the details that show to learners, select Next: Add discovery information.
-
You will see the following fields on the Simulation discovery page that determine how the simulation is classified in Percipio. All of these attributes help learners search for and discover your custom CAISY.
- Modality: Once you add your custom CAISY to a channel, it will show in whichever modality tab you choose in this step. We recommend Practice.
- Select a Content type. Content type is a universally recognized classification that defines how the content will be consumed by the learner. By default, it shows as AI Simulation.
- Select a Content source from the list or enter a new value. We suggest you use the type ahead feature to avoid replicating an existing entry. Content Source is who owns the intellectual property; it is not the platform where the item resides, such as YouTube or SharePoint. Skillsoft uses source to distinguish brands and partner content like Wintellect and GoFluent. If you have the permission to manage content types and source values enabled, you can add new values to this field. If that permission is not enabled, you must pick from existing values for this field.By default, the value specified in Organization name is associated as a content source for your custom content, dynamic content, journeys, and live courses. You do not need to specify the Organization name in this field in order for learners to use the Organization name as a Content source filter on the search results page, but you must specify something as described above.
- Recommended duration: Estimate how long a learner will take to complete the simulation.
- Content has been created and optimized for: Choose the best device for a learner to complete the simulation on. When learners attempt to access this content on a device not selected here (an “unsupported device”), a message directs them to access the content on the selected (“supported”) device(s).
- Expertise level: You have the option to select a level of expertise that is optimal for completing the simulation. For example, you may be targeting your simulation to learners who are new to the topic. In this case you may choose to select beginner as the expertise level.
- Technology title: You may choose to add additional details about the technology covered in the simulation.
- Technology version: You may choose to add additional details about the technology covered in the simulation.
- Additional search terms: If you enter terms in this field, your custom CAISY will appear in the results if a learner searches for that term.
- External ID: An External ID is the unique identifier used when searching for your custom content in Percipio Admin.
-
Select Next: Review and finalize.Review the information on the summary page. Be sure that all of the details are right for your custom CAISY simulation.
-
Select Publish simulation, then confirm that you want to publish the content.
-
You must add your custom CAISY simulation to a channel or journey so that it shows to learners.
 Add published custom content item to a custom channel or journey.
To add the item to a journey, see Editing a Journey. To add to a custom channel follow these steps:
- On the Content > Channels page, select the name of the channel to which you want to add the custom content. The Edit Channel page displays.
- Select Add content from library.
- Enter item's title.
- Select
 .
.
Note: If you recently published your item to Percipio's server, it may take several minutes to display in your search results.- Locate the item and click
 to add it to the channel.
 - Select Done to save the channel.
- Select Publish to publish the channel to Percipio.
The number of assets in each modality updates in yellow. To see the newly-added item, click the appropriate modality tab.
Learners can now find your custom content in the library or by searching.