Previous Topic

Next Topic

Assign Books24x7 Collections to specific learners

You can assign Books24x7 collections in a more granular way, so that your licensed collections can be specifically available to your targeted learners. You can do this by creating a new Group with specific Books24x7 assets that will be available to select learners.

This is a manual process in OLSA and can be accomplished by doing the following:

  1. Perform several Admin tasks in OLSA to create a new Group for these Books collections.
  2. Download the relevant metadata for the assets.
  3. Copy and edit the metadata that's been generated.

To create a new group for specific Books assets

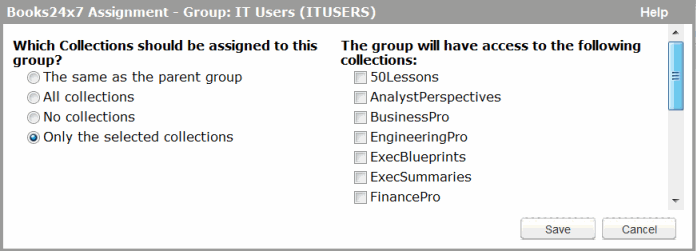
For example purposes, we will set up an IT Users group to assign the ITPro Books24x7 collection to.

  1. Log in to the OLSA Admin.
  2. From the OLSA Admin home page, select Management > User & Group Management. The User & Groups Management screen appears.
  3. Under the Skillsoft group, create a new group by selecting New Group. The New Group dialog appears. Enter the following:
  4. Do one of the following:
    1. Click Save & Add Another if you'd like to create another new group.
    2. Click Save to return to the User & Groups main window.
  5. Entitle the collection to the new group by doing the following:
    1. From the Users & Groups window, in the left pane, select the new group (in our example, IT Users). In the right pane, select the Books 24x7 Assignment Tab. Click Edit Group Assignments.

      The Books24x7 Assignment dialog appears. Select which collection(s) should be assigned to the group. Use the scroll bar to view all possible collections:

      Once you've selected the collection(s) to entitle to the group, click Save.

  6. Download the AICC metadata for addon_books_001. You will now need to edit the metadata. For more information on this, see the section on editing AICC metadata and editing SCORM metadata.
  7. Copy the addon_books_001 metadata to a new file and rename the file (for example, addon_books_001_itpro. You may name the file whatever you wish).
  8. Open the AU file and edit the web_launch parameter appending &groupcode=<orgcode>, where <orgcode> is the name you have selected for the Org Code of the new group. In our example, &groupcode=ITUSERS.
  9. Open the CRS file and edit the Course_Title and Course_ID elements. You must edit these, and optionally can also edit the description; choose meaningful names. The example below shows the standard CRS file followed by the edited CRS file:

    Standard CRS File

    Edited CRS file

  10. Load the metadata into your LMS:
  11. You can now assign this new asset to users that you wish to have access to the specified Books24x7 collections.