Create a Schedule
Before creating a schedule, it is important to understand how the schedule dates and the template date filters relate to each other. See Understanding Date Settings for more information.
To create a schedule
- Click Templates and select either the Default or Personal tab.
- Select the desired template.
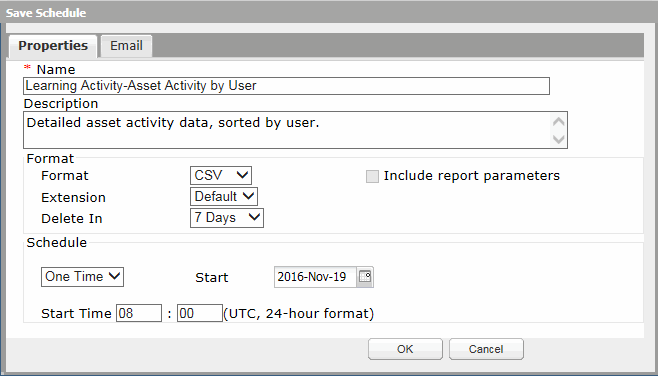
- Click Schedule. The Save Schedule dialog displays with a Properties tab and an Email tab.

- In the Properties tab complete all fields as described below.
- Name - (Required) Modifiable field pre-populated with the name of the saved template. Creates the name of the schedule and the name of the report generated by the schedule. Max character limit is 256. Accepts alphanumeric characters only. Does not support the use of any special characters.
- Description - Modifiable field pre-populated with the description from the saved template. Field can be blank. Max character limit is 512.
- Format - Determines the format of the saved report generated by the schedule. Choices include: Excel, HTML, CSV (default), PDF. When opened, a saved report displays in the viewer associated with the file type on the user's machine.
Note: Reports saved in the Excel format may have an extra column in every row. You cannot hide this column in the report template, however you can remove the column once you open the report in Excel.
- Extension - Determines the file extension (Default or TXT) for the report results. Only enabled for the CSV Format.
- Delete In - Determines when the report generated by the schedule will be automatically deleted from the Results tab. Choices include: 7 Days (default), or 30 Days. To store a report for longer than 30 days, use the Download option.
- Include report parameters - When checked, parameters such as template name, description, date generated, input options, and last successful database refresh will display in the report generated by the schedule. Default is unchecked. Cannot include parameters in a CSV file.
Note: Saving a report in the Excel format with Include report parameters checked causes columns to merge and the output is difficult to read.
- In the Schedule section, select the type of schedule you want to create from the drop down. Complete all fields as described below.
Note: The time zone for all schedule Start times is UTC.
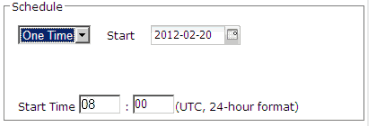
 One Time Schedule One Time Schedule
Create a one time schedule if you only need a snapshot of the data for one period in time.

Complete all fields as described below.
- Start - (Required) Determines the date the schedule should become active. The schedule will run the report once and not reoccur. Default is next day's date.
- Start Time - (Required) Determines the time of day the report will be queued for execution. For best performance, the default start time is a random time between 07:00 and 11:55 UTC. However, you can change this to meet your specific needs.
 Daily Schedule Daily Schedule
Create a daily schedule if you need the report to run on more than one day a week.

Complete all fields as described below.
- Start - (Required) Determines the date the schedule should become active. Default is the next day's date.
- End by - Determines the date the schedule becomes inactive and reports stop running. If left blank, the report will reoccur indefinitely.
- On the following days - Determines which days of the week the report will run. Select one or more days.
- Start Time - (Required) Determines what time of day the report will be queued for execution. For best performance, the default start time is a random time between 07:00 and 11:55 UTC. However, you can change this to meet your specific needs.
 Weekly Schedule Weekly Schedule
Create a weekly schedule to run the report on only one day of the week.

Complete all fields as described below.
- Start - (Required) Determines the date the schedule should become active. Default is the next day's date.
- End by - Determines the date the schedule becomes inactive and reports stop running. If left blank, the report will reoccur indefinitely.
- On the following day - Determines which day of the week the report will run. Select only one day.
- Start Time - (Required) Determines what time of day the report will be queued for execution. For best performance, the default start time is a random time between 07:00 and 11:55 UTC. However, you can change this to meet your specific needs.
 Monthly Schedule Monthly Schedule
Create a monthly schedule to run the report on the same day of each month.

Complete all fields as described below.
- Start - (Required) Determines both the date the schedule becomes active and the day of the month the report will run. If the date is 29, 30, or 31 the report will not run for months that do not contain that date. Default is the next day's date.
- End by - Determines the date the schedule becomes inactive and reports stop running. If left blank, the report will reoccur indefinitely.
- Start Time - (Required) Determines what time of day the report will be queued for execution. For best performance, the default start time is a random time between 07:00 and 11:55 UTC. However, you can change this to meet your specific needs.
If desired, click the Email tab to configure the Email Notifications feature.
- Click OK. The schedule displays on the Schedules window.
|

 One Time Schedule


