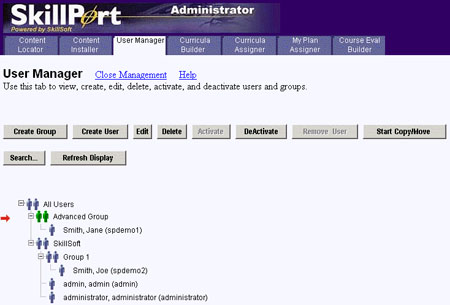
User Manager Tab
Use the User Manager to view, create, edit, delete, activate, and deactivate  users, users,  user groups, and user groups, and  advanced groups. Users are displayed in an expandable tree hierarchy, organized into various user groups. advanced groups. Users are displayed in an expandable tree hierarchy, organized into various user groups.
Working with User Groups
- Users can be part of more than one group. No matter the number of groups a user appears in, there is still only ONE record for that user in the SkillPort database.
- Remove vs. Delete Users. If you want to remove a user from a group use the Remove User button to take a user out of a particular group. Note a user must be part of at least ONE group. Use Delete to permanently remove the user record from the database.
- You cannot delete the original admin or administrator users in the SkillSoft root group.
- If the ILT Add-On Module is installed/enabled, users with ILT history cannot be deleted from SkillPort. If you wish to delete a user from the system, you can either remove their ILT records using the ILT module and then delete them, or simply deactivate the user in SkillPort instead of deleting them.
- If an Approval Manager is deleted, all users assigned to that account will be left without an Approval Manager. You should first assign those users to a new Approval Manager prior to deleting the original account. Run the Users Manager Report to locate all users assigned to the Approval Manager being deleted and assign those users to a new Approval Manager. You can then delete the original Approval Manager account.
- Only registered users are shown in the user tree.
- Users are either Active (able to log in to SkillPort and access learning events) or inactive (user cannot log in to SkillPort). Inactive users appear in the user tree with the word (DEACTIVATED) next to their name. Select a user and click the Activate or Deactivate button to change the user's status.
- Use the More Users or the More Groups link to page through long lists. The User Manager can display up to 24 users or groups at one time.
 How to... How to...
 Create a new user or group Create a new user or group
- Select the parent group for the new user or group. Users and groups will inherit their parent group's content assignments.
- Click Create Group or Create User.
- Enter the appropriate information in the form fields.
Create User:
- All fields except Login/username are optional. The password, firstname and lastname will default to the username if not supplied.
- Fields on the create user form are determined by the settings in User-Stat Options form.
- You must specify a user profile for new users.
- If Enable User Manager Custom Privs is enabled in website switches, You can further define a user's access to administrative features by customizing their user privileges. Custom User Privs allows you to limit Admin or Manager access to specific functionality when creating or editing a user.
- Only Super-admin, Company Admin and Admin users can create groups and users.
- An Admin user cannot create or modify a Super-Admin user.
- You must follow the allowed character criteria when creating users.
- If Enable Manager Approval is turned on in website switches, select an Approval Manager (Optional).
Note: There exists a list of reserved words that you cannot use in creating user names (doing so produces an error). The following are the most common: add, all, block, count, down, force, link, mount, off, simple, tag, up.
Create Group:
- Enter the user group name (required) and org code (optional).
- Select the check box to make this group a available as an option on the self registration page.
- Click Submit.
Note: Group names are limited to 240 characters.
Copy/Move users and groups
- Select a user or group in the user tree. A red arrow appears to the left of the selected item.
 - Click Start Copy/Move.
- Select the items you want to copy or move in the Select Items to Move box and then click Next.
 Note: You cannot copy groups (they must each be unique).
Select the destination group in the user tree.
- Click Move Selected Items or Copy Selected Items. The group and user hierarchy on the left refreshes and the selected item(s) appears in the destination group.
Note: You cannot move the root SkillSoft group. Certain admin functions may fail when copying/moving users or groups that share the same name. For example, moving user ABC in to group ABC.
Search for a user or group
- Click Search.
- Select either Search by User or Search by Group.
 - If searching by user, enter the login name, first name, last name, email address or Approval Manager. If searching by group, enter the group name or org code.
- Searching with wildcards: Use an asterisk (*) to represent one or more characters in a search if you are not sure of the course name, course ID, or group name. For example, to search for a course that contains the word "Network", you could type *network*. This will return all courses that have the Network in the course title.
- Select the method for ordering search results:
- If you are searching by user, select login name, first name, last name or email address.
- If searching by group, select group name or org code.
- Choose to display the first 25 or first 50 rows of search results.
- Click Search.
- If results are found, the user or group displayed in the hierarchy. If that user or group exists in a group with other users, the search result shows only the user you specified.
- If no results were found, you are prompted to click Refresh Display to return to the user hierarchy.
|