|
|
|
Group CSV Template
The group CSV template is the file that you edit (and then upload) to define the hierarchy of the user groups in your organization. A group hierarchy is needed in order to register learners into specific groups or organizations. Once your group structure is in place, administrators can better manage reporting and curricula assignments.
Note: The size of the file that you upload cannot exceed 786 KB. If your file exceeds this size, divide the group data across 2 or more files as needed, and upload the files one at a time.
File Type
- Must be submitted in CSV format
- Must be encoded in UTF-8 format
File Names
As a best practice (not required), use a convention such as <mycompany>_groupADD_<date>.csv, for example, ABCCorporation_groupADD_05262009.csv.
Upload Guidelines
- Regardless of whether you are uploading a batch of new groups or changes to existing groups, you must include all required fields. During an update operation, if an optional field is left empty, the existing value for a group is not changed.
- As mentioned above, the file size cannot exceed 786 KB. If the file that you need to upload exceeds this size, divide the group data across 2 or more files as needed, and upload the files one at a time.
- Specify parent groups before subgroups.
- Do not change the values in row 1 (column headers) or the import will fail.
- Data for a column must fit in one cell. See the maximum field sizes that follow.
- Enclose fields with embedded commas in quotes. Note that the quotes are not saved as part of the field value. If quotes are desired as the first and last characters of the field data, then you must enclose them with a second set of quotes. For example, to upload “myName”, you must enter “”myName””.
Upload Format
A group upload file contains several columns that organize the groups in an expandable tree structure. The following table describes each field in the group CSV template.
Field |
Required? |
Maximum |
Description |
Name |
Yes |
240 |
The name for the group that is displayed in the User & Group Management user interface. |
Org Code |
Yes, but only for an update operation |
240 |
The unique, alphanumeric identifier for the group. The purpose of the org code is to uniquely identify the group in the system, as the name of the group does not have to be unique. If you do not specify an org code for a new group, the system assigns one to the group automatically during the import process using the format org_<number>, for example, org_18. However, you can change the org code for a group at any time. You can use the following characters:
Spaces, tabs, and new lines are not accepted. Note: Do not change this value when performing a group update. To determine a group's org code, click Users & Groups | User Management, and navigate to the group in the hierarchy in the left pane. The org code for a group is displayed in parentheses beside the group name. |
Display on Registration Page |
No |
See Description |
Determines whether the group is displayed on the Self-Registration page. Acceptable values are 1 (for yes) or 0 (for no). The default value is 0. Note: All groups displayed on the Self-Registration page must also display the parent group under which they reside. In other words, to display a subgroup on the Self-Registration page, you must first display its parent group. |
Group Type |
No |
See Description |
Indicates the type of group. Acceptable values are NORMAL, ADVANCED, and ASSIGNMENT_GROUP. If this field is not set, the group data is treated as a NORMAL group. |
Parent Group |
Yes |
240 |
The org code of the parent group for this group. A group with this org code must already exist. Capital letters are accepted, and the value must not contain spaces, tabs or new lines. The value _*_ means this group is a root group (has no parent). The position of this field in the group upload file will determine its lineage. Note: Advanced groups may only be top-level groups. Assignment groups may only exist in the top-level group called "Assignment Groups". The Parent Group field is ignored for both of these group types, and any changes to this column in the Group CSV template are ignored (groups cannot be moved to new parent groups using the Batch Add/Upload feature).
|
The column labels in the group CSV file are identical to the field labels that you see when you create a new group using the User & Group Management interface.
Defining the Group Hierarchy
Groups are added in a hierarchical manner, which means the highest-level group (root group) must be indicated first. Subgroups are then added sequentially as defined in the group CSV file. To assist you in creating a well-formed group CSV file, SkillSoft recommends that you visually map out the group structure that you require before completing the file.
As an example, assume you are an administrator for ABC Corporation, and a group representing ABC Corporation has already been created for you by SkillSoft when your site was built. Typically this top-level group is named with your company name. Your task is to define a group CSV file that defines the additional groups—and group hierarchy—as shown in the following image:
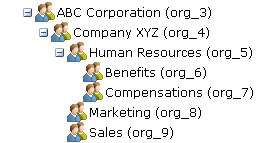
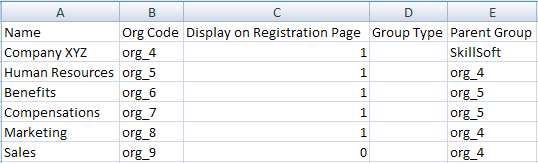
Because groups are added in a hierarchical and sequential manner, to create the group hierarchy shown above, you must create a group CSV file that looks like the following:
Note: If you listed the Benefits and Compensations groups before the Human Resources group, the upload would fail because both groups are subgroups of the Human Resources groups. To add either group to the system, the Human Resources group must already exist.
Displaying Groups on the Registration Page
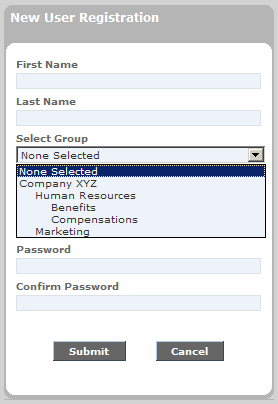
You can specify that the groups defined in the group CSV file be displayed on the New User Registration page. This allows learners to join these groups (either a single group or multiple groups) when they register themselves.
To display a group on the New User Registration page, under the Display on Registration Page column in the group CSV file, enter a 1 for the given group and for all parent groups above it in the group hierarchy. To hide a group on the New User Registration page, enter a 0.
In the preceding image, note that the Sales group is not shown. This is because the groups were defined using the group CSV file shown earlier in this topic, which specified a 0 for Sales in the Display on Registration Page column.
Specifying a Group Type
You can specify one of the following:
- NORMAL
- ADVANCED
- ASSIGNMENT_GROUP
As mentioned earlier in this topic, if this field is not set, the group data is treated as a NORMAL group (an organizational group ![]() ). For more information on advanced groups
). For more information on advanced groups ![]() and assignment groups
and assignment groups ![]() , respectively, see Advanced Groups and Assignment Groups.
, respectively, see Advanced Groups and Assignment Groups.