Configure a Course
For most Skillsoft courses in your collection, you can add one or more configurations. Courses that Skillsoft provides through a vendor, such as Microsoft or Cisco, are not available for configuration.
A configuration is a copy of a course where you can add any non-instructional topics to the course's table of contents. Non-instructional topics could include introductory or summary text, policy or other documents, or videos. Adding a configuration does not change the original structure of the course, or the course number![]() The number assigned by Skillsoft to each course. An example of a course number for a legal course is: lchr_01_a87_lc_enus; and one for an environmental course is: ehs_hsf_c10_sh_enus. You can add as many configurations per course as you need, and for each configuration you can add as many topics as you need. After you publish a configuration, you must add it to a custom channel or journey for learners to access it.
The number assigned by Skillsoft to each course. An example of a course number for a legal course is: lchr_01_a87_lc_enus; and one for an environmental course is: ehs_hsf_c10_sh_enus. You can add as many configurations per course as you need, and for each configuration you can add as many topics as you need. After you publish a configuration, you must add it to a custom channel or journey for learners to access it.
Compliance Note
Only customers who have Skillsoft Compliance Suite and manage their compliance content in the Skillsoft Platform can use this feature. If you manage your compliance courses in the Compliance platform (Compliance 1.0), see these instructions for configuration.
.To configure a course:
- Select Content > Content Configuration.
- Select Create configuration.
- Locate the course you want to configure by first selecting the language and then start typing the course title until it shows in the list. If the course you want to configure is retiring soon, you will see a notification letting you know. We recommend that you pick a replacement course if one has been identified.
If you can't find the course you want to configure in the list, it is not available for configuration (most likely because it is a vendor's course that Skillsoft has in its collection). If you select a course that is available for credit, such as for PDU or CPE credits, and configure it, a learner who takes the configured course won't earn any credits. If the learner needs the credits, they need to take the original Skillsoft approved course.
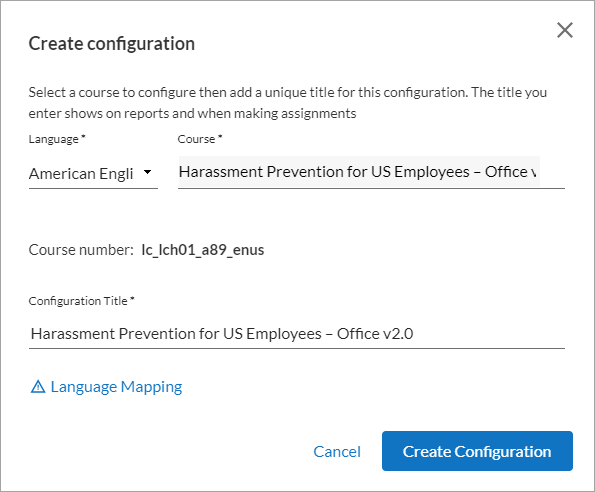
- Next, specify a unique title for this new configuration.
- The new configuration retains the same Course number
 The number assigned by Skillsoft to each course. An example of a course number for a legal course is: lchr_01_a87_lc_enus; and one for an environmental course is: ehs_hsf_c10_sh_enus as the original Skillsoft course and continues to get any course updates.
 - The new configuration does get a new Content ID Unique identifier for a specific content asset.. The Content ID is appended to the Course number when naming an AICC package for importing into a third party LMS.
- You can change the title later if you need. You just need to republish the configuration for learners to be able to see it.
- You can not add a configuration to a configured course, you can only add a configuration to a Skillsoft original course.
- When you add a configuration to a course that is available for CPE or PDU credits, the configured version of the course is not available for credits.
- If you want to offer each configuration in more than one language, you must select each language version of the course from the list, then add the translated files. If you do not have translations for a particular language version, but want the language version to display to learners, you must still add a configuration to that language version but with no content. If you do not add a configuration for a language version, the learner using that language sees the English version of the configuration. You can also add a language mapping.
For example: An administrator wants to add a policy to the English and Spanish versions of a Back Safety course, but not the French version. However, the administrator wants to allow their learners to view the course in all three languages. To achieve this, the administrator must:
- Create additional configurations for the each of the English, Spanish, and French versions of the Back Safety course
- Add a policy document to the English and Spanish versions
- Link the languages together via language mapping
The result allows a learner to choose between English, Spanish, and French when taking the configured Back Safety course. If English or Spanish is chosen the learner sees the appropriate policy as part of the course content. If French is chosen, they only see the original course in French. If you do not create a French configuration, the learner choosing French sees the course in the English configuration.
Note for Multiple Configurations: If you want to assign the configured course only once using the English version and allow the learner to automatically see the configuration in their own language, you must also supply Skillsoft with a language mapping that shows which configurations correspond to each other. If you do not supply the language mapping, learners see the English version of the configuration.
- The new configuration retains the same Course number
- If you want to select which topics of the course to keep, turn on Content Management, otherwise keep it off and go to step 6. If you turn on Content Management, you cannot turn it off. You would have to recreate your configuration.

With Content Management on, do the following:
- Review all topics and select the Visibility toggle next to each topic to turn on those you want your learners to take. A few notes regarding visibility:
- If you choose to hide a content item, its associated questions are hidden from knowledge checks and the course test in the published course even if you leave visibility turned on for the knowledge checks.
- The questions that show to learners in a knowledge check are dynamic. If you hide a knowledge check, the succeeding knowledge check in the table of contents assumes the questions from the content topics prior to it. For example:
If you have a table of contents:
Topic 1
Topic 2
Knowledge check A — contains at least 2 questions, 1 for Topic 1, 1 for Topic 2
Topic 3
Knowledge check B — contains at least 1 question for Topic 3
If you hide Knowledge check A, the questions from Knowledge check A go to Knowledge check B provided you don't hide Topic 1 or Topic 2.
If you were to keep Topic 1 and 2, hide Knowledge check B, and move Knowledge check A after Topic 3, then Knowledge check A would contain the questions for all three topics.
- If you want, you can edit the title of the topic to make it relevant for your learners. Select the edit icon in the topic row for the title you want to edit,
 , and enter your new title. Select Save.
 - Click and drag the topics in the order you want your learners to take them. A few notes regarding order:
- A knowledge check contains at least one question for every content topic that precedes it. If multiple Knowledge Checks exist in the table of contents, then each succeeding knowledge check will only ask questions on the content topics that show after the preceeding knowledge check.
- If you place two knowledge checks one right after the other, only one shows in the published version of the course. The knowledge check that shows contains all the questions for the content topics that show after the preceeding knowledge check.
- Select the Course test tab to review the questions your learners will see. For each topic you made visible, you see a bank of questions. Every time the learner takes the course test, one question from the bank of each topic is presented to the learner.
- Review all topics and select the Visibility toggle next to each topic to turn on those you want your learners to take. A few notes regarding visibility:
- Add you non-instructional topics. Select Add content.
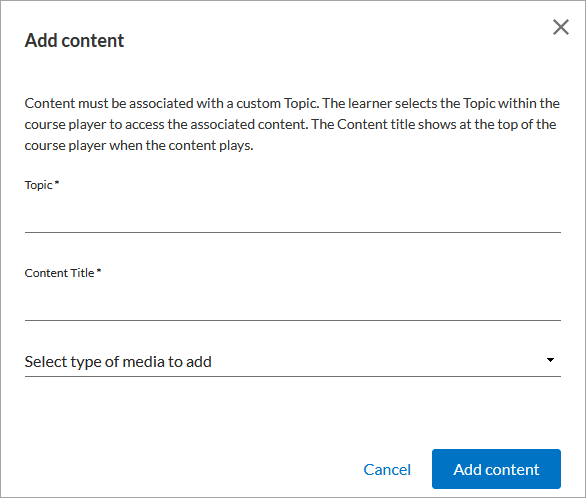
- Specify the type of content you are adding by entering:
- Topic: This displays to learners in the course player table of contents.
- Content title: The content title shows at the top of the course player when the item plays.
- Type of media to add:
- Video: An MP4 file that is less than 1GB.
- Text: Any formatted text
- Policy: A PDF or a URL link
- Select Add content. The details page displays.
- Enter the details of the item you are adding:
- Title: Enter a title that displays to the learner when viewing the topic.
- Duration: Specify in hours and minutes how long the learner can expect to engage with the content. If adding a video, this is populated automatically from the video file metadata.
- Document/video: Only shows if you selected Video or Policy.
- If adding a video, add an MP4 that is less than 1GB
- If adding a policy document and you select PDF, add a PDF document.
- If adding a policy document and you select Add link, enter a URL.
- Description: Only shows if you selected Policy or Text. Enter a description of what this policy contains or your full text. Use the in app formatting bar to make it easy to read.
- Attestation statements: Only shows if you selected Policy. Ensure your learners read and understand the policy by adding up to 5 questions that the user has to answer before progressing further into the course.
- Accessibility: Options change depending on the type of content you selected. All audio files must be mp3.
- Audio descriptions: if adding a video, you can add an audio description file.
- Non-video playback image: if adding a video, you can add a non-video playback image in JPG or PNG format. This image displays to a learner if they disable video because of low bandwidth.
- Text audio: if adding text, you can add a corresponding audio file in MP3 format.
- Policy text and attestation audio: if adding a policy, you can add a policy text and attestation audio file in MP3 format.
- After you add your configuration information, select Save. You now see the Table of Contents tab with your new topic added.
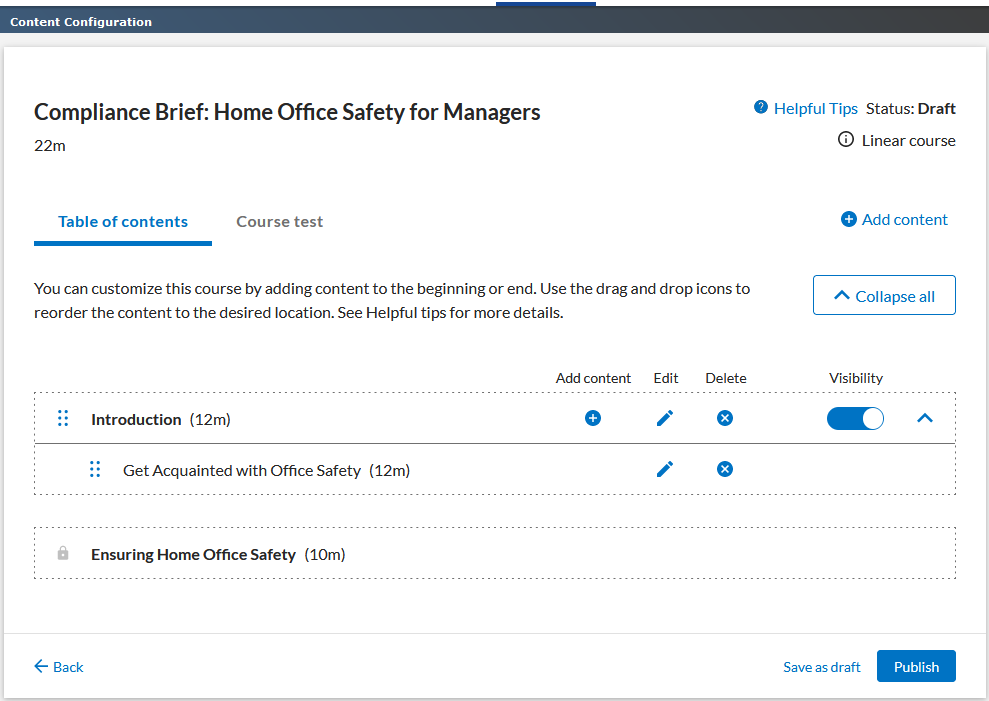
- Continue adding content in this manner (steps 6- 10), or if you want you can add additional items under the topic you created by selecting the plus icon,
 .
. - Click and drag your topics in the order you want them presented to the learner.
- You can move topics to the beginning, end, or between topics.
- You cannot move sub-items between topics, but you can move items within topics.
- If you want, you can Preview configuration to see how your course will display to learners in the course player. The course player opens in another browser tab. After you make and save changes, it may take a few minutes to process your changes and for the preview function to become available. Previewing a course configuration may have some minor differences from the final experience that Learners see.
- After you add all your topics and have them in the order you want, choose one of the following:
- Save as draft: Save all changes and return to the Content Configuration page where you can preview all your changes.
- Publish: Publish the course configuration so you can add it to a custom channel or journey so your learners can find it.
- Back: Returns you to the Content Configuration page.
If you chose Publish, you will need to add the configured course to a custom channel or journey so your learners can find it.
If you are configuring courses that need to sync with another LMS, you must also update the content rule set to individually include the configured courses.