Managing Class Registrations, Waitlists, and Completions
To manage class registrations, waitlists, and completions, you need to access the class roster. The roster includes a list of registered learners, wait-listed learners, and details of the class, such as capacity, status, start date, and location.
Instructors assigned to the class and others who can select Live Courses (ILT) from the Content menu in the left navigation bar can manage the roster.
Open the class roster
Before you can perform any roster action, you need to open the class roster.
To open the class roster, if you are an instructor
- From the left navigation bar, select My Learning, scroll to the Management section.
- Select Instructor Schedule. The list of classes assigned to you displays.
- From this list of classes, locate the specific class and select View Roster.
If you are a site admin, content coordinator, or content curator with live course (ILT) admin access
- Sign into the platform.
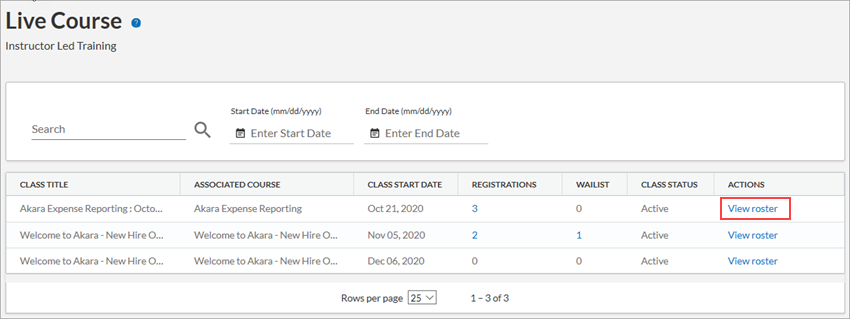
- From Content, select Live Courses (ILT). The list of live courses displays.
-
 in the Actions column, then select Manage Roster.
With the class roster open, you can perform any of the following actions:
- View roster and class details
- Approve or deny registration requests
- Register learners for a class
- Cancel a learner's registration
- Manage the waitlist
- Mark the class complete and give a score
- Revoke completions
- Mark the class incomplete
- Change an incompletion to a completion
- Download the class roster
- Download the course roster
- Download the class audit file
View the roster and class details
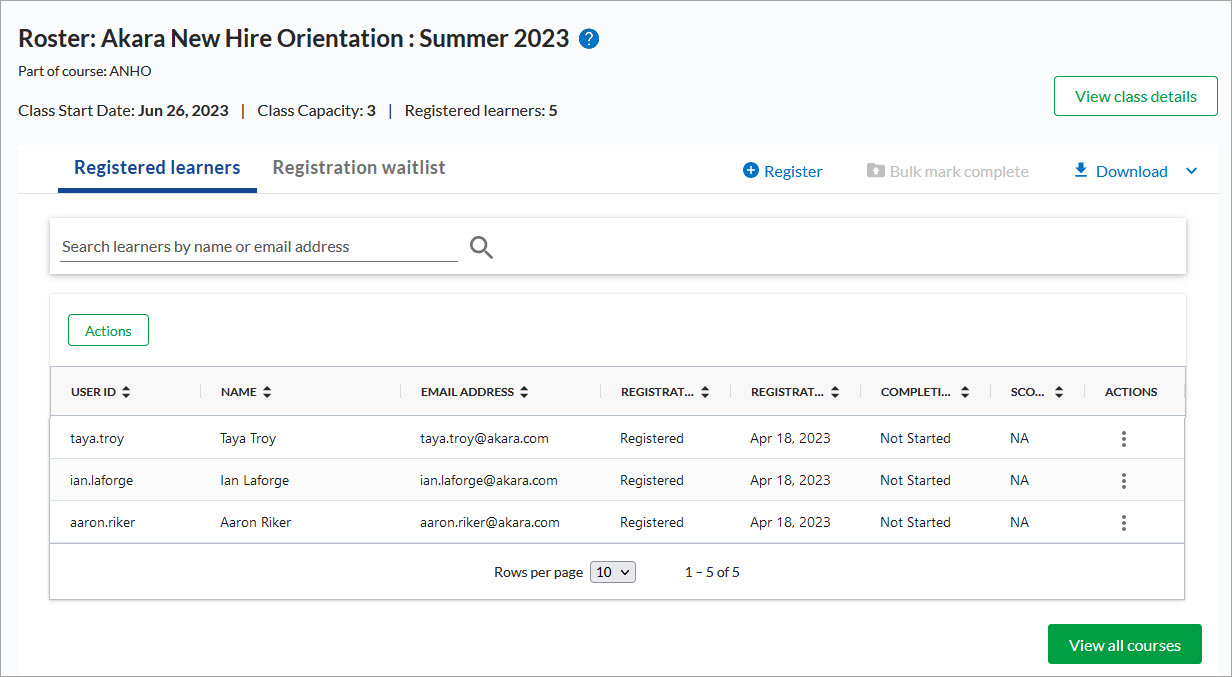
After opening the roster for a particular class, you see the class capacity, number of registered learners, and class start date across the top of the page. If you need additional details, select the View class details button.
The list of registered participants displays in the table under the Registered Learners tab. Select the Registration Waitlist tab to see those learners who attempted to register after the registration window closed or class capacity was reached.

Approve or deny registration requests
You can chose to activate the option to approve registration requests. Only site admins can approve pending requests. After learners make the request, site admins get an email notification.
-
If you chose to activate the option to approve registration requests you see a Pending approvals tab on the Manage roster page for a specific class.
-
To approve a single request:
- Locate the learner in the Pending approvals list.
- select the Actions menu in the Actions column, then select Approve Request. When you approve a request:
- If the class has reached maximum capacity, you have the option to either register the learner and exceed capacity, or add the learner to the waitlist.
- If you register the learner, the learner gets notified that their request was approved and their status changes to Registered.
- If you waitlist the learner, the learner gets notified that their request was approved and their status changes to Waitlisted.
- The learner has the option to Cancel their registration.
To deny a single request
- Locate the learner in the Pending approvals list.
- select the Actions menu in the Actions column, then select Deny Request. When you deny a request:
- You must specify a reason for denying the request.
- The learner gets notified that their request was denied. The status of the course changes to available and they can request approval again for the same class.
- The platform removes the learner's name from the Pending approval list. There is no record that you denied the request.
If you want to manage multiple learners for the same class at the same time:
- From the Manage roster page for the class, select Pending approvals.
- Select Actions.
- Select all or some of the learners using the check box on the left.
- With learners selected, under Actions, select either Approve request or Deny request.
Register learners for a class
Whether or not you allowed learners to self-register, you can register learners for a class. When registering learners:
- A learner must have a Skillsoft Platform user account before you can register them for a class.
- If multiple classes are available for one course, a learner can only be registered for one of its classes at a time. If a learner is currently registered for a class that is in progress, you cannot register them for a different class until all days and times of the current class have ended and you marked them incomplete.
- You can register learners even if the class is over capacity.
- You can register learners even if you did not add the live course to a channel they can access. In this case learners can only see the class listed on their Live Learning page.
To register a learner, select Register. There are three tabs available depending on what you need to do.
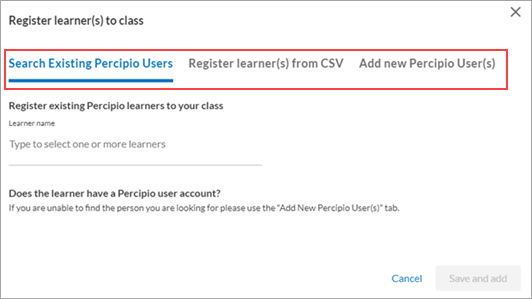
- Search existing Percipio users: Use this tab if you know learners have a Skillsoft Platform user account and there are not too many learners that you need to register.
- Type the learner name in the Learner name field. As you type, the platform finds matching user accounts.
- Select the matching user account.
- You can repeat until all learners you want to register display.
- Select Save and add. All learners get added to the registration list and receive a registration email confirmation.
- Register learners from CSV: Use this tab to register a long list of learners from a comma-separated value (CSV) file.
- Select Download template.
- Open the CSV file in your preferred editing application, such as Microsoft Excel or Google Sheets. Ensure to not alter the headers or remove any columns, otherwise the import will fail.
- For each learner you want to register, add either their Skillsoft Platform Login name, Email, or External User ID and specify one learner name per row.
- Save the file in the native CSV format.
- On the Register learners from CSV tab, click Select file.
- Locate the file and select Open.
- Select Register learners to this class. All learners get added to the registration list and receive a registration email confirmation.
- Add new Percipio users: Use this tab to open a new User Management browser window where you can create user accounts for the learners you need to register. After you create the user accounts, you need to return to Search existing Percipio users tab to register the learner.
Cancel a learner's registration
You can only cancel a learner's registration prior to the class start date. After the class start date passes, you have to wait until the last date and time of a class ends before you can mark the learner incomplete and register them for another class.
From the Registered Learners tab, locate the learner in the list, select the Actions menu ![]() in the Actions column, then select Yes, cancel registration.
in the Actions column, then select Yes, cancel registration.
When you cancel a learner's registration prior to the start date:
- The platform sends a notification via email that the registration was canceled.
- The class shows as available in the live course list as long as the class is not full.
- The learner can re-register for that class or a different class of that same course.
Manage the waitlist
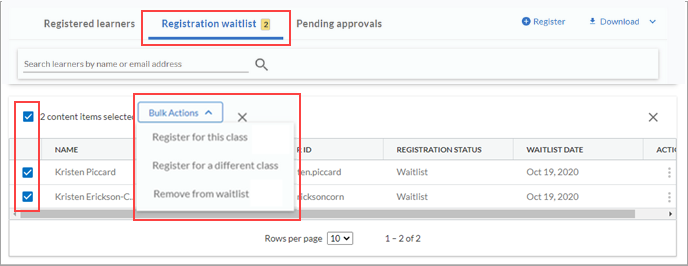
Click the Registration Waitlist tab. For each learner listed you can either register them for a class or remove them from the waitlist.
If you are managing one learner at a time, locate the learner in the list, select the Actions menu ![]() in the Actions column, then select Register for this class, Register for a different class, or Remove from waitlist.
in the Actions column, then select Register for this class, Register for a different class, or Remove from waitlist.
If you want to manage multiple learners at the same time:
- Select Actions.
- Select all or some of the learners using the check box on the left.
- With learners selected, under Actions, select either Register for this class, Register for a different class, or Remove from waitlist.
When working with the waitlist:
- When you register a learner to this class, the platform automatically removes them from the waitlist.
- You can register learners to a class even if the class will be over capacity.
- You can register a learner for a different class within the same live course. If that different class is also at capacity, you can add the learner to the waitlist of that other class or override its capacity.
- Canceling a waitlist request removes the learner from the list, but does not prevent the learner from joining it again.
Mark the class complete and give a score
After a class ends (for a multi-day class this is after the last date and time has passed), you can mark it complete for each learner. Learners see the course as Started in their Learning Activity until you mark it complete.
Click the Registered learners tab to begin.
To mark a single learner complete
- Locate the learner in the list, then select the Actions menu in the Actions column, select Mark complete and score.
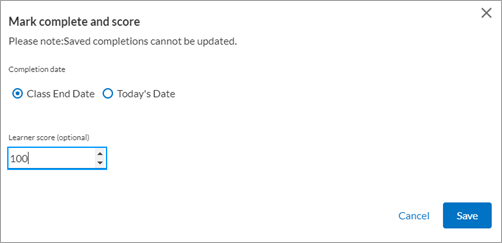
- Specify the date that should appear for completion, today's date or the date of the class.
- Enter a score for the learner.
- Select Save. The learner sees the score and completion in their Learning Activity.
To mark multiple learners complete at the same time
- Select Actions.
- Select all or some of the learners using the check box on the left.
- With learners selected, under Actions, select Mark complete and score. You are prompted to enter a date and score which will be applied to all learners selected.
- Select Save. Learners see the score and completion in their Learning Activity.
To mark learners complete with a CSV file
- Select Bulk mark complete.
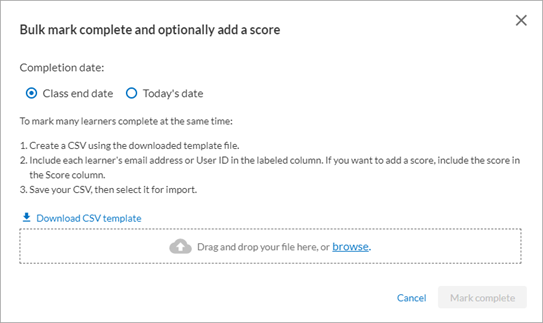
- Select the date that should display for completion, today's date or the end date of the class.
- Select Download CSV template.
- Open the downloaded template. For each learner, add a new row. Specify each learner's email address or User ID in the labeled column. If you want to add a score, include the score in the Score column.
- Save the CSV file.
- Add the CSV and select Mark complete. All users in the CSV file are marked complete.
Details on completing a course
When you mark a course complete for a learner, the following occurs
- Once you confirm your selection as complete, you can only change the status one time.
- If you perform a bulk action on a learner who already has a completion status and score, no changes are made to that learner.
- Learners see the completion status in their Learning Activity from My Learning.
- When you select bulk action and enter a score, all learners selected receive that score.
- When completing a class, you must specify a completion date. This can be the date of the last class or the date you are entering the data (today's date).
- If a learner who attended is not on the registration list, you can add that learner at this time.
- If all learners are marked complete or incomplete, the Class state changes to verified from ended.
Revoke completions
Before you revoke a completion, ensure it is what you want to do because once you revoke it, you cannot undo it. The revocation is final.
To revoke a completion for a learner:
- Locate the learner in the list, then select the Actions menu in the Actions column, select Revoke completion.
- Choose a reason for the revocation. Once you revoke a completion, you cannot change it back to complete. The action is irreversible.
- Select Yes, revoke the completion. The learner sees the updated status in their Learning Activity.
Mark the class incomplete
After a class ends (for a multi-day class this is after the last date and time has passed), you can mark it incomplete for a learner who did not attend or meet participation requirements. Learners see the course as Started in their Learning Activity after you mark it incomplete.
Click the Registered learners tab to begin.
To mark a single learner incomplete
- Locate the learner in the list, then select the Actions menu in the Actions column, and select Mark incomplete.
- You are prompted to confirm your selection.
To mark multiple learners incomplete at the same time
- Select Actions.
- Select all or some of the learners using the check box on the left.
- With learners selected, under Actions, select Mark incomplete.
- Select Save. Learners continue to see Started in their Learning Activity.
Details on marking a course incomplete
When you mark a course incomplete for a learner, the following occurs
- Once you confirm your selection as incomplete, you can only change the status one time.
- If you perform a bulk action on a learner who already has a completion status, no changes are made to that learner.
- Learners with an incomplete see the course as Started in their Learning Activity from My Learning.
- If you mark a learner incomplete, they can register for another class.
- If all learners are marked complete or incomplete, the Class state changes to verified from ended.
Change an incompletion to completion
Before you mark an incomplete to a completion, ensure it is what you want to do because once you complete it, you cannot undo it. The completion is final.
To change an incompletion for a learner:
- Locate the learner in the list, then select the Actions menu in the Actions column, select Mark complete and score.
- Choose a reason for the change in completion status.
- Select Save. The learner sees the updated status in their Learning Activity.
Download the roster
You may want to print the roster to use as a sign-in sheet or share with those who do not have online access.
Click Download. Choose either PDF or CSV format.
Other roster actions
Any Skillsoft Platform role with roster privileges, except instructors, have two additional actions they can take with regards to the roster.
Download the course roster
You can download the course roster as a CSV file. This file contains a list of learners who have interacted with at least one class associated with the course. The learners are grouped by class title, learner status (registered, waitlisted, approved, denied), and completion status. To download the course roster:
- From the Content menu in the left navigation bar, select Live Courses (ILT).
- Locate the course in the Courses tab, then select the Actions menu and Download course roster option.
Download the class audit file
You can download an audit history trail to see who made changes to learner registrations and when, including registrations, approvals, denials, and cancellations. To download the audit file:
- From the Content menu in the left navigation bar, select Live Courses (ILT).
-
and Download class audit option.
The CSV file provides specific class details at the top and then contains five sections:
- Learner registrations: Shows each learner who was registered to the class, who registered them, and on what date.
- Registration approvals: Shows each learner whose registration request was approved, by whom, and on what date.
- Registration denials: Shows each learner whose registration request was denied, by whom, and on what date.
- Canceled registrations: Shows each learner whose registration request was canceled, by whom, and on what date.
- Canceled waitlist requests: Shows each learner whose waitlist request was canceled, by whom, and on what date.