Email Templates
Your contract with Skillsoft determines if you have access to this feature. Reach out to your Skillsoft account team for more information.
You can create, edit, and delete email campaign templates to help ensure consistency across emails and teams. Templates help ensure all your admins are following your corporate brand guidelines.
You can create as many templates as you want for each campaign type. You can change the templates that campaigns use at any time depending on your situation. However, if you create a custom email template, you can only use it for custom campaigns, similarly, if you create a custom welcome email template or assignment email template, you can only use it for welcome campaigns and assignment notifications respectively.
Access email templates
To get to the email template page, navigate to Emails & Notifications > Email Templates.
You are presented with a list of all the email templates you created. For each template you see:
- Name: The name of the template.
- Category: Indicates if the template was created for welcome, assignment, or custom email campaigns. You can only use the associated template with the matching campaign, that mean you cannot use a welcome template for a custom email campaign.
- Status: The status of the template. The options include:
- Draft: The template is in a draft state and can be edited.
- Published: The template is published and can be selected as part of a campaign.
- Language: The default language the template was created in. It also shows a link to other languages selected.
- Created by: The first and last name of the person who created the template.
- Created date: The date the template was created.
- Modified by: The first and last name of the person who last modified the template.
- Modified date: The date the template was last modified.
Depending on the status of the template, you may find the following actions available:
- Edit: You can edit any template at any time. When you edit a template, any campaign associated with the template sees the new template next time the campaign is sent. If you edit a published template, you cannot save it as a draft again, you must republish it.
- Copy: Make a copy of the template if you want something similar without having to design it from scratch.
- Delete: Remove the template from the list. You cannot delete a template if it is selected as part of a campaign. You must first modify the campaign and select another template.
Create a new template
To create an email campaign template:
- From the left navigation bar, select Emails & Notifications > Email Templates. The Email Template page displays.
- Select Create template.
- Choose the type of template you want to create and select Get started. Your options are:
- Welcome emails: When you create a welcome email, you choose it from the drop down list when you customize your welcome email series. This type of template can only be used for Welcome email campaigns.
- Assignment emails: When you create an assignment email, you choose it from the drop down when you create your assignment email reminders. This type of template can only be used for Assignment email campaigns. You have three categories of assignment email templates that you can create:
- New Assignment Email: Use this email template from the Notification email section when creating assignments.
- Assignment Reminder Before Due Date: Use this email template from the Reminder emails section when creating assignments. You can select it for both initial reminders and due date approaching reminders.
- Assignment Reminder After Due Date: Use this email template from the Reminder emails section when creating assignments. This template is only available for After due date reminders.
- Custom emails: When you create a custom email campaign, you can choose it from the Browse template option. This type of template can only be used for custom email campaigns.
- Choose the language that you want to use to create the template. You can add more languages later, this is just the starting point.
- At this point you have two choices:
- You can choose to base your template off an existing one. If you want to base it off an existing one of the same type:
- Scan the list of templates from either the default (provided by Skillsoft) or from the custom list (those you previously created). You can select the preview button to view the design and layout before you select it.
- Choose Select to use the template as the base.
- From the bottom of the page, select Create with selected template.
- You can create your template from scratch. At the bottom of the page, select Create template from scratch. If you create it from scratch, the expiring link that learners can use to access the system is not available. If you want to keep the expiring link for learners, base your custom template off a Skillsoft default template.
- You can choose to base your template off an existing one. If you want to base it off an existing one of the same type:
- Specify the Subject line. This is the subject of the email. This field is required. This field supports merge tags to personalize your message. Add tags using curly braces { }. Supported tags include: {First name}, {Last name}, {Login name} and {Organization Name}.
- Specify the Preheader text. This is additional text that appears in the inbox underneath the subject, to give recipients a better idea what the email is about. This field is required. This field supports merge tags to personalize your message. Add tags using curly braces { }. Supported tags include: {First name}, {Last name}, {Login name} and {Organization Name}.
- Use the Editor to design or modify your template.
- In the Editor pane, you see a Block in a single column format. A block is a row that can contain content. The block segments the page into columns. You can add content to the existing block or remove it and choose another block style. From the right hand menu, you can choose different block styles and click and drag them to the Editor pane. You must have at least one block in the Editor pane before you can add content.
- After you add a block, you can add a Content type to each column of the block by clicking and dragging from the Content menu on the right to the Editor pane on the left. For example, if your block has two columns, you might choose the left column to have a headline and the right column to have an image.
- After you add your content types to your blocks, you customize each content type by selecting it in the Editor pane to open the formatting box on the right. From the formatting box, you can add URLs to hyperlink somewhere, you can format text, add images, and change settings like padding and responsive design.
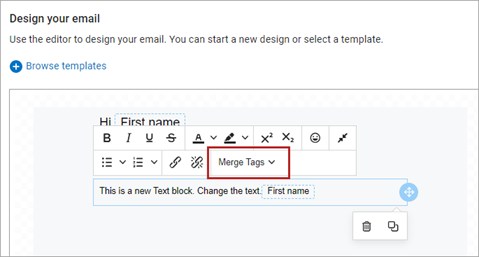
When you add Text as the content type, you can add variables or placeholders to the text to personalize the message with a first name, last name, or login name. To add a variable or placeholder, select it under the Merge Tag drop down on the text formatting bar. The Merge tag gets replaced with the user's information when the email is sent.
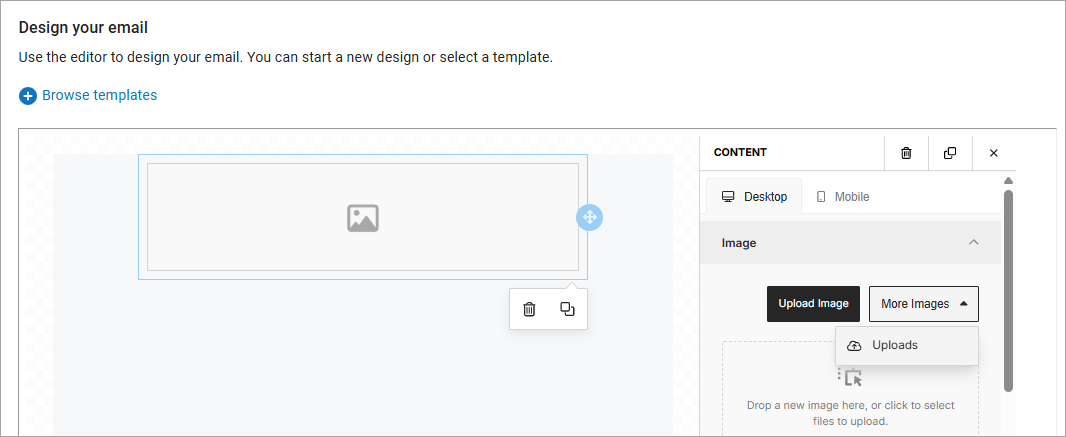
When you add an Image, you can choose to upload directly to this campaign or select from more images which is an image library list that you can configure so you can easily select the same images for future campaigns.
- You can add as many content types as you want and the page stays segmented into the same column format of the block you added.
- If you want to change the number of columns, add a new block and continue adding content. You can add as many blocks on the page as you wish.
- When you are done designing, select the Preview icon to see how your email will look on a desktop, tablet, or mobile device.

- If you want to add languages, we suggest that you select Save as draft before continuing to add languages.
At this point you can Add more languages. For each language that you select, you must offer translations for all fields: Subject line, Pre-header, and email content.
When you select other languages, the platform makes a copy of the default language template layout and uses that as a base for the other languages. If you are planning to have all languages use the same template layout and you just want to offer translations, we recommend that you customize your template first, then add your languages so the platform copies your final layout. If you add your language before you customize the email content, you will have to update each language template separately. In this way, each language can have its own template or the same template with just a translation.
When you select a language, the platform adds a tab for that language. You can choose to Translate with AI or translate the text on each tab yourself. If you initiate the AI translation, you see the status for each selected language on its tab. Translations may take up to a few hours to complete depending on the complexity of your design and content. You can save your work and continue with other tasks. You receive a Message Center notification when translations are complete.
After AI finishes translating, you can edit any language template independently to ensure the best experience for your learners.
- When you are done designing your template:
- You can Save as draft to continue editing later. When you save as draft, you cannot select it from an email campaign drop down.
- You can Send a test email to make sure your design works as expected in your email inbox.
- You can Publish which makes the template available for use by the email campaign you designed it for. Before you can publish, all AI translations must be complete.
-
After you design your template and publish it, you must add it to the campaign.
- If you added a Welcome template, go to: Emails & Notifications > Settings > Email Campaign settings > Welcome emails. Choose the type of campaign: single or full, then select your new template from the drop down.
- If you added a custom template, go to Emails & Notifications > Email Campaigns > Custom Campaigns and when you create your campaign select your new template from the drop down list.
- If you added an assignment template, go to Learning > Assignments. Locate the assignment from the list and edit its notifications by selecting your template from the drop down list. You must match the template category to the type of assignment reminder.
Edit a template
You can only edit a template if it is in draft status. To edit an existing draft template:
- From the left navigation bar, select Emails & Notifications > Email Templates. The Email Template page displays.
- Locate the draft template you want to edit, and from the more action menu, select Edit.
- Use the Editor to make any adjustments.
- When you are done designing your template:
- You can Save as draft to continue editing later. When you save as draft, you cannot select it from an email campaign drop down.
- You can Send a test email to make sure your design works as expected in your email inbox.
- You can Publish which makes the template available for use by the email campaign you designed it for. Before you can publish, all AI translations must be complete.
Delete a template
To delete an email campaign template:
- From the left navigation bar, select Emails & Notifications > Email Templates. The Email Templates page displays.
- Locate the template you want to remove and select Delete from the more action menu associated with the template card.
- Confirm you want to delete the template. Any existing campaigns retain their formatting. Users will not be able to base new campaigns off this template.
- Select Done to return.
- After you remove your email template, you can either cancel or save the email campaign as a draft.