Note: If your organization has enabled Skillport's recurrence feature, use the To add a recurring asset to a Development Plan set for a group or user drop-down.
 To add an asset to a Development Plan set for a group or user
- Click Users & Groups > User Management on the navigation bar.
- In the left panel, find the group or find the user whose assignments you want to modify, and select that group or user.
- In the right panel, click the Dev Plan Assignment tab.
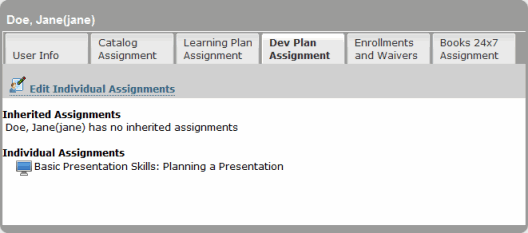
All Development Plan assignments for the user or group display:

Note: While you can browse the inherited Development Plan assignments for the user or group, to modify these, you must modify the assignments of the parent group.
- Do one of the following:
- If you have selected a user, click Edit Individual Assignments.
- If you have selected a group, click Edit Group Assignments.
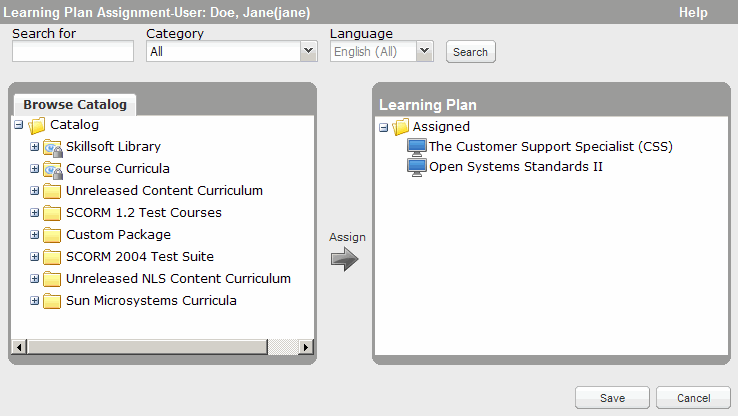
The Development Plan Assigner page displays.

- Browse or search the library to find the learning asset that you want to add, and select it. You can also
 add a specific book section or course topic to the Assigned folder.
- Move your mouse over the asset title.
A Show Details link displays.
- Click Show Details.
- Click
 to expand the relevant book chapter or course lesson.
A list of the book sections or course topics display.
- Hover your mouse over the book section or course topic you want to add to the Assigned folder.
An Add link displays:

- Click Add.
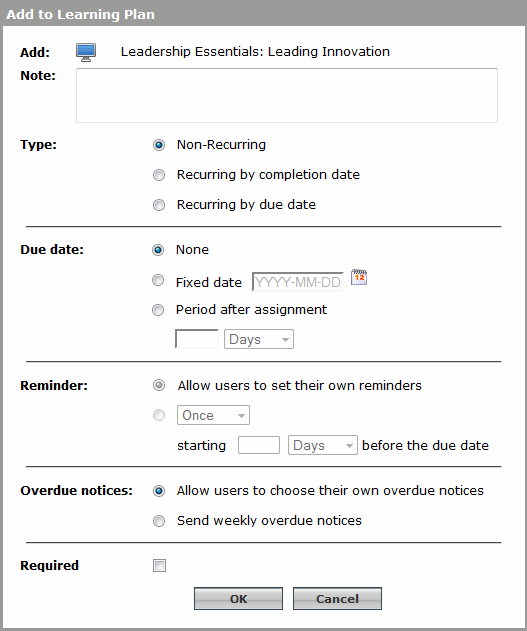
The Add to Learning Plan dialog box displays.
- Move your mouse over the asset title.
- Click
 , or drag the asset to the right pane and drop it into the Assigned folder.
The Add to Learning Plan dialog box displays.

Depending on the configuration of your site, one or more of the settings shown in the image above might not be available.
- If the option exists, select Non-recurring.
- Enter a Note (for example, the objective of the learning asset) up to 100 characters.
- Select a Due Date.
- Fixed date is a date you select from the calendar.
- Period after assignment is the number of days, weeks or years from the date you assign the asset to the user.
- Select the type of Reminder.
- Select Allow users to choose their own overdue notices to have the user set his own reminder.
- Select a one-time or recurring email to be sent to the user automatically.
Note: If you set a reminder, you must also enter the number of days before the asset's due date to send the initial or one-time reminder email. The reminder e-mail contains direct links to the asset itself and to its details page.
- Optionally, select
 Overdue notices to send weekly email reminders if the asset is not completed by the specified Due Date.
 - If applicable, select
 Required.
 Note: This setting does not affect the behavior of application; it is used for reporting. It differentiates required assets from optional ones.
- Click OK. The asset displays in the user's Development Plan set in the Assigned Learning tab in his learning plan, and is automatically in an approved state.
- Click Save.
- If your site is configured to do so, the Preview Email Template dialog box displays, where you can send an email about the assignment:
- If desired, enter a personal message in any language at the top of the body of the email, and click Send. You can enter a maximum of 1,024 characters. Click Don't Send if you do not want to send the email.
- In the case of a group assignment, click Send again in the confirmation window that displays to confirm the action.
 To add a recurring asset to a Development Plan set for a group or user
Note: The types of assets you can restart include courses, test preps, SkillSims, custom content, practice labs, and recorded Dialogue sessions. For more information, see Compliance.
- Click Users & Groups > User Management on the navigation bar.
- In the left panel, find the group or find the user whose assignments you want to modify, and select that group or user.
- In the right panel, click the Development Plan Assignment tab.
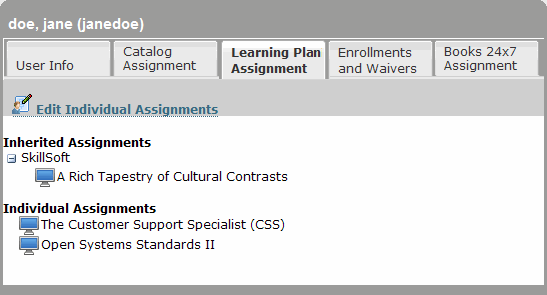
All assignments for the user or group display:

Note: While you can browse the inherited learning plan assignments for the user or group, to modify these, you must modify the learning plan assignments of the parent group.
- Do one of the following:
- If you have selected a user, click Edit Individual Assignments.
- If you have selected a group, click Edit Group Assignments.
The Learning Plan Assigner page displays.

- Browse or search the library to find the learning asset that you want to add, and select it. You can also
 add a specific book section or course topic to the Assigned folder.
- Move your mouse over the asset title.
A Show Details link displays.
- Click Show Details.
- Click
 to expand the relevant book chapter or course lesson.
A list of the book sections or course topics display.
- Hover your mouse over the book section or course topic you want to add to the Assigned folder.
An Add link displays:

- Click Add.
The Add to Learning Plan dialog box displays.
- Move your mouse over the asset title.
- Click
 , or drag the asset to the right pane and drop it into the Assigned folder.
The Add to Learning Plan dialog box displays.

Depending on the configuration of your site, one or more of the settings shown in the image above might not be available.
- Enter a Note (for example, the objective of the asset) up to 100 characters.
- Select the Type of asset.
- Non-recurring asset (see To add an asset to the Development Plan for a group or user, above)
 Recurring by completion date
- Select
 Recurring by completion date.
 - Enter the Initial Due Date.
This date is the first time the assigned content will be due for completion. Enter a numeric value and select Days, Weeks or Years from the drop-down list. (For example, if you assign an asset on May 1, and enter the Initial Due Date as 30 Days, the assignment is due on May 31.)
- Enter the Recurrence.
This becomes the date from which the reassignment value is based. Enter a numeric value and select Days, Weeks or Years from the drop-down list. For example, if you set the Recurring Due Date to May 1, 2014 and the user completes the asset on February 1, 2014 (earlier than expected), the next due date remains May 1, 2015.
- Set the Open window.
The time frame set here determines when the user can access the content. If, for example, a course repeats yearly, you may not want a user to take the course on December 31, 2014 and again on January 1, 2015 to fulfill the requirement. The Open Window option allows you to specify when you want the course available to the user for training.
- For the Reminder, select one of the following:
- Allow users to set their own reminders
- Set your reminder: Select the frequency from the drop-down list and enter a number of days, weeks or months prior to the due date to send the reminder. (For example, a Daily reminder set for 5 Days before the due date.)
Note: If you set a reminder, users cannot change it. However, if you allow users to set their own reminders, you can override them with a reminder that you set (which also cannot be changed by users).
- For Overdue notices, select one of the following:
- Allow users to choose their own overdue notices
- Send weekly overdue notices: The system sends an email the day after the due date and every 7 days thereafter until the user completes the course. The Overdue notices setting is not available if you are adding a series from the Library, because the series will contain multiple courses that may be in varying stages of completion.
- If applicable, select
 Required.
 Note: This setting does not affect the behavior of application; it is used for reporting. It differentiates required assets from optional ones.
- Click OK. The Add to Learning Plan dialog box closes and the content displays in the Assigned Learning tab in the learning plan. If the content is for the Development Set, it displays in that set within the tab.
- Select
 Recurring by due date
- Select
 Recurring by due date.
 - Enter the Initial Due Date.
This date is the first time the assigned content will be due for completion. Enter a numeric value and select Days, Weeks or Years from the drop-down list. (For example, if you assign content on May 1, and enter the Initial Due Date as 30 Days, the assignment is due on May 31.)
- Enter the Recurrence.
Reassign every x Days/Weeks/Years based on recurring due date: Enter the number of days, weeks or years when you want this assignment to reassign (reappear) in the user's learning plan. Enter a numeric value and select Days, Weeks or Years from the drop-down list.
Recurring Due Date: This becomes the date from which the reassignment value is based. Enter a numeric value and select Days, Weeks or Years from the drop-down list. For example, if you set the Recurring Due Date to May 1, 2014 and the user completes the asset on February 1, 2014 (earlier than expected), the next due date remains May 1, 2015.
Note: For example, on May 1, 2014, you set the Initial Due Date to 30 days after the assignment, making the asset due on May 31, 2014. If the Recurring Due Date is set to May 31, 2015 (because you want the user to take the course every year), and you set the Reassign every... field to 180 Days, then the content displays in the learning plan on November 27, 2014 and the next time the content is due is the date set in the Recurring Due Date field.
- Set the Open window.
The time frame set here determines when the user can access the content. If, for example, a course repeats yearly, you may not want a user to take the course on December 31, 2014 and again on January 1, 2015 to fulfill the requirement. The Open Window option allows you to specify when you want the course available to the user for training.
- For the Reminder, select one of the following:
- Allow users to set their own reminders
- Set your reminder: Select the frequency from the drop-down list and enter a number of days, weeks or months prior to the due date to send the reminder. (For example, a Daily reminder set for 5 Days before the due date.)
Note: If you set a reminder, users cannot change it. However, if you allow users to set their own reminders, you can override them with a reminder that you set (which also cannot be changed by the user).
- For Overdue notices, select one of the following:
- Allow users to choose their own overdue notices
- Send weekly overdue notices: The system sends an email the day after the due date and every 7 days thereafter until the user completes the course. Note that the Overdue notices setting is only available if you are assigning an individual course to a learning plan (and for no other type of content). It is not available if you are adding a curriculum folder of courses since the folder will contain multiple courses that may be in varying stages of completion.
Note: If the content is a course, for Overdue notices, select one of the following:
- users can choose whether to receive overdue notices by email, or
- overdue notices should be sent (and users should not be given the choice to receive these notices)
- Click OK. The Add to Learning Plan window closes and the content displays in the user's learning plan. If the content is for the Development Set, it displays in that set within the tab.
- Select
- Click OK.
- Click Save.
- If your site is configured to do so, the Preview Email Template dialog box displays, where you can send an email about the assignment:
- If desired, enter a personal message in any language at the top of the body of the email, and click Send. You can enter a maximum of 1,024 characters. Click Don't Send if you do not want to send the email.
- In the case of a group assignment, click Send again in the confirmation window that displays to confirm the action.