Create a Custom User Profile Field
You can create custom user profile fields to collect additional information about users. You can create a maximum of 30 custom fields for each Skillport site.
![]() Watch: Adding User Profile Fields
Watch: Adding User Profile Fields
When you create a new custom field, the user CSV template is automatically updated to include the field.
To create a custom user profile field
- Click Configuration > User Profile on the navigation bar.
The Manage User Profile Fields page displays.
- In the Custom Fields section, click New Field.
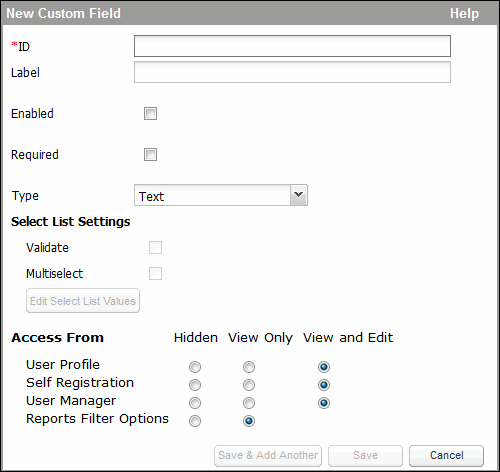
The New Custom Field dialog box displays.

- Enter the information:
- ID* (Required): enter a unique identifier for the custom field. You can enter a maximum of 256 single-byte characters. Valid characters are a-z, A-Z, 0-9, and ‘_’ (underscore). This ID is included in the user CSV template and also displays in Skillport Learner if no label is specified for the field.
Note: The prefix
_sysis reserved for standard fields and cannot be used for custom fields. - Label (Optional): Enter the custom field's Label that you want to display in Skillport. (For example, if you want a user to select the state in which his office is located, you could enter State in the Label field.)
Ensure that you enter a meaningful label since it is displayed in several places in Skillport, including the Self-Registration page, the Manage User Profile Fields page, the New User and Edit User dialog boxes in User Management, and in reports.
Note: If localization is available for your site, see Specify Localized Labels.
- Enabled check box (Optional field): Select to display the field on your site. By default, this option is selected.
- Type (Optional): Select the data type for the field. Valid options are Text, Integer, Date, Boolean, Select List, and Localized Select List. Note that the date format is YYYY-MM-DD.
If you selected the Type as Select List or Localized Select List:
- Select Validate to have the pre-defined data in the user CSV template validated during a batch add/update.
- Select Multiselect to allow selecting multiple list items at once.
- Edit your list values:
- Click Edit Select List Values.
- In the Values dialog box, click Add.
- In the Add Value dialog box, enter the desired list value.
- To add another list value, click OK and Add Another, then enter the desired value.
- Click OK, then click OK again.
Note: If localization is available on your site, see Specify Localized List Values.
- Access From (Optional): Click the desired option for displaying the field in Skillport. See Configure User Profile Settings for more information.
- To save the custom field and keep the dialog box open to create another field, click Save & Add Another. Otherwise, click Save.