User Management
One of the most important admin functions within the Skillsoft Platform is managing your user community.
Access User Management
To access the User Management page:
-
Ensure your left navigation is in the admin menu view. To get there, select Switch to my Admin View. If you see Switch to my Learner View, that means you are on the admin view.

-
From the left navigation bar, select Users > User Management.
User Management list page
You see two tabs:
- Users: The list populates with data that you entered when you created a new user, bulk imported users, or used SAML integration (contact your Skillsoft representative to configure this third option). The list displays sorted by last name, followed by first name. If you have a user role of learning admin or manager, you only see users who are in an audience you own.
- Self Registration: This list shows all those users who self registered. It also shows any pending requests.
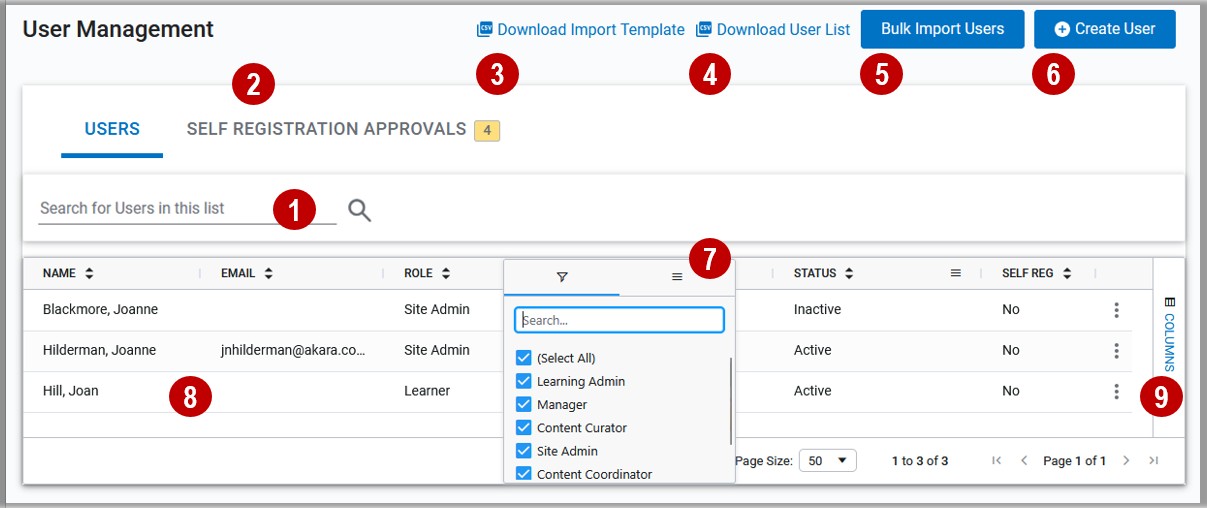
- Search for Users: Enter text to find a specific user in your list. The search returns users based on the name, email, and/or User ID fields. Use the filters to narrow your search.
- Self Registration: Shows all users who self registered and any that are waiting approval.
-
Download Import Template: A blank CSV template file containing only column headers, used to bulk import new users into Skillsoft Percipio Platform.
- Download User List: A populated CSV template file that includes a comprehensive list of all user accounts and their associated profile data. Use this file to make changes and updates to multiple user profiles, then update existing users by bulk import into the platform. Open the file in a program like Microsoft Excel to manipulate the data, or upload the file into another business system.
- Bulk Import Users: Click to bulk import new users.
- Create User: Click to create a new user.
- Filter: Click to see options for filtering the user list by role or status.
- User list: A list of Skillsoft Platform users in your organization or in audiences you own. You can sort the list alphabetically by name, email, User ID, or status. If available to you, use the Action column to edit user details and view an audit log that shows the history changes to a user's account.
- Columns: Organize the columns in the table by sorting, filtering, changing the order, and choosing which ones to display.