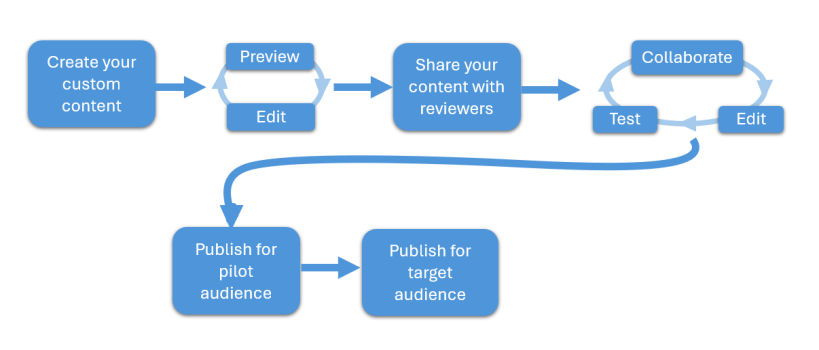
Best Practice Workflow
No matter what type of content you are creating content in LX Design Studio, the process of taking your custom content from an idea to a published item in the Skillsoft Platform looks very similar. The types of content you can create are:
- CAISY for Conversations: The CAISY for Conversations app allows you to create role-playing simulations in which learners practice difficult conversations by chatting with an AI coach.
- CAISY for Presentations: The CAISY for Presentations app allows you to create simulations in which learners practice giving a presentation and answering questions from an AI audience. Learners are given feedback based on a customized rubric.
- Assessments: The Assessments app allows you to create Skill Benchmarks in which learners can test their skills and get specific feedback on their areas of improvement.
- Courses: The Course Designer app allows you to create courses with custom videos and assessments so you can cover a variety of topics in one structured learning plan.
Follow the steps below to ensure the process of designing, creating, and getting your content approved works as effectively and efficiently as possible.
Note, your LX Design Studio access level may not allow you to publish custom content to the platform. We recommend that you speak to your organization's administrators if you have questions about your privileges in LX Design Studio.
- Launch LX Design Studio from the platform and select the workspace that you want to work in. We recommend that you create content in a workspace that contains the people that will collaborate with you on your project.
- You can create content in one of two ways. You can either:
- Start chatting with the Design Assistant to let it know the type of content you are looking to create. Based on your input, the Design Assistant assembles a design brief and may recommend one or more apps that align with your learning goals. At the end of your conversation, select the app to continue creating your content. The Design Assistant makes a copy of the design brief and opens the copy in the app.
- If you know the type of content you want to create, launch the app directly and begin using the app's Design Assistant to create content.
- When you create content, you need to add it to a project. Select a project that already has necessary collaborators, otherwise create a new project that you can share with others later.
- Follow the steps within the app to continue creating your content. For more information, visit the corresponding page for creating content within an app.
- After you add all the details and create your content, select Preview to see how the content will display to learners. The content opens in a new window. Pretend you are a learner using the content to practice or assess specific skills.
- Return to the app and make any needed edits. Preview your content again to be sure it works as expected.
- Repeat steps 6 and 7 as needed. Your progress is saved automatically. You can safely Exit. Your content is in Draft status. You can find this draft content from the main app page, the project page, or the Content items page.
- When the content is in a state to share with collaborators who have access to LX Design Studio, go to your Projects page and share the project containing your new content with others. These should be people on your team who you want to include in the design process. You can give collaborators view access or edit access.
- Collaborate with your team outside the app and then make any edits to the content until it meets your team's standards.
- When the content is as your team wants it to be, you can pilot it to a small group of users who can test it for you before you make it available to a wider audience. To make it available to a specific audience:
- Select Publish.
- Check the box: I also want to make this available to learners right away. Ensure the users who should see your draft content are included in an audience. See Create audience for details on how to create an audience and add users.
- Select Select learners, and then choose your audience from the list. By default all users in your company are selected.
- Select Save.
- Select Publish again. When you publish content, it shows in the Manage Content Items list in the platform.
- Select Go to Percipio. You see your new content in the list. People in the audience you selected should be able to search on your content title to find it. At this point they cannot browse to it.
- If you want, you can also add your new content to a channel or journey and make that channel or journey available to a select audience of reviewers that can test the new content to make sure it meets organization standards. Visit the Create Custom Journey or Create Custom Channel pages for more information on how to add custom content to a channel or journey and entitle it for just one audience.
- Obtain feedback from the pilot audience and make any final adjustments to your content.
- Re-publish your content to the platform. This time select a broader audience or all users when you publish.
- Add your new content to channels or journeys so that learners can easily access it as part of their learning. You can also assign the content or add it to a learning program.